Apple Inc. developed iTunes for multiple practical uses." Apart from being known as one of the top media management platforms, iTunes allows you to easily manage your collection of music, movies, TV shows, podcasts, and more. It also serves as a powerful tool to guide you through the process of burning a CD.
Learn how to burn a CD on iTunes with ease and quickly. This tutorial will guide you step-by-step through the entire process, so you don't have to worry about a thing. By using iTunes, you'll be able to create custom CDs for your friends and family members in no time.
So what are you waiting for? Learn how to burn a CD on iTunes with ease and quickly. Learn how to burn a CD on iTunes with ease and quickly. Let's get started with the first section of this article.
Contents Guide Part 1. Detail About the Three CD Burn Options on iTunesPart 2. How to Create a New Playlist for CD?Part 3. How to Burn the Playlist with iTunes?Part 4. The Best Way to Burn a CD on iTunesPart 5. Summary
Before we finally head to the process of how to burn CD on iTunes, we will first give you an idea about the three-CD burning options on iTunes.
The initial step of the how to burn CD on iTunes process is to identify or select the CD type to use. You would need to head to the iTunes preferences menu and then tick the burning tab to choose the burning format you would like to use. Each of the three has its own purpose and we will be giving details about them in this section of the post.
Audio CD is actually the standard type. It has audio data that can be read by any audio CD player due to its format. If you are to use this, you can only put audio files that are 74 minutes in length.
If you are to burn playlists on CDs, using the MP3 CD type would be the best option for you. As the name suggests, you will be able to get copies of the files in MP3 format. However, you need to take note that AAC files in the playlists (protected or not) won’t be included in the CD. It will be an advantage for you if your purpose would be to save the tracks and be played on your MP3-compatible CD players.
If your goal will be to burn all the songs in a certain playlist, the best option is to select Data CD or DVD as the burning type. A lot of people think of this as the best among the three as they will be able to get copies of all the tracks even the protected AAC ones. Additionally, you’ll have the chance to burn tracks to a DVD-R disc that’s offering 5x more data storage per disc.
You are now well versed about these three CD-burning options on iTunes. And so, you can now read more about the how to burn CD on iTunes process in the second part.
The “how to burn CD on iTunes” procedure is just so easy to perform. And in this section, we will be sharing a detailed guide that you can follow. You would need to create a new playlist first before you head to the burning process.
Here are the steps of creating a new playlist in iTunes.
Step #1. On your computer, open your iTunes app.
Step #2. Tick the “File” menu first and then choose the “New” button. Afterward, select “Playlist” from the selections displayed. Or simply, you can click “Command-N” while you are on the iTunes main page.
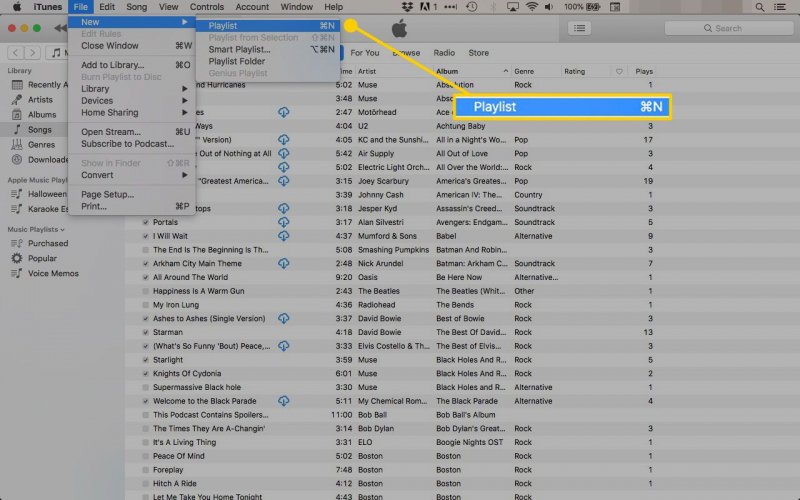
Step #3. Right away, you shall see the new playlist in the right sidebar of your screen. You now need to select those tracks or music that you wish to be added to it. If you wish to do it efficiently, you have the option to sort your library by choosing a menu at the top area of your iTunes window page – like Artists, Albums, Songs, or others.
Step #4. Once done with the selection process, you can just have them dragged and dropped to the new playlist. You can continue adding tracks to the new playlist created if you wish to. To keep track of how many are in it, you can just look at the playlist pane.
Step #5. The iTunes app is known by many as an easy-to-use media managing app. In fact, in this playlist you just created, you can actually rearrange the songs as you wish just by dragging and dropping them. Or if you don’t want to do it manually, you can just let iTunes automatically sort it based on “Artists’, “Genre”, “Rating”, or any other variables as you like through the “Sort by” menu.
Step #6. You can also rename and customize your newly created iTunes playlist. Just tick the playlist’s title once and then just type a new name you prefer.
Step #7. Once you are satisfied with the setup you just made, you only have to tap the “Done” button. By doing so, iTunes will then save the settings made on the new playlist created.
Take note that you can see this newly created playlist in the sidebar of your iTunes main screen. For you to see the sidebar, tap the “Show Sidebar” button that is under the “View” menu. To have it played, just tap the name of the playlist and then double-click the first song saved in it. iTunes will then play the tracks in the chosen playlist from start to end.
Upon knowing how you can create a new playlist in iTunes, we will now be heading to the “how to burn CD on iTunes” procedure.
Now that you have the newly created playlist with the songs you like to burn on a CD, we will now be dealing with the “how to burn CD on iTunes” procedure here.
Step #1. Start off by inserting a blank CD on your computer’s drive. It is always suggested that you use a new CD rather than using a CD-RW one as there are cases that they won’t play once inserted on a CD player.
Step #2. Usually, once a CD is inserted, a new window will be displayed on your computer. But, of course, it will still depend on your computer’s settings.
Step #3. You now need to choose the newly created playlist (the name of the playlist you just created recently) that’s in the sidebar of your iTunes page.
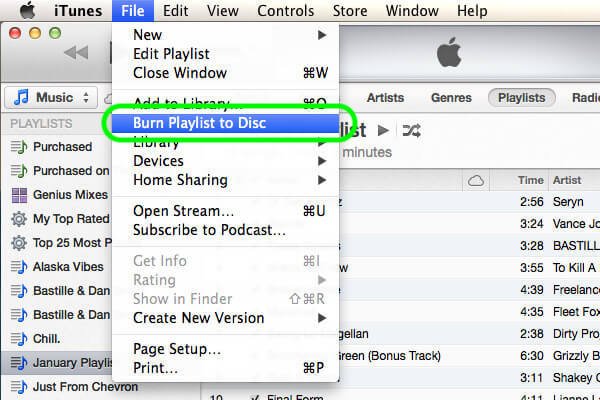
Step #4. At the upper-left area of the iTunes screen, there is this “File” button. Click it and then expect to see a drop-down menu. From the options, select the “Burn Playlist to Disc” button. By tapping this button, you will see a new window to appear on your screen.
Step #5. You have to make sure to put a mark on the “Audio CD” option. You can select what type to use depending on the purpose you defined upon reading the first part of this article. Usually, most users are choosing the “Audio CD” option.
Step #6. Once you are done with the selection process, you just have to tap the “Burn” button that you will see right at the bottom of the window. iTunes app will then start the burning process. The length of the burning process will depend on the number of songs you are processing.
Step #7. Once the burning process ended, you just have to eject the CD by tapping the “Eject” button. There are also other computers that automatically eject the CD once the burning process has been completed.
That’s it! The “how to burn CD on iTunes” procedure is just as simple as the above!
The iTunes app is only recommended to be used in the burning process if you have files that are unprotected. But what if you wish to burn Apple Music songs that are protected? At first, you might find it impossible to do but actually, it’s not. It’s also easy!
You just have to remove the DRM of those Apple Music songs you wish to burn on a CD through applications like DumpMedia Apple Music Converter.
There are several apps on the web that has the ability to do the DRM removal process. However, not all have advantages that are outstanding. And so, you would need to rely on applications that can offer greater benefits.
The DumpMedia Apple Music Converter can do the DRM removal of your Apple Music songs in just a few minutes. It can even help in the conversion procedure as it supports a variety of output formats including MP3, FLAC, M4A, and more.
The conversion process will be done without risking the quality of the files. Output files will still have amazing quality – 100% as the original ones! Also, the ID tags and metadata information will be kept and maintained.
Apart from being a reliable Apple Music Converter, the DumpMedia Apple Music Converter can also function as an audiobook converter so if you are into audiobook streaming as well and you have audiobooks that you wish to transform, DumpMedia Apple Music Converter can also help you.
This app has a very fast speed. It’s actually 10x faster than any other professional converters. It was built with easy navigation functions making it very easy to use.
For your reference, here’s a guide to help you with Apple Music conversion via DumpMedia Apple Music Converter.
Step #1. Install the DumpMedia Apple Music Converter on your PC upon completing the installation needs. To see the detailed list, you may refer to the official website of DumpMedia.
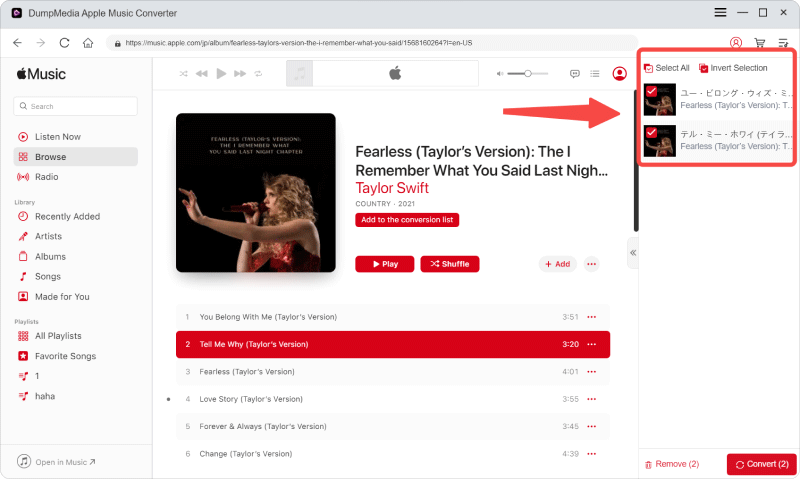
Step #2. Start by launching the app and then start previewing and choosing the Apple Music songs to convert (for burning on your CD). You can process a bunch of songs using this app so you can choose a lot.
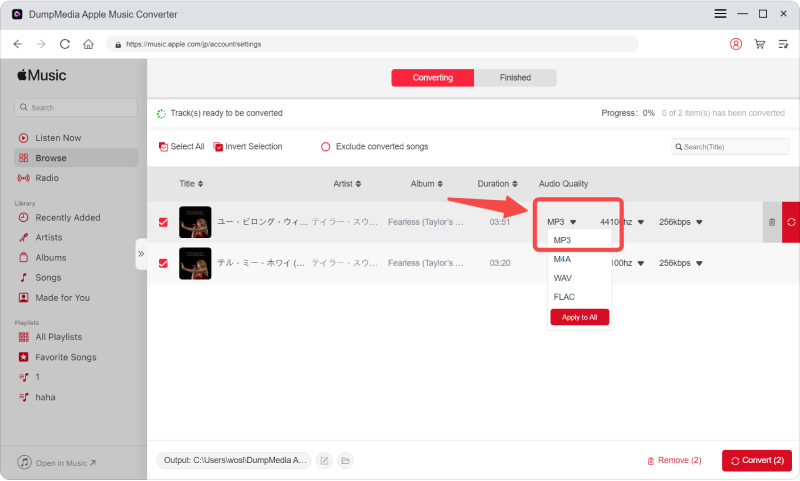
Step #3. Set up the output format. At the bottom area of your screen, there are options displayed. You can modify them as you like. Of course, you have to choose an output format to use and then define an output folder (for easy access after the conversion process).
Step #4. Tick the “Convert” button. This will trigger the app to start the conversion procedure. The DRM removal process will also be done accordingly.

Since the DumpMedia Apple Music Converter functions at a very fast speed, you can expect the converted and DRM-free Apple Music files to be readily available on the output folder you just defined.
You can now start burning these converted files to your CD disc. There won’t be any other limitations since the DRM protection of the songs was removed already.
Finally, you are now aware of the “how to burn CD on iTunes” procedure. You can now burn the tracks that you like to your CD through iTunes with ease. Additionally, if you have protected files, you can process the conversion and DRM protection removal first through DumpMedia Apple Music Converter before proceeding with the burning to disc procedure.