“How do I add Amazon Music to CapCut ?” Perhaps, you are also curious about this problem which is why you have arrived at this page.
CapCut has been a very popular video editing tool that is continuously making every editor’s life so easy. It is actually a mobile editor that gives users the advantage of enjoying bunches of great features. One can easily add effects, trim or crop clips, and even add background music for beginners to use CapCut. But its compatibility with both iPhone and Android mobile gadgets makes it very handy for users to edit videos by just using their mobile devices.
We know that you are here to learn more details on how to add Amazon Music to CapCut. CapCut does have an impressive library, however, you may be so drawn to the songs you are listening to on Amazon Music. So, if you’re interested in finding out the answer, just keep on reading this post.
Contents Guide Part 1. Why CapCut Doesn’t Support Amazon MusicPart 2. How to Download and Convert Amazon Music to MP3Part 3. How to Add Amazon Music to CapCutPart 4. Additional TipsPart 5. Summary
Though we are here to explain how you will be able to add Amazon Music to CapCut, you must be aware at first that Amazon Music isn’t actually supported by CapCut as Amazon tracks are protected by DRM. You are only allowed to use unprotected music on CapCut. Additionally, the audio that must be added should be in the format that is supported by CapCut itself. With this being said, you must know then that there are three audio formats that can be accessed on CapCut – MP3, WMA, and WAV.
Now, since we wish to add Amazon Music to CapCut, there is a need for you to remove the protection of your chosen Amazon songs first, convert them to any of the three formats supported by CapCut, and then finally add them to be used as background music on videos.
The first goal here is to find a tool that can easily get rid of Amazon Music’s protection after Amazon Music downloading so we can finally add them to CapCut.
To help you, rather than let you look for a tool that can do that, we made sure to include a portion here to highlight the best professional software app that can help with the DRM removal and conversion procedures. We have that in the second part. Let’s finally jump into it.
As we have stated in the first part, before we can finally add Amazon Music to CapCut, the Amazon Music songs’ DRM protection must be removed first as you can’t import protected tracks on CapCut.
There are several apps that can do the DRM removal process. However, choosing one could be tricky especially for first time users or beginners. Thus, we will be recommending the best here.
Try using this DumpMedia Amazon Music Converter then. Of course, this app can help you with the process of how to add Amazon Music to CapCut because one of its amazing features is to get rid of Amazon songs’ DRM protection.
Apart from DumpMedia Amazon Music Converter’s ability to do DRM removal, it can also aid in the conversion of the tracks to formats like MP3, WAV, FLAC, and M4A. Thus, making the Amazon songs accessible on CapCut. Moreover, the songs will be readily accessible as well on other media players and devices given that most of them support the MP3 format.
Although the Amazon songs will be processed through this professional app, you won’t need to worry about the quality of the output files because the app will do lossless conversion. With this being said, the 100% original quality of the tracks will be maintained alongside their metadata and information and ID tags. The title of the songs, album names, artists, artwork, and many other details will be untouched.
When it comes to the time needed to complete the conversion and DRM removal processes, you should also know that DumpMedia Amazon Music Converter works pretty fast. The app is also being updated consistently so you can be assured that enhancements are always being done on the app. When using this music converter and you suddenly encountered issues, tech support is always available for you so you don’t need to worry that much.
Here’s a guide on how to use this DumpMedia Amazon Music Converter to convert the Amazon songs you like to add to CapCut.
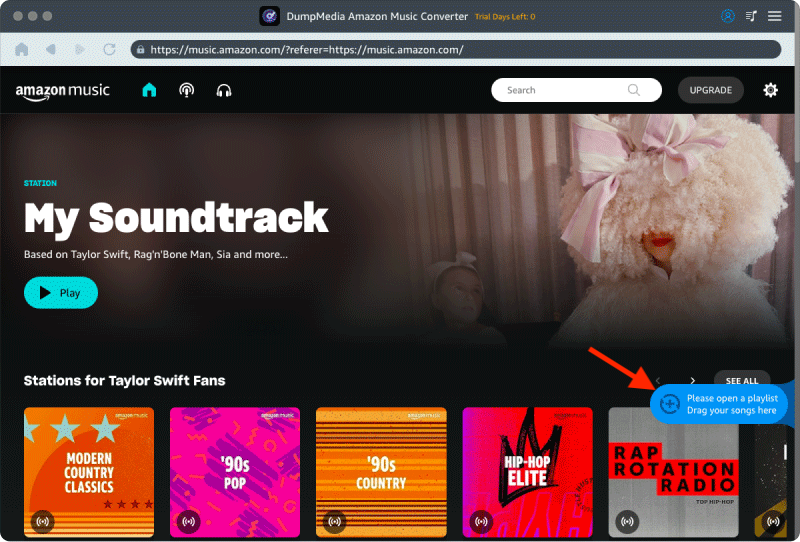
Step #1. Install the DumpMedia Amazon Music Converter once you have verified that all the installation needs are met and accomplished. Launch it afterward to start adding the Amazon Music songs you’d like to use on CapCut.

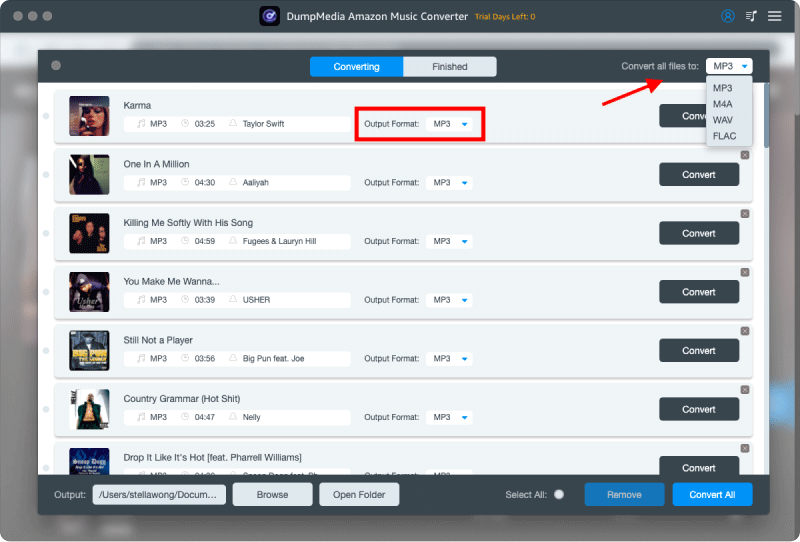
Step #2. Set up the output format and the output folder. Since we aim to convert the songs to MP3 format, make sure to select MP3 from the options of available output formats. Setting up the output folder is also too important so make sure to select a folder you’d like to use. Other remaining output parameters can be changed as you wish.

Step #3. Tapping the “Convert All” button at the bottom area of the screen will let the app do the conversion and DRM removal procedures. This should only take some minutes because the app does its job pretty well and fast.
After the completion of the conversion and DRM removal processes, the Amazon Music songs will now be DRM-free and in MP3 format. Now, you can have them finally added to CapCut. To further help you, we will be explaining how to add Amazon Music to CapCut in the next part. Let us see how it can be done then.
Since CapCut can be accessed on mobile devices, you can just add the converted Amazon Music songs to your device and finally import them to CapCut. We will be showing here how you can make it by using your smartphone.
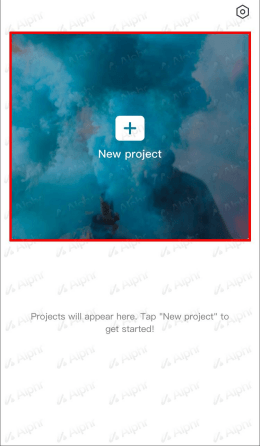
Step #1. On your mobile device, open the CapCut app. You will be able to create a new video by tapping the option to start a “New Project” that can easily be seen on your screen. You will now be able to access the videos and photos that your device has. Just add those that you’d like to use.

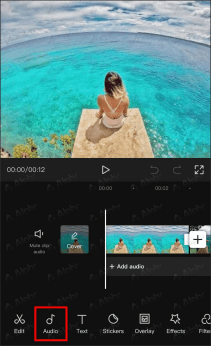
Step #2. Once the video or file has been added to CapCut, you just have to tick the “Audio” menu that is at the bottom of your screen. You can then pick the “Sounds” option afterward.

Step #3. Head to the “Your sounds” section. From the two selections presented, choose the “From device” option. This will let you select or search for music from your device that’s in use.
Step #4. All those songs that you have on your smartphone will then be displayed including those unprotected and converted Amazon Music songs. A “+” button is next to each track. Just tap that button to use it.
Finally, upon finishing the above procedure, you now have finally added Amazon Music to CapCut.
Though we have fulfilled already our promise of letting you learn how to add Amazon Music to CapCut, we still have added tips for you in this section.
You must know that apart from using CapCut’s music library as well as adding your converted and DRM-free Amazon Music favorites, you can also use your voiceover as background to your CapCut video. Here is a tutorial just in case you are interested in learning this as well.
Step #1. You have to open the “Audio” option first.
Step #2. There is a “Voiceover” option that you will see at the bottom of the screen. Choose that by tapping it.
Step #3. You shall see the recorder key right away. To start recording audio, press and hold this key.
Step #4. A popup window will appear asking you if you’ll allow CapCut to record audio. Just tap the “Allow” button to proceed.
Step #5. You may now start speaking. Your voice should then be recorded by the app. When you’re done, you can just release the key and tick the “check” button to edit it.
You just finished learning how you can make your favorite Amazon Music songs converted to MP3 as well as the process of getting rid of their protection through the DumpMedia Amazon Music Converter. With this knowledge, you can then be able to add Amazon Music to CapCut with ease!
