iTunes has been a great media streaming platform alongside with Spotify and Apple music. Having the capability to store different forms of files – be it songs, videos, shows, games, audiobooks or movies, many are really into using iTunes.
As mentioned, one of the most used features of this application is its ability to play and keep thousands of songs.
However, iTunes uses AAC format making it a bit difficult for other media players to access its files. With that, we are to offer the best way to convert iTunes library to MP3 format.
Contents Guide Part 1: Comparison of AAC And MP3 FormatPart 2: The Best Way to Convert Songs in iTunes Library to MP3 FormatPart 3: How to Convert iTunes Library to MP3 Using iTunes ItselfPart 4: In Summary
For everyone’s information, those files in AAC format can only be played on Apple products such as iPhones, iPads or Mac computers. If you would want to have such files or songs played on your non-Apple gadgets or MP3 players, as stated, the conversion is the key.
And, most of the times, several people resort to having an MP3 format as the resulting format. Simply because MP3 is the most suitable for almost all media players, devices, and gadgets. Here is a comparison of the two formats initially mentioned.
Convert iTunes library to MP3 will be the major topics of this post, let us now hop into the next part of this article to find out more.

To be able to convert iTunes library to MP3, the best way you can do is to use a professional software application – the DumpMedia Apple Music Converter.
DumpMedia, being a great tool offering video and audio converters, has been a great help for many users nowadays. Aside from having amazing video/audio converting features, a Spotify Music Converter, and a video downloader, it also has an Apple Music Converter which lets you convert your favorite and most loved music like M4P to MP3 format or any other formats you desire to be highly playable in any media player!
This tool is capable of removing DRM protection and allows you to convert songs to thousands of available formats. It even lets you listen to downloaded Apple Music songs offline, and even keep your songs running although your subscription has ended! Great, right?
Let us now take a look at how we can use this DumpMedia Apple Music Converter is a tool for converting songs in your iTunes library to MP3 format and how it can aid in the removal of DRM protection of files the fastest way possible.
Let us look into these steps in detail.
Of course, we need to ensure that DumpMedia Apple Music Converter has been downloaded and installed on your personal computer. Once installed, open and launch the program. Once the program has been launched, iTunes will also be activated. No need to worry about this and just proceed with the process.
Under the “Library” menu, tick “Music” and you will now be seeing all the songs stored on your iTunes library. To be able to choose the songs under a certain album you wanted to be downloaded and converted, you can either tick the checkboxes right next to each song or make use of the search bar to easily find the songs you wanted to be downloaded.

The next step that should be done is to perform the adjustments on the settings of the resulting output. You can choose any format from those that would be listed. The application supports many DRM-free formats including MP3.
This as well supports those in AC3, M4A, M4R, AIFF, FLAC, AU, and even MKA format. Selecting any of these will do. But, in this case, we ought to convert the songs to MP3 format. Therefore, you must choose MP3 among those listed.
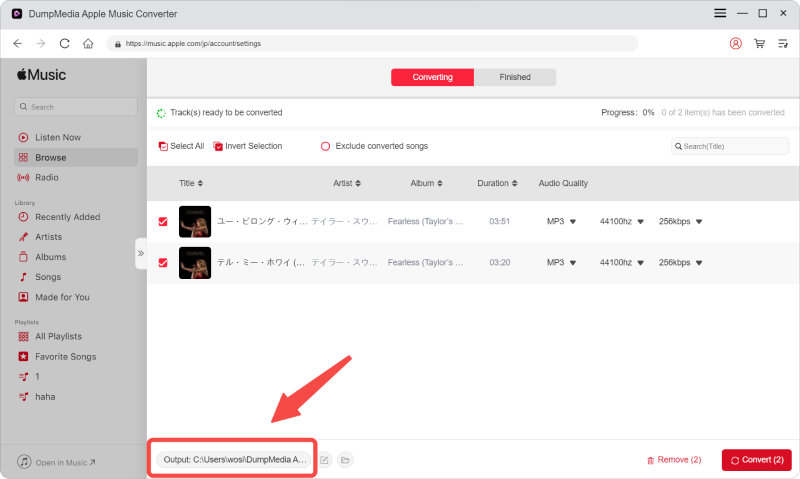
The tool will also allow you to change other options such as the bit rate and sample rate. You can as well perform the renaming of the resulting file. In this step, you would also need to specify the output path or the target location wherein the song or music will be saved.

Upon completing all the adjustments wanted for personalization or customization, the final step would now be the conversion process. You can just hit the “Convert” button which is located at the bottom right corner of the screen.

After a few minutes, your songs will now be converted and finally downloaded. You can now enjoy the songs anytime you want to! In addition to this, alongside with conversion, DRM protection will also be removed at the same time the file was transformed.
Now that you learn about this awesome converter and how it can help you with conversion, we are to give you additional information.
Keep on reading this post.
Yes! You read the subheading correctly! You can convert iTunes library to MP3 Using iTunes Itself because it has its built-in audio converter feature.
An amazing iTunes to MP3 converter was presented in the previous part of the article because that is the best way to do the conversion alongside removing of DRM (Digital Rights Management) protection.
However, if you got tight resources and would like to use some applications for free and still wanted to proceed with the conversion, this could be an option for you. You would just have some limitations such as the number of the possible output format and the quality of the resulting file.
In case you would like to know how to do that, here is a simple guide for you.
Of course, the first thing you need to do is to look for your iTunes application and launch it. Once opened, head to the settings option. Tick the “Preferences” button then “General” followed by “Import Settings” and finally, “MP3 Encoder”.
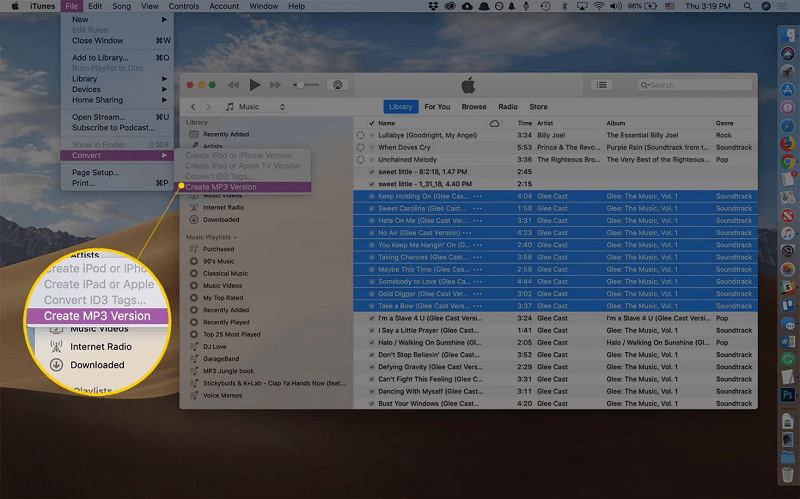
Upon doing the first step, you will now need to look for the songs you desire to convert. You can do this by either manually checking all the songs or using the search bar for easier search. Once songs were seen, tick the checkbox alongside each song.
Once songs have been selected and highlighted accordingly, the next thing is to be done is to head to the “File” menu which is located at the top portion of the screen and hit “Convert”. Once ticked, you will need to click the “Create MP3 version” to begin the conversion process immediately.

Steps needed to be performed are actually too easy and simple. If you would like to resort to this method, the decision would still be yours. You just need to keep in mind that this has some limitations if you will proceed.
This article had discussed the best way to convert iTunes library to MP3 format. The best recommendation is of course to use DumpMedia Apple Music Converter.
You can still make use of iTunes for audio conversion, however, there are some limitations and drawbacks which you need to take into consideration including the number of possible resulting format, the quality of the file to be converted, and the restriction that such can only be used for audio files.
Have you ever experienced this issue? Why not use DumpMedia Apple Music Converter to resolve this? Do you have any other recommendations in mind? Why not share it? Make sure to leave your comments below!
