In this age of social media, users like to share a part of their life with the world. A beach vacation, a camping trip, a visit to your favorite tourist destination, your day at work or even the movie you are currently watching or the music you are currently listening to.
For bloggers and content creators, for example, sharing stories and personal interests is already a norm. That is why if you have a personal website and happen to be subscribed to Apple Music, you might be already looking for ways to embed Apple Music into your pages.
In the following sections, you will get to know several options to share your favorite Apple Music playlists with the rest of the world.
Contents Guide Part 1. Can I embed Apple Music into WordPress?Part 2. How to Remove DRM Protection from Apple Music?Part 3. How to Embed Apple Music to WordPress?Part 4. Conclusion
Can you embed Apple Music into WordPress? The answer is YES! Embedding Apple Music into WordPress can provide a seamless listening experience for your website visitors.
It also allows you to access valuable features such as background music, playlists, and song recommendations. Additionally, Apple Music is a popular and widely used platform, which can make it more attractive to your audience.
The Connect to Apple Music plugin enables you to add songs, albums, and artists through Apple Music badges, links, and widgets on your WordPress site. The Connect to Apple Music plugin enables you to add songs, albums, and artists through Apple Music badges, links, and widgets on your WordPress site.
Apple Music player is only capable of playing song previews for up to 30 seconds. That’s a bummer, isn’t it? If you have been subscribed to Apple Music for some time now, you should already know that you can only play full songs using the official Apple applications like Apple Music. This is because Apple protects its songs with DRM.
DRM protection prevents you from getting your Apple Music songs and embedding them in your WordPress blog. So how do you embed Apple Music in your website and get unlimited playback for your favorite songs? Well, cheer up. We’ve got the best solution for you.
Introducing our DumpMedia Apple Music Converter. It’s the best tool to help you get around Apple’s DRM Protection. Aside from DRM removal, it also offers other impeccable features like:
To embed Apple Music in your blog, follow the procedure enumerated below.
Step 1. Get a copy of the DumpMedia Apple Music Converter installer and install it on your computer. Select the appropriate package for your system.
Step 2. Open the application and then select the Apple Music playlist or album you want to convert.

Step 3. Select the file format to MP3 or any format you prefer to embed in your WordPress site.

Step 4. Sit back and just look out for the notification that conversion is done.
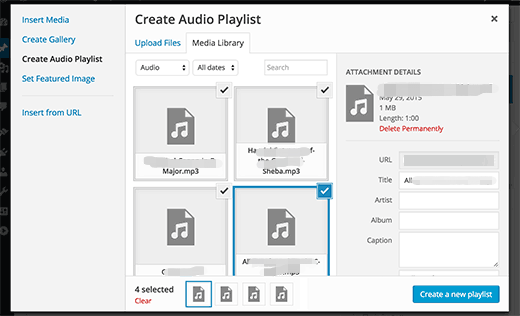
Step 5. Once the audio files are available, go to your WordPress dashboard and go to your WordPress media library. Then, choose “Create Audio Playlist” and select the audio files you want to include. You also have the option to add any other metadata you prefer.

Step 6. Choose from the other options for displaying the artist's name and other artwork and then Publish your post.
And you’re done. You just followed and learned the steps to embed Apple Music to your WordPress site without the limitation of 30-second playbacks. This is all possible because of the best Apple Music Converter from DumpMedia.
Start by opening Apple Music and searching for the playlist you want to be displayed on your website. If such a playlist does not exist yet, you should create that first. Then, search for the album from the Apple Music search box.
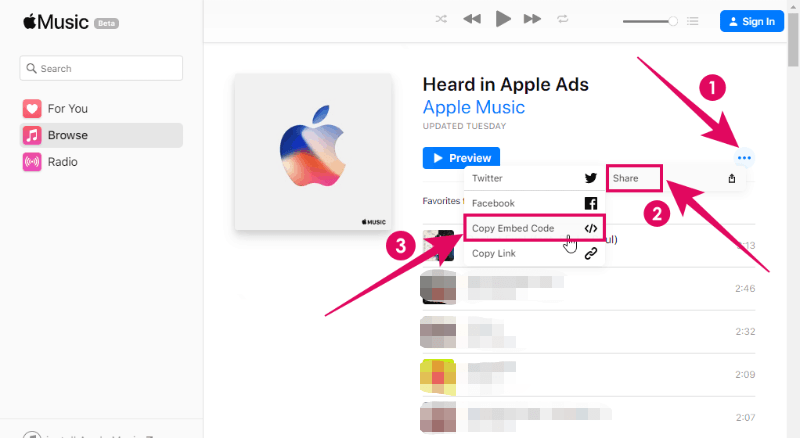
Once the album is open, you should see three dots (…) at the right side of the album cover photo just above the list of songs. Click on it to open a popup menu with options. Select the Share menu item and then select Copy Embed Code.

After this step, go to your WordPress dashboard and add a post. Then paste the link you copied earlier and preview your post. If all goes well, you should now see Apple Music’s preview player on your webpage.
This approach has almost the same steps as option 1 above except for not being able to create your playlists. Note that you can only create your playlists from Apple Music.
First, go to the Apple Music Marketing Tools website. Then search for your target album or playlist.
Next, find the Preview Player section by scrolling to the middle of the page. Once you see the Preview Player, you will be presented with options to set the width and height of the music player you want to be displayed on your site.
Then click on the Copy Embed button.
Afterward, go to your WordPress dashboard similar to what you did in Option 1, and paste the link you copied previously.
That’s about it. If everything went well, you should now have an Apple Music Preview Player on your page.
It is really cool to have your favorite songs displayed on your website. Whether you’re an artist trying to market your songs and albums or just someone wanting to add a personal touch to your blog, having your songs showcased on your site would definitely make it stand out from the many blogs and websites out on the internet right now.
In this article, you learned two ways to embed Apple Music into your site. The first way is by copying an embeddable code from Apple Music or Apple Marketing tools and then adding that code to your website. This will display a preview player on your site that allows playback of your songs for up to thirty seconds.
The second way is to download your favorite Apple Music, host them on your website, and then embed them in your blogs and other web pages. With this approach, you will be able to play your songs to your heart’s content.
By using the best Apple Music converter in the market today, the DumpMedia Apple Music Converter, you will gain the flexibility to exhibit your favorite songs on your website or blog without limits.
