“How to export songs from iTunes?” The MP3 format is a file format that is known by many as a very flexible one as this can be played on any device or media player. In fact, it has been regarded as the standard format for digital audio files. By having the MP3 versions of the iTunes songs that you love, you can have them saved on any external drive for playing even on your car’s stereo or if you wish to rip some songs to a CD disc.
It is sad to know that iTunes songs are not in MP3 format as Apple had set it up to take AAC as the songs’ file format. With such a format, iTunes songs are kept with protection (under Apple FairPlay’s Protection Policy) making them not playable and not accessible on devices that are considered unauthorized. Knowing some methods to export songs from iTunes to MP3 format will surely be a relief for many.
If you are one of those people who are searching for a guide to export songs from iTunes to MP3 format, just keep on reading as this is what we have here.
Contents Guide Part 1. How to Convert iTunes Plus to MP3?Part 2. How to Export DRM-Protected iTunes to MP3?Part 3. Summary
The good thing with iTunes songs is that not all are protected ones. Fortunately, iTunes had released songs that are DRM-free and can easily be converted to MP3 format, can be burned to CD, or can be accessed on any AAC-supported devices.
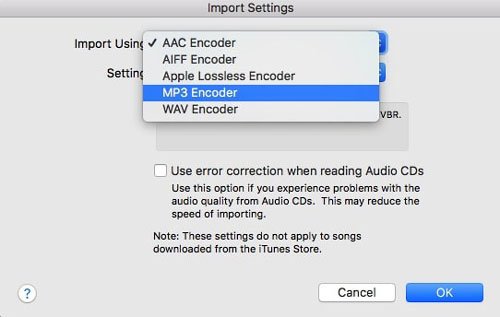
For you to export songs from iTunes to MP3 format (for the unprotected iTunes songs), you can use the built-in converter that your iTunes app has. You can follow these steps to export songs from iTunes and save them in MP3 format.
Step #1. The good thing with iTunes’ built-in converter is that you will have full control over the conversion settings and even the audio quality of the output files.

Step #2. Look for the unprotected iTunes songs that you wish to be converted to MP3 format. You can highlight and choose a number of iTunes songs if you wish to process a lot.
Step #3. After highlighting the iTunes songs, tick the “File” menu.
Step #4. Click the “Convert” button next.
Step #5. From the selections shown, tick the “Create MP3 Version” menu. By doing so, the iTunes app will start creating the MP3 versions of the iTunes songs that you just highlighted.
After completing the above five steps, you will be able to see the MP3 versions on your iTunes library as well next to each original AAC file.
The method explained in Part 1 only applies if you are to process unprotected AAC iTunes files. If you wish to export songs from iTunes that are DRM protected, you will be needing a third-party software app that can remove the protection and the same time, convert the files to MP3 easily.
In this case, you can check out how effective the DumpMedia Apple Music Converter is. It can do both the conversion (to several flexible formats like MP3, FLAC, AC3, AAC, WAV, and more) and DRM removal procedure while keeping the 100% original quality of the songs, their ID tags, and important information.
More so, the app can also work as an audiobook converter supporting both AA and AAX file formats. The app can be installed on both Windows and Mac computers so compatibility issues shouldn’t be encountered. The app does its job fast at a speed of 10x faster than others.
Of course, it has an interface that is friendly so surely, you won’t have any problem with using the app to export songs from iTunes and save them as MP3 files.
To give you an overview of how to use the DumpMedia Apple Music Converter to export songs from iTunes that are protected and convert them to MP3, we have here the below procedure for your reference.
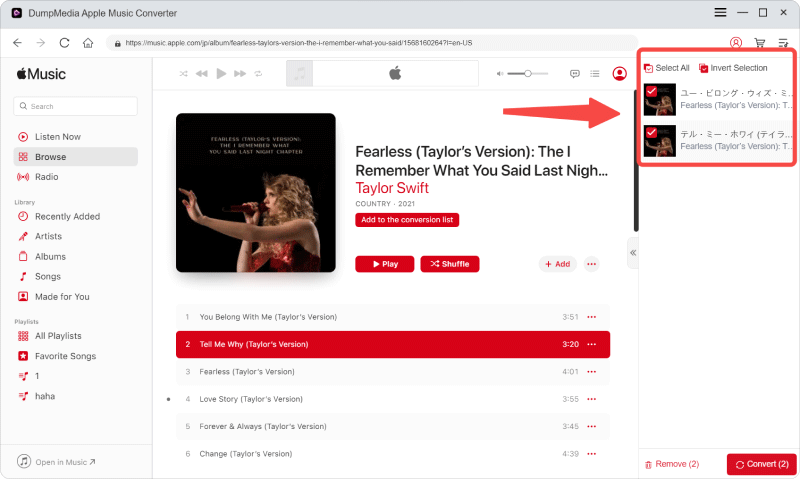
Step #1. Install the app on your personal computer. Start by launching it right away after the successful installation. On the main page, you can start previewing and choosing which Apple Music or iTunes songs you wish to convert to MP3. If you want to select a number of songs to be processed, you can do that via this app.

Step #2. At the bottom of the page, there are options about the output parameters that you can change if you wish to. You have to make sure that MP3 will be chosen as the output format. Defining an output path is as well important as this will give you easy access to the converted files after the whole process.

Step #3. After doing the setup, you can just hit the “Convert” button. The app will then start the conversion process and the DRM removal procedure.

Within just a few minutes, you will be able to access the MP3 versions of the iTunes songs you just exported. The process to export songs from iTunes is just easy, right?
You have two options that you can do to export songs from the iTunes app and save them as MP3 files – you can use the iTunes app itself or a professional converter like DumpMedia Apple Music Converter. Just remember that you can only process DRM-free iTunes songs on the iTunes built-in converter. All those that are protected should be handled by professional tools as mentioned.
