“What are the best methods for me to export song lists from iTunes? I have been wondering about moving from collections but aren’t so sure how it can be done smoothly.”
The iTunes app is a widely used platform because of its great features. In fact, apart from being so useful as a media player, one can also further utilize this tool to manage and organize several media files like tracks, videos, TV shows, images, e-books, and more. Since our topic is to deal with the process of how to export song list from iTunes, we will focus more on the collection of tracks in one’s iTunes library.
Sometimes, people are looking to import playlists into iTunes or export song list from iTunes due to many purposes, changing devices or gadgets, or others. Whatever reasons you have, it is indeed totally beneficial to learn the detailed process. In this article, you will learn the detailed methods of how you can export song lists from iTunes. Let us now begin by jumping into the first part.
Contents Guide Part 1: How to Export Song Lists From iTunesPart 2: Best Way to Export the Whole Song Lists from iTunesPart 3: Summary
Since we already had given a brief introduction and information about the iTunes platform in the introduction part, we will now be dealing right away with the methods of how you can finally export song lists from iTunes.
You might be surprised to know but you can actually use the iTunes platform itself to export song lists from iTunes. In fact, this is the traditional way of solving this dilemma. The whole guide is also fairly simple to follow.
It is just a bit unfortunate that this won’t work on all music files which means that there is a possibility that not all tracks in a certain playlist will be fully transferred or exported and that the whole process is purely manual.
Nevertheless, here is a reference to export song lists from iTunes by using the iTunes app itself.
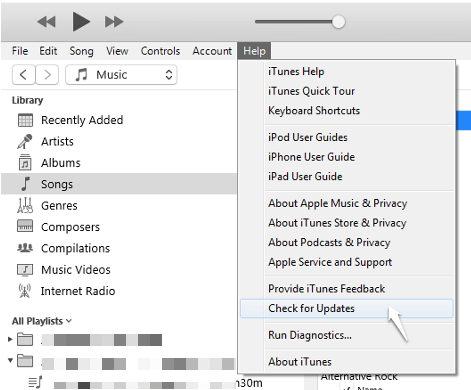
Step #1. Of course, you need to power up your iTunes app. Always make sure that you are using the latest version. Now, head to the playlist that you’d like to process.

Step #2. You need to create a new folder on your desktop where the playlist to process will be stored.
Step #3. Once the new folder has been created, just drag and drop those tracks from the chosen playlist.
As simple as the above, you can have the tracks exported from the iTunes app. Again, remember that there are cases in which not all songs are exported as there are iTunes tracks that are protected under the DRM Protection program.
In this section, we will teach you how to export song lists from iTunes by emailing the music files. Just beware that this one’s a bit advanced compared to the first process presented. But, of course, this is still doable. You may refer to the below step-by-step guide.
Step #1. Once the iTunes app has been launched, the first thing to do is to edit the “Preferences”. Tap the “iTunes” tab to see the “Preferences” menu.
Step #2. Once the “Preferences” window pop-up, choose the “Advanced” option at the top. On this window, look for “Keep iTunes Media Folder Organized” and “Copy Files to iTunes Media Folder…” menus. You need to activate these two. To save the new settings, just tap the “OK” button.
Step #3. Move back to your iTunes folder. You should see that the iTunes Media Folder has all the songs or playlists from your iTunes library.
Step #4. You can now attach the files to an email conversation and then send it out.
Note: If you can’t find the files, head to the “iTunes” folder, then to “iTunes Media”, and finally to the “Music” folder.
Apart from the first two methods of how to export song lists from iTunes, here is another one – exporting iTunes playlists to text. Basically, the main point is saving the iTunes playlists as coded XML documents. You can’t have the actual audio files out of this document but you can use it to export your entire iTunes library perhaps, to another computer. Simply, this method will help you move your entire iTunes library to another computer. Here’s the detailed guide for your reference if you wish to check out this method.
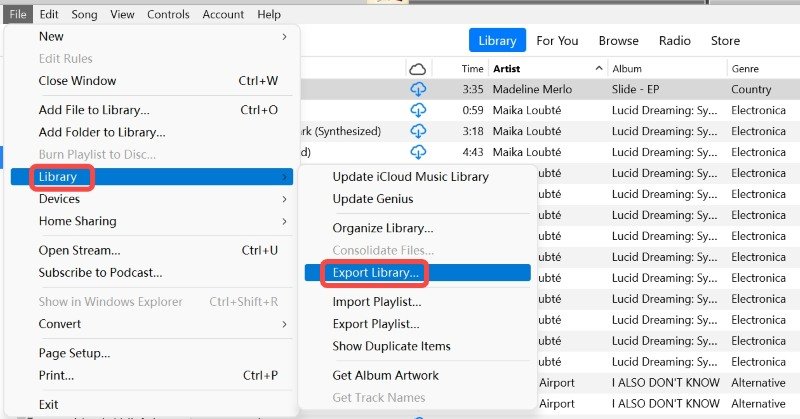
Step #1. Open your iTunes app and then tick the “File” button at the top of the screen. Choose “Library” next, then the “Export Library” option.

Step #2. Name the library as you like. You can also define where the XML document will be saved. Tap the “Save” button once you’re done.
Step #3. Look for the folder where you saved the XML document and then just attach it to the email that you are to send.
You just have to take note that the code will only accept iTunes-purchased tracks. It won’t work for those songs in your library that are from other sources.
You could find the previously mentioned ways to export song lists from iTunes as easy or quite difficult to do. Also, there could be limitations especially if you are to process the protected iTunes files. To avoid encountering issues along the way, it would always be best to rely on the most effective way to export song list from iTunes. We’ll have that tackled in the next part actually!
If you think any of the above-presented methods to export song lists from iTunes are quite hard to do, rather than checking all the procedures, why not just consider downloading the iTunes tracks? Well, we know you could be worried about them being protected by DRM encryption. Actually, this isn’t something you should think that much as this can easily be handled.
In fact, with the help of professional tools like this DumpMedia Apple Music Converter, you won’t be worried anymore about the protection the iTunes or Apple Music songs have as they can be removed right away. More so, you can even use this converter to transform the tracks to common formats like MP3 making them accessible on any device or media player that you like to use.

This also works fast enough and can even process audiobook conversion. While converting the files, the original quality will surely be maintained alongside the ID tags and metadata details. The output profile settings and filename format can also be customized.
With the easy interface this DumpMedia Apple Music Converter has, anyone will surely be able to handle the usage of this professional tool.
For everyone’s easy reference, we also have here the guide on how to convert and download protected iTunes and Apple Music songs to one’s desired output format.
Step #1. Once all the installation needs of DumpMedia Apple Music Converter have been met, just have this app installed on your PC and then launch it. On the main screen, the user can start previewing and selecting the Apple Music songs or iTunes songs to be processed. Batch conversion is also supported so converting a bunch of tracks will work.

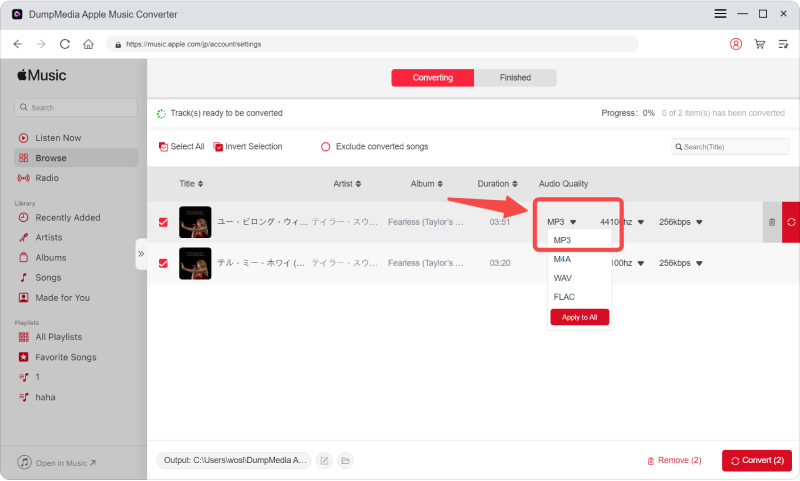
Step #2. It is now time to select an output format to use. The other output parameter settings (that are at the bottom area of the screen) can also be modified as wished.

Step #3. Tap the “Convert” button at the bottom of the screen to finally allow the conversion to happen. At the same time, the DRM removal procedure will also be done by the app.
Since this works pretty fast, you shall have the selected iTunes and Apple Music songs converted within just a few minutes. Those should be DRM-free already and can now be saved on any devices or media players as well as on external drives and online storage clouds like Google Drive or Dropbox.
More so, the files can also be shared with friends and family members without worrying if they will be able to access them.
Indeed, though there are various methods to export song lists from iTunes (some were presented in this article), it will still be best to use professional converters like DumpMedia Apple Music Converter to avoid facing issues along the way. Handling the DRM protection of the tracks could be hard for some users but with the help of such mentioned professional tools, everything can be solved with ease.
If you happen to have queries related to the process to export song lists from iTunes, just feel free to leave them below and we’ll gladly address them all!
