iTunes indeed is one of the best applications ever developed by Apple Inc. From being an app that can handle media files – images, videos, songs, and more for viewing and streaming, you can also use this during file organization.
Indeed, many find using the iTunes app as an additional convenience to them. In this post, we will be dealing more with the iTunes app and specifically, how to add songs to a playlist on iTunes.
Having playlists on your iTunes account is totally an advantage and is convenient. Of course, you can just group the tracks depending on how you want them to be saved into several playlists. Right away, when you think about an iTunes track, you can just go and visit the playlist where it is saved and streams as you wish.
You can categorize your iTunes playlists based on your moods, on the activities you usually do, or in any way you want. The good thing is that you can easily create a new iTunes playlist right away and even have it edited if you feel like it.
If you are new to using the iTunes app, you probably aren’t that much knowledgeable when it comes to how to add songs to a playlist on iTunes. Don’t worry. The purpose why this post was created is to give you more information about the whole procedure so that you, yourself, can proceed with adding songs to your iTunes playlists anytime you wish to.
Contents Guide Part 1. How to Make a Playlist on iTunes?Part 2. How to Add Songs to Playlist on iTunes?Part 3. Bonus: How to Enjoy Apple Music Free Forever?Part 3. Conclusion
As we have initially stated, the advantage of being able to create playlists on iTunes is that you can have all those favorite iTunes tracks saved and grouped the way you want them to be.
So, before we go to the procedure pertaining to how to add songs to a playlist on iTunes, we’ll first teach you how to make a new playlist on your iTunes account. This is totally easy to follow so there shouldn’t be any issues while trying to create one.
Step #1. Of course, we need you to launch your iTunes app on your PC.
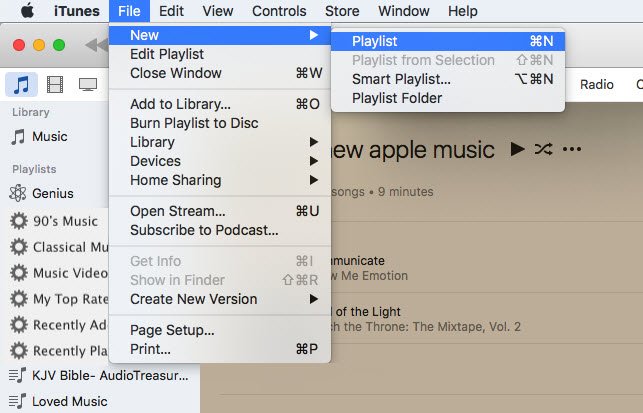
Step #2. The creation of a new playlist is so easy. You just have to click on the “File” button that is located at the top area of your screen, then from the new options displayed, select “New”, then “New Playlist”. Alternatively, you can just press “Ctrl + N” on your keyboard simultaneously.

Step #3. Now, you can name the new playlist as you wish – perhaps, something that you can easily remember. After naming it, you will be at the playlist’s page wherein you’ll see more options such as adding, rearranging and even renaming your music.
Step #4. In the upper right portion of the page, tick the “Add Music” button. By doing so, the iTunes app is allowing you to add some tracks from your computer’s library.
Step #5. You can also drag and drop the tracks to the newly created iTunes playlist. If you wish to add a lot of songs one time, you can just use the “Ctrl” or “Command” button during track selection.
Step #6. Once done, you just have to tick the “Done” button. The iTunes app will bring you back to the newly created playlist and would allow you to rearrange the songs or rename the playlist if you want to. To reorder the songs, you can just click and drag them. To rename the playlist, just right-click on it and then select “Rename”. If there are any songs you forgot to include initially, just click the “Add Songs”.
As simple as that, you can create a new playlist on iTunes.
Now, we’ll head to a much more detailed procedure of how to add songs to a playlist on iTunes as you go to the second part of this article.
Of course, we still want to share the detailed steps of how to add songs to a playlist on iTunes even if we already initially highlighted them in the first section of this post. While reading this, we expect you now know how it is easy to do playlist creation.
Here, we will be sharing two methods of how to add songs to a playlist on iTunes – you can either utilize some keyboard shortcuts or use the sidebar instead.
We will be dealing with the steps of how to add songs to a playlist on iTunes using your keyboard shortcuts first.
Step #1. Open your iTunes app and then choose the “Songs” view on your Library tab.
Step #2. Choose the first song.
Step #3. Hold the “Shift” button on your keyboard and highlight the last song you wish to add to your playlist. If the songs you want are not in order, you can utilize the “Ctrl” or “Command” function during the selection of songs.
Step #4. Now, “Control + Click” on one of the songs you just highlighted.
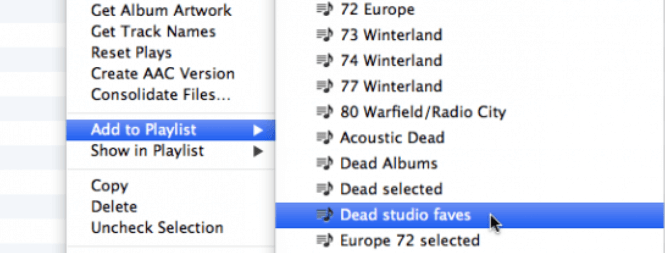
Step #5. There would be new options presented on the screen. From those, select the “Add To Playlist” option or choose “New Playlist” if you wish to save them to a new one.

By completing these five steps, you shall see the tracks highlighted saved on the playlist you chose!
Now, here is what you need to do if you wish to use the sidebar during the adding of songs to playlist on your iTunes app or account.
Step #1. Launch your iTunes app on your PC and then head to the “View” menu (located at the top area of the screen).
Step #2. From the options displayed, make sure to choose the “Show Sidebar” option.
Step #3. You have to ensure that the “Library” tab is selected on your iTunes music library.
Step #4. There is this “Songs” section in the sidebar. Select it.
Step #5. Choose the first song.
Step #6. Hold the “Shift” button on your keyboard and highlight until the last song you want to add to your playlist or utilize the “Ctrl” or “Command” button in case tracks are not in the order you want them to be selected.
Step #7. Now, you have to drag the selected songs to the sidebar and ensure to scroll until the appropriate playlist has been found.
Step #8. Finally, drop the highlighted songs once the playlist has been identified.
After reading this part, you are surely now aware of the steps of how to add songs to playlist on iTunes. In the next section, we’ll just share bonus information (as we are too generous to share everything we know) that we know will help you keep the Apple Music songs that you love saved on your personal computer forever! Want to find out how this can be done? Then make sure to keep reading until the end!
It is true that Apple Music songs are protected and having them downloaded for forever keeping might be a difficult task to do. But that is until you found out about how amazing the DumpMedia Apple Music Converter is!
Do you know that there are third-party software applications that can remove all limitations you can think of and finally let you enjoy those Apple Music songs you love for free forever?
One good example of those apps is this DumpMedia Apple Music Converter. This is very much capable of removing DRM protection, allowing you to keep the songs on your PC or on any device as long as you want to!
Worry no more about an Apple Music subscription! Added to this, you can even have the tracks converted to a format supported by your devices and preferred media players. So, if you think the format of the songs won’t work on the device you are currently using, you can have them transformed as you wish!
The app’s speed is too fast making the conversion process finished immediately! It can even maintain 100% audio quality. And oh, it is important to note that this can be used by anyone as this is so easy to handle!
Knowing more about DumpMedia Apple Music Converter would surely be beneficial to you if not now, perhaps in the coming days. So, to further learn more about this app, just visit DumpMedia’s official website!
With the procedure presented in the earlier part of this post, you are surely knowledgeable enough of how to add songs to playlist on iTunes. We are glad to help you out this time! If apart from the information we gave in this post, there are still concerns that you wish to be solved, leave them below!
