Listening to music has been one of the many hobbies and past times of several people. Music is one’s escape from reality. All songs cater to different emotions and bring about a lot of happiness to every person listening to it. If you are one of the many music lovers in town, you probably got numerous playlists saved on your devices and even in many software applications including iTunes. You surely got a bunch!
But what if you wanted to know how to download iTunes on computer? How are you going to do it? This guide would give you the ultimate solution to this problem!
If you are one of those who have experienced the same issue before but still haven’t found the answer yet, surely, you will be enlightened once you have finished reading this post.
If you are excited to know, let us then begin!
Contents GuidePart 1: How to Download iTunes Music to Your Computer with iTunes Itself?Part 2: The Best Way to Download iTunes Music to Your Computer DirectlyPart 3. In Conclusion
iTunes has been one of the best applications created and introduced by Apple. Because of its capability to be used not only on Apple devices and gadgets but as well as on Windows personal computers, a mentioned application was considered to be one of the most amazing applications in town.
In using this application, you got the ability to add, organize, and even create as many playlists as you want. You can choose lots of songs and embed those to different folders of your preference. What is great about this is that you can freely have it on your Apple devices, Mac and Windows computers.
As you have read on the subheading, you can download iTunes music to your personal computer by using the application itself. you can listen to Apple Music without iTunes. If you are thinking that the process of downloading those purchased songs is difficult, you are absolutely wrong since the process is indeed very easy and can be finished in just a few minutes!

Yes! You read the above right. And, here is how you can proceed with the downloading of iTunes music to your personal computer by using iTunes itself.
Step 1: Download and install the latest version of iTunes on your personal computer.
Step 2: Launch the application and look for the purchased songs.
Step 3: Look for the songs intended to be downloaded and hit the “Download” icon.
Check out the detailed steps on this portion.
Of course, the first thing needed to be done is to ensure that you got the iTunes application downloaded and installed on your personal computer.
It is well recommended that you install the latest version of iTunes just to make sure that you can get the best output possible. Once you have it installed, ensure that you already signed it to continue using the application.
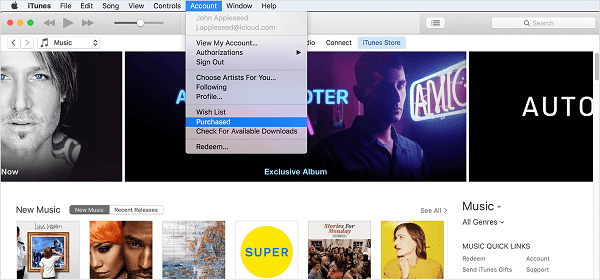
Once finished with the installation, open and launch the application to finally begin. In the main interface that you will be seeing, tick the “Account ” button which is just located at the upper part of the screen. Once done, hit the “Purchased” option.
If you are using iTunes for sharing, you will be seeing “Family Purchases” instead of the “Purchased” menu. Once clicked, you will finally see all the songs you have purchased.

Note : If you are using a Windows personal computer and is having a hard time looking for the menu bar, you can just go to the “Menu” icon which you will see in the upper left corner of the screen. After that, just hit the “Select Menu Bar ” button which you will be seeing right after clicking the “Menu” button.
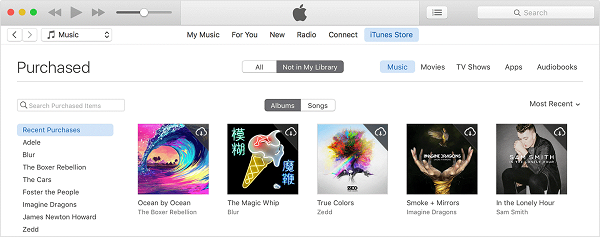
After doing the first two steps mentioned above, you would now need to head to the “Not in My Library " button to finally see all the purchased contents which are not yet downloaded on your computer. This is the time that you will be selecting all the songs or albums that you prefer and intend to be downloaded.
Once done with the selection, just tick the cloud-shaped “Download ” icon located in the upper right portion of each image shown to finally begin the downloading process.
After completing the third step, you can hit the “Recently Added” playlist and you will immediately view all the songs you just finished downloading.

In just three easy procedures, you can have your purchased songs downloaded to your personal computer.
However, there are some cases that users tend to have unplayable music downloaded through iTunes. With this, you still got another option that you can learn in the next part of this post.
Apart from utilizing iTunes itself, you can also make use of DumpMedia Apple Music Converter is a tool to be able to download songs from iTunes directly. This one is a professional software application that can perform a lot of amazing things and contains numerous and awesome features.
DumpMedia, being a great tool offering video and audio converters, has been a great help for many users nowadays. Aside from having amazing video/audio converting features, it also has an Apple Music Converter which lets you convert your favorite and most loved music to MP3 format to be highly playable in any media player!
This tool is capable of removing DRM protection and allows you to convert songs to thousands of available formats. It even lets you listen to Apple Music songs offline, and even keep your songs running although your subscription has ended! Great, right?
Let us now take a look at how we can use this DumpMedia Apple Music Converter is a tool in for downloading iTunes music the fastest way possible.
Let us look into these steps in detail.
Step 1: Download and install DumpMedia Apple Music Converter
Of course, we need to ensure that DumpMedia Apple Music Converter has been downloaded and installed on your personal computer. Once installed, open and launch the program. Once the program has been launched, iTunes will also be activated.
No need to worry about this and just proceed with the process. Under the “Library ” menu, tick “ Music” and you will now be seeing all the songs stored on your iTunes library.
To be able to choose the songs to be downloaded and converted, you can either tick the checkboxes right next to each song or make use of the search bar to easily find the songs you wanted to be downloaded.
Step 2: Perform adjustments on the settings of the resulting output
The next step that should be done is to perform the adjustments on the settings of the resulting output. You can choose any format from those that would be listed. The application supports many DRM-free formats including MP3. This as well supports those in AC3, M4A, M4R, AIFF, FLAC, AU, and even MKA format.
Selecting any of these will do. The tool will also allow you to change other options such as the bit rate and sample rate. You can as well perform the renaming of the resulting file. In this step, you would also need to specify the output path or the target location wherein the song or music will be saved.

Step 3: Tick the convert button to begin the process
Upon completing all the adjustments wanted for personalization or customization, the final step would now be the conversion process. You can just hit the “Convert” button which is located at the bottom right corner of the screen.

After a few minutes, your songs will now be converted and finally downloaded. You can now enjoy the songs anytime you want to!
After reading this article, you will probably say that the dilemma of downloading iTunes music to your personal computer is not an issue anymore! Two of the best ways have been presented and explained in the first portion of this post.
You got an option of using either the iTunes application or even an amazing Apple Music Converter – the DumpMedia Apple Music Converter.
If you are to choose between the two, we are highly recommending the second option. Having DumpMedia Apple Music Converter will surely help you not only on this one but in a lot more cases because of the amazing features it has. Its ability to remove DRM protection is one of the best features it has!
Do you have any other recommendations, suggestions or ideas in mind? Have you tried any of the two? Surely, you will get the best output in using the second option. We would really love to hear you out! You can freely share all your thoughts in the comment section below!
