
Apple Music is very generous. You can listen to their songs offline even if you’re on a three-month free trial. So, if you’re wondering how to make Apple Music available offline, it’s pretty easy. However, there is something that you need to consider.
Keep on reading to learn more about it and make sure to read until the end to learn of ways how to make Apple Music available offline for a very long time.
Contents Guide Part 1. Can Apple Music Be Used Offline?Part 2. How Do I Make My Music Available Offline?Part 3. Ways How to Make Apple Music Available Offline for Long TimePart 4. Conclusion
There is one thing that you need to know first to avail of Apple Music Offline. You need to sign up for a paid account. Yes, you will get a three-month free trial period and you can download songs to play offline during that period.
However, if you decide not to push through with a paid account, your downloaded songs disappear. Your three-month free trial automatically upgrades to a paid plan. That is if you decide to go for it. If you don’t decide to go for it, you lose whatever you have downloaded.
Now, if you do decide to go for it, keep in mind that you can only keep your downloaded songs for as long as you are paying for your account. Soon as you decide to cancel your paid account with Apple Music, the downloaded songs disappear as well. So, you should learn how to make apple music available offline.
Tip: About more Apple Music problems, you can find the solutions here.
So, yes! You can download and add songs from Apple Music to your Library on your Mac. That way, you will be able to listen to them offline. Below is a process for downloading and making Apple Music available offline.
Again, it’s important to keep in mind that this particular process is not for keeps. While you can download to make Apple Music available offline, it’s only temporary. The songs you download will only be available for you if you are signed up as a subscriber.
Because you have no other choice but to go for a paid plan after the three-month free trial, you would have to pay to be able to enjoy listening to Apple Music offline. Once you stop paying for your account, you will no longer be able to access the songs that you have downloaded from Apple Music.
With that in mind, take a look at the steps below on how to download songs to make them available offline.
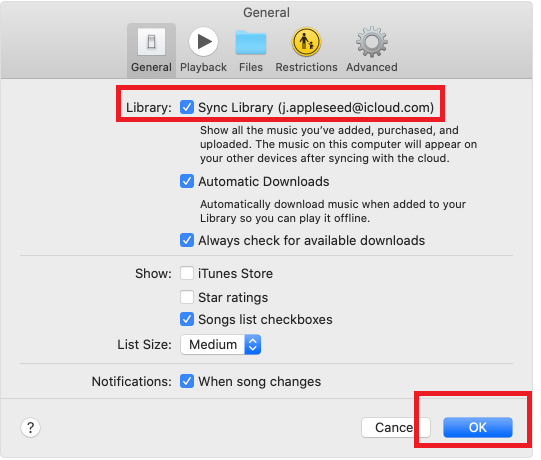
Take your cursor to the top menu and click on the Apple logo. Select System Preferences from the drop-down list. Then tap on General. Activate Sync Library by checking on it. Then click on the OK tab.
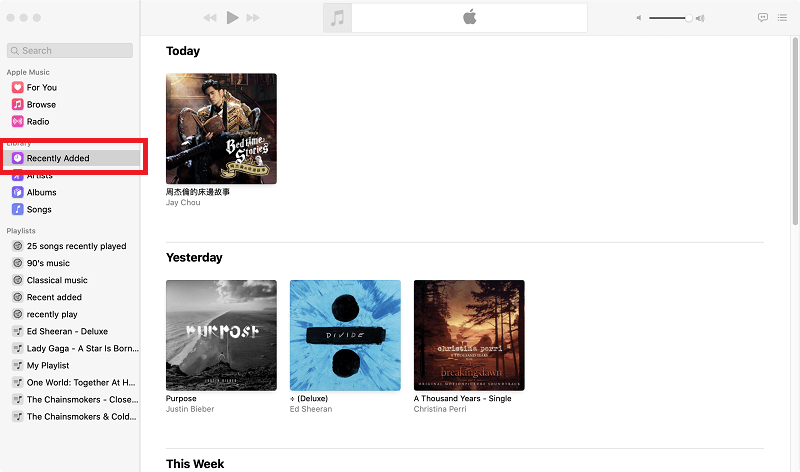
You can add a song or a playlist from Apple Music. Just click on the + button you see on the right side. So, choose a song and click on the + sign. Then check the Recently Added section of your Library to check on the songs you have just added.
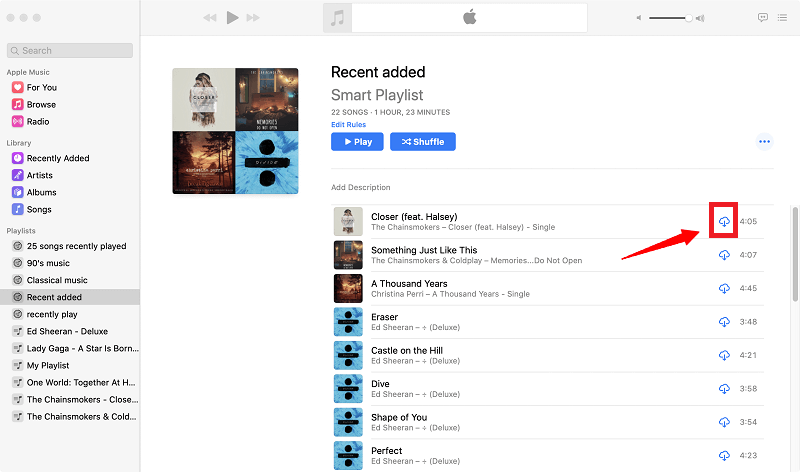
Search your Library and you should be able to see the song that you have just added. Unfortunately, when you play it, you would still be streaming it from Apple Music since it hasn’t been downloaded on your Mac yet.
To download, just click on the Download icon. You will see that particular icon when you click on the three dots opposite the song.
If you want to know how to add music on your iPhone for offline playback, you can see more details in Apple Support.
Wouldn’t you want your Apple Music to be available for a very long time? If not, for keeps? Of course, you would. The good thing is that you can download all your favorite Apple Music songs or make them available offline for a very long time.
Just continue reading to learn of the ways how to make Apple Music available offline for a very long time.
Using the Apple Music Converter from DumpMedia is probably the easiest way to download and play songs offline. It just takes a couple of clicks on this particular program to convert and download songs from Apple Music.
While it converts the songs, it removes the DRM so that you can play the songs offline on any device. Sounds pretty neat, right? Take a look at the steps on how you can use it.
Now, the detailed steps below will aid you in understanding how to use the DumpMedia Apple Music Converter.
Click on this link to access and download the DumpMedia Apple Music Converter. Click on which link is appropriate for your computer. After you have downloaded the program, run and open it.
Adding a song from Apple Music to the program is very easy. Just take your cursor to the left-hand side of the program and click on Music. There’s no need for you to launch Apple Music. Once you click on Music on the program, all your songs will appear on the main screen.
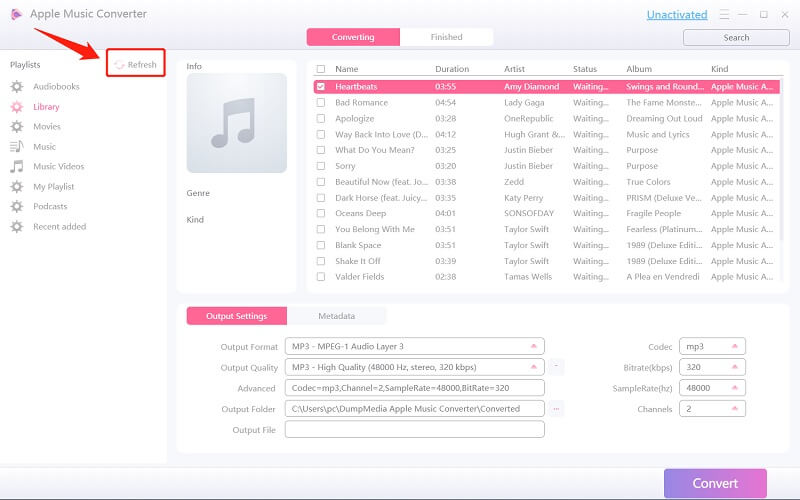
Choose the songs you want to convert. Then take your cursor to the bottom part of the DumpMedia Apple Music Converter to adjust the settings of your output. This is where you can also change the file format of your songs so that you can convert, download, and play them offline for a very long time.
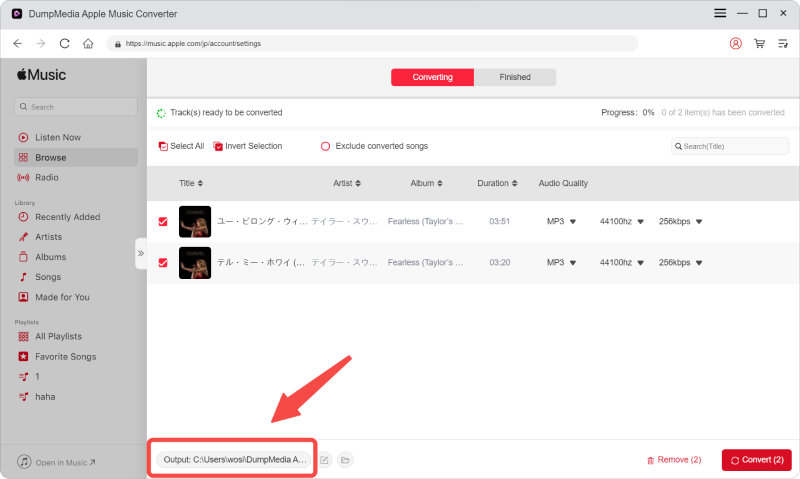
Once you have adjusted the settings of your output, you’re all set to download the songs. You can do so by clicking on the Convert tab you see at the left, bottom part of the screen.

You can also use an audio recorder called Apowersoft. The steps below will show you how you can use it.
Here is a free option that you can explore. It’s called the Free Apple Music Converter 2.11.18.1954. Keep in mind that there are a lot of things to consider when using free software. Nonetheless, you can check out the steps below to see how you can use it.
If you think about it, there’s no need for you to sign up for Apple Music after the three-month free trial period ends. Furthermore, there’s no need for you to activate the Sync Library option.
With just your three-month free trial of Apple Music, you can convert and download all the songs that you love. With the use of the DumpMedia Apple Music Converter, you can always keep all the songs that you love for a very long time. Hurry up and learn how to make apple music available offline!
Do you listen to Apple Music? Have you ever tried downloading songs from Apple Music? How did you do it? Your thoughts are always welcome here. Feel free to drop us a line or two. Our readers would love to hear from you.
