iTunes is one of the best platforms that’s being utilized by many users. This serves not only as a media player but also as a file manager because you can store your media files on this app.
Since we will be dealing with this “how to play iTunes on Alexa ” topic in this article, the major point will be circling and focusing around iTunes music. You would also be surely delighted that you can have your favorite iTunes music content played on your Amazon Echo speaker with the aid of this AI technology named Alexa.
Actually, Amazon had taken a huge leap as it welcomes the expansion of its service – offering the integration of Apple Music and iTunes on Amazon Echo speakers. With this advantage, users can easily listen to their favorite Apple Music or iTunes songs with the Alexa app. As we mentioned, you have three ways to play iTunes/Apple Music on Alexa. We will be further looking into each of these as we jumped to this post’s parts.
Contents Guide Part 1. How to Play iTunes Music on Amazon Echo with Alexa?Part 2. How to Play iTunes Music on Amazon Echo with Bluetooth?Part 3. How to Play iTunes Music to Amazon for Playback on Echos?Part 4. Summary
The first method of how to play iTunes on Alexa is by setting up the default music streaming service to Apple Music which is a very easy thing to do. You just have to ensure that your Apple Music or iTunes account has been linked to the Alexa app to begin streaming your favorite songs.
We, of course, have a guide here to help you out.
Step #1. Using your mobile or handy device like iPhone, Android, or an iPad, launch the Amazon Alexa app.
Step #2. At the bottom area of the screen, there is a “three-line” menu. Tap this. This is actually the “More” option.
Step #3. Choose “Settings” next.
Step #4. Scroll down until you see the “Music & Podcasts” option.
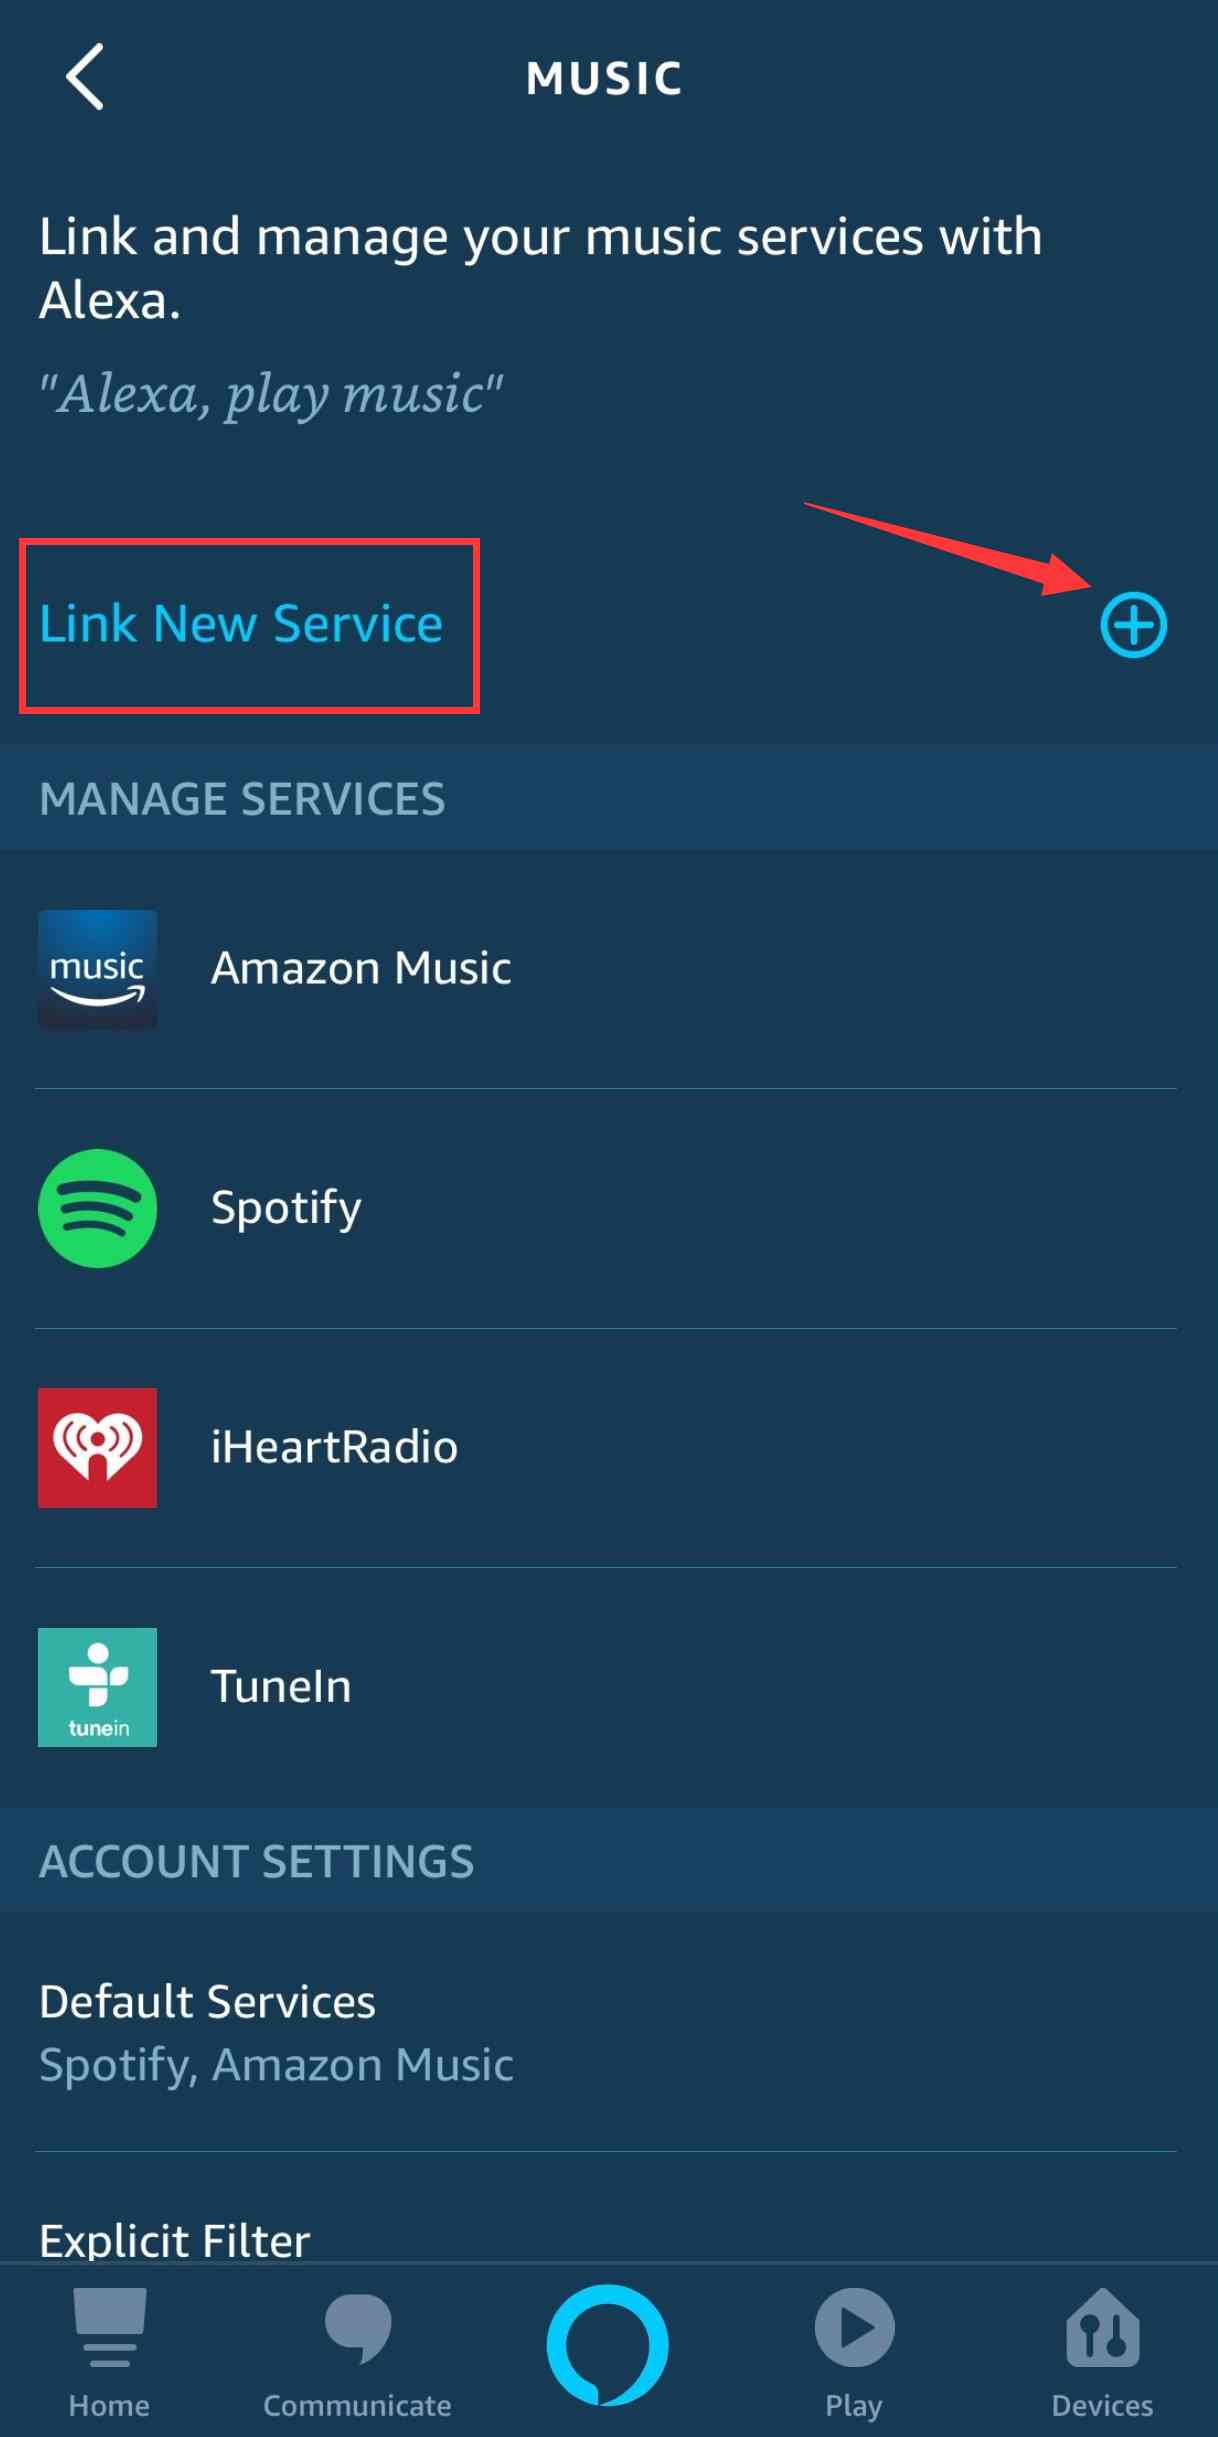
Step #5. Choose the “Link New Service” button next.

Step #6. Choose the “Apple Music” icon, then tick the button for “Enable to Use”.
Step #7. You will be asked to sign in with your Apple ID credentials. Provide the needed details to proceed.
Step #8. Lastly, choose the “Change” option, and then make sure you select “Apple Music” to be the default music streaming service on your Alexa app.
The above is a simple method of how to play iTunes on Alexa as you can also integrate your iTunes library with your Apple Music account.
Another method how to play iTunes on Alexa on your Amazon Echo is with the help of Bluetooth. Amazon Echo speakers are smart speakers that support Bluetooth connectivity. Thus, it is much easier for you to stream your favorites once this feature has been utilized. All you have to do is to ensure the successful connection of your phone or tablet with your Amazon speaker and you’ll be good to go.
Of course, we have here a detailed guide of how you can pair your Amazon Echo speaker with either your phone or tablet. Just make sure that before you do the below procedure, your portable or handy device has been set to “Bluetooth pairing mode” already. Also, this should be within the range of your Amazon Echo to ensure the successful connection between them.
Now, here is the procedure of how you can connect your handy device with your Amazon Echo speaker through Bluetooth to finally play iTunes on Alexa.
Step #1. The Bluetooth pairing mode on your Amazon Echo speaker must be enabled or activated first. You can do this by utilizing Alexa. Just say “Pair” and Alexa will do its job. If you wish to exit the pairing mode, all you have to say is “Cancel”.

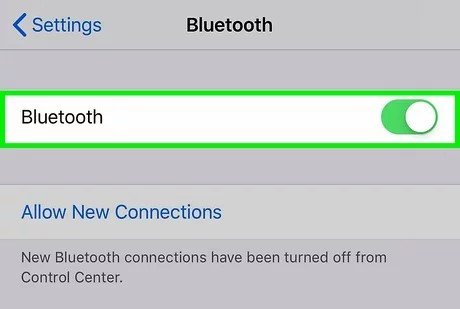
Step #2. On your handy device, head to the “Settings” menu and look for “Bluetooth”. You just have to choose your Amazon Echo speaker. Alexa will then let you know once the successful connection between the devices has been established.
Step #3. Once the connection has been done successfully, you will now be able to access your Apple Music and iTunes library and then start streaming them on your Amazon Echo speaker. If you are done listening to them, for you to disconnect your mobile or any handy device in use with the Amazon Echo, just say “Disconnect”.
The process of how to play iTunes on Alexa on your Amazon Echo is totally easy as well if you are to use the Bluetooth connectivity feature.
The above methods of playing iTunes on Alexa on your Amazon Echo speaker are easy to do but there is a much simpler way for you to listen to your favorite iTunes or Apple Music songs. That is, to have the songs, albums, or playlists uploaded to your Amazon Music account. In this way, you won’t need the aid of your handy device while streaming. Another good thing with this method of how to play iTunes on Alexa is that even without a subscription, you will get to listen to the songs anytime you like. Even if you are to cancel your subscription or it expired already, you don’t have to think that much.
Upon reading the above passage, you might be wondering how the uploading of Apple Music and iTunes songs to Amazon Music will be possible given that they are protected files. If you aren’t aware, these songs are protected under Apple’s FairPlay Protection program. Due to this encryption, you won’t be able to access the files on devices that are unauthorized. More so, they can’t be altered, moved, or transferred.
Well, the above is given unless you’ll have the protection removed! Good thing, there are lots of amazing professional apps that can do the DRM removal job. And, there is no need for you to research. We’ll introduce and share the best app that you can use here.
You can try utilizing this DumpMedia Apple Music Converter. This DumpMedia Apple Music Converter is one of the best tools when we are to talk about removing DRM from Apple Music. This does this process so well and even aids in the transformation of the files to formats like MP3, AAC, FLAC, WAV, and more. With the fast conversion speed it has, you can ensure that the converted files will be made available right away.

Also, it is worthy to mention that you won’t be losing the original quality of the songs. They will still have 100% original quality. Additionally, all ID tags and important details about the tracks will be kept. You also have the power to customize the output settings as you like.
More so, this app’s interface is too simple to handle that even beginners will surely be able to use it well. For your reference, we have here the detailed steps of how you can use this DumpMedia Apple Music Converter to convert the iTunes songs to MP3 format that you have for uploading to your Amazon Music account.
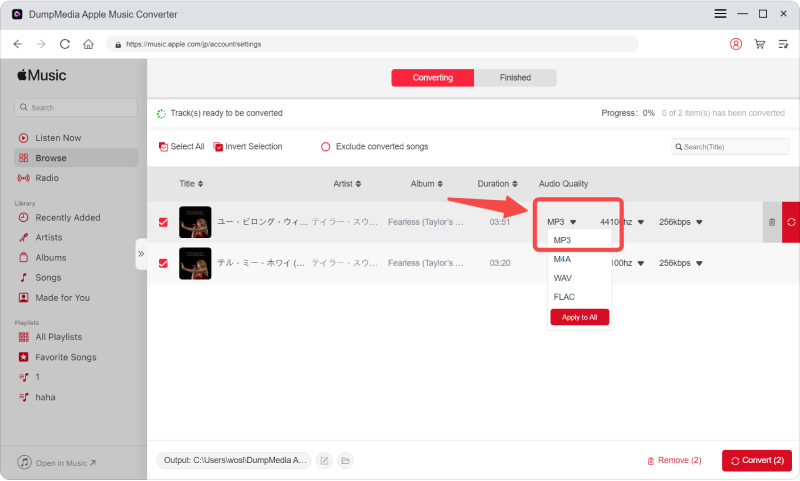
Step #1. Launch the DumpMedia Apple Music Converter once you have fully installed it on your PC. You may begin previewing or selecting the tracks to be converted. Batch conversion is also possible so if you are looking at converting lots of songs, this app will be so helpful.

Step #2. Set up the output parameter settings. The output format and folder are important items that should be checked. Other options available can be modified as you wish.

Step #3. Tapping the “Convert” button will let the app initiate the conversion and DRM removal procedures.
Once the process is done, the DRM-free and transformed files will be accessible from the output folder that was defined in Step 2. All you have to do now is to upload them to Amazon Music!
You just need to make sure that the Amazon Music app has been installed on your PC. Just open it, and then drag and drop the DRM-free tracks into the “Upload” section that’s under “Actions”. Alternatively, you can also choose the “My Music” menu.
Once you have accomplished the uploading process, you’ll then be able to listen to those songs on your Amazon Echo speaker and control the playback with Alexa!
At this point in the article, “how to play iTunes on Alexa” should no longer be a question to you. We had presented you methods that you can apply to finally enjoy the Apple Music and iTunes tracks on your Amazon Echo speaker with Alexa already. If you are aiming to keep your favorite songs forever, always seek help from apps like this DumpMedia Apple Music Converter!
