“I just upgraded my mobile phone to iPhone XR, but I am thinking about this dilemma - how to transfer music from computer to iPhone XR? Can anybody help me here?”
Of course, getting a new gadget would be so great especially if it’s an Apple product. Moving and advancing to a new device would be awesome but there could be times when dilemmas (the same as the above statement) will occur.
Having a new mobile phone, specifically, an iPhone XR would be very delightful. You can do a lot of things with it. With its improved features, users find it so well to use the phone, especially during photo taking, video viewing, and even music streaming.
As for the music lovers out there, being able to learn how to transfer music from a computer to iPhone XR would be very important. Of course, you are going to bring your iPhone XR with you anywhere you go, and you might want to have your favorite music choices along with you as well.
If you have those favorite tracks saved on your computer, it would be so much helpful to get to read more of this article’s content as this will be tackling all about how to transfer music from a computer to iPhone XR.
Contents Guide Part 1. How to Transfer Music from Computer to iPhone XR with iTunes?Part 2. How to Transfer Music from Computer to iPhone XR without iTunes?Part 3. Conclusion
As initially mentioned, one answer to the “how to transfer music from computer to iPhone XR?” question would be the use of the iTunes application which you might already have on your personal computer. If you do not have it yet, we suggest having it installed immediately.
iTunes is an app that is mostly used by a lot of people. Apart from being an app that is capable of letting you view and stream media files, you can also further utilize its feature and even make it an app for organizing your file (media file library).
Though iTunes is good, a lot is not recommending the use of it during the transferring of music files from one’s PC to a mobile device like this iPhone XR as according to them, several functions might confuse you. But, if you’ll be able to understand the procedure well, it shouldn’t be that hard.
The below four-step procedure will help you know how to add music to the iTunes library first (before we go ahead and learn how to transfer music from a computer to iPhone XR).
Step #1. You need to have your iPhone XR connected to your personal computer. You can do it with the help of a USB cable.
Step #2. Now, head to your PC and launch the iTunes app. You need to tick the “Trust” button to make sure the whole process would turn out smoothly.
Step #3. You should be able to see the icon for your iPhone device once the connection has been successfully made (on the left area or corner of the screen).
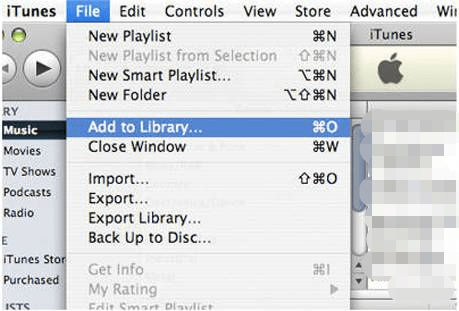
Step #4. You can now start importing the iTunes tracks from your PC to your iPhone XR by ticking the “File” button at the top portion for Mac users (or tap the iTunes menu if you are a Windows PC user). Afterward, select the “Add to Library” button.

Now that music is added to the iTunes library, we’ll now learn how to transfer music from a computer to iPhone XR with the use of the iTunes sync feature.
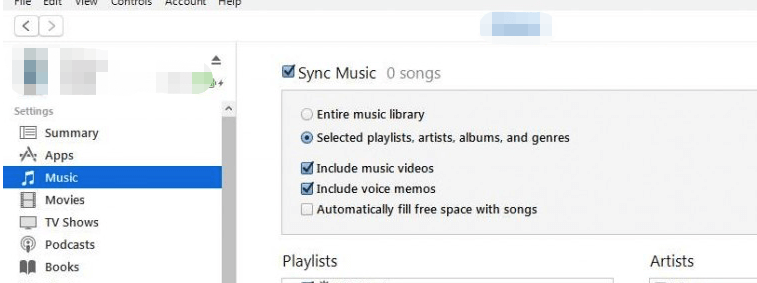
Step #1. You have to select the option that says “Music”. Afterward, make sure to put a checkmark in the box alongside the “Sync Music” menu.

Step #2. Now, there is an option if you would like to sync your entire music library or would just want to select depending on the playlist’s name, the artist, or the genre and album.
Step #3. Once you selected the option you want, you just have to click the “Apply” button and then the syncing from your iTunes app going to your iPhone XR would happen.
For your reference, we also got some tips listed in this portion just in case you would find these things helpful.
Now, what if you find using the iTunes app not that good during the transfer of music from your personal computer to your iPhone XR? Well, that would lead you to find a much better way to answer the “how to transfer music from computer to iPhone XR?” dilemma. And that’s what we are to focus on in the second section. So, stay tuned.
You should know at this point that it is a challenge to transfer Apple Music files or iTunes-purchased files to your iPhone XR. This is because those are protected by DRM. Also, using the iTunes app might be a bit confusing to you as stated in the earlier part of the first portion of this post. It could also bother you that before successfully syncing, the existing files that you have on your iPhone might be deleted and erased.
So, what else should you do? How to transfer music from a computer to iPhone XR?
That is simple! You just have to look for a third-party software application that can remove all those limitations and just help you make sure that the transfer would be successful. With that being said, we are glad we have the DumpMedia Apple Music Converter.
What can this app do to help you out?
Well, firstly, this DumpMedia Apple Music Converter has a feature that can remove the DRM protection of Apple Music songs and those songs purchased from the iTunes store. It is also a converter that can support various output formats, MP3, M4R, MKA, AC3, FLAC, just to name a few.
By converting the tracks via this DumpMedia Apple Music Converter, you would be assured that the ID tags from the original songs will still be maintained as well as 100% quality. The user also can customize the profile settings of the output songs and even the filename format.
Apart from these good things, it is also notable that this DumpMedia Apple Music Converter can also serve as a powerful converter for audiobooks. It can transform your AA / AAX files into supported formats as you wish. The conversion speed is at 10X! Thus, you can have the output files ready in no time!
So how can you do the conversion and downloading of Apple Music or iTunes songs via the DumpMedia Apple Music Converter and finally answer the “how to transfer music from computer to iPhone XR?” question?
Well, you just have to complete these three steps!
Step #1. Make sure you complete all the things needed before the installation of the DumpMedia Apple Music Converter on your PC. The complete list is displayed on the official website of DumpMedia. After having those accomplished, just proceed with the installation and the launching of the app on your PC. Now, select the Apple songs / iTunes songs that you wish to convert and download.

Step #2. At the lower portion, there is this “Output Format” option that enables you to choose which of the supported file types you want your tracks to be converted to. In this step, you also can select and set the output settings as you prefer or wish. Defining an output path would also matter as this will help you with easy access once the conversion process has been completed.

Step #3. Lastly, you just have to tick the “Convert” button that is in the lower right area of the screen to let the DumpMedia Apple Music Converter do its job and have the conversion completed right away.

After having the tracks readily available on your personal computer, you just have to connect your iPhone XR to it via a USB cable and have the tracks copied right away. Now, you can play the converted files anytime as long as you have your iPhone XR with you!
Finally, you now know how to transfer music from a computer to iPhone XR! You can do it with the help of your iTunes application or via the help of third-party software applications like the DumpMedia Apple Music Converter!
