You may have known a lot about the iTunes app. In fact, with this app being so versatile, surely, almost all users are into utilizing its features. The good thing with the iTunes app is that apart from being popular as a music streaming platform (as you can also get some good songs from the iTunes Store), it’s as well a media manager.
This post will be talking more about iTunes and those iTunes songs that you can purchase through the iTunes Store, specifically, the process of how to do iTunes export to MP3.
If you have been using the iTunes app for quite a while now, you would have known already that those that you can get from the store are in M4A file format. It’s true that using iTunes is definitely a good idea. However, if you have these iTunes songs with you, you must also know that these aren’t playable on non-iOS devices.
Therefore, if you wish to avoid any issues when it comes to streaming your favorite iTunes songs on any media player or device that you like, there is a need for you to learn about how to do the iTunes export to MP3 process.
Contents Guide Part 1. How to Export iTunes Songs to MP3 with Simple Steps?Part 2. How to Export DRM-Protected iTunes Songs to MP3Part 3. Summary
Do you know that you might have iTunes songs on your library that can easily be converted to MP3 format using the iTunes app itself as well? That’s right! Those are DRM-free tracks. What do we mean by the term “DRM-free”?
Apple Inc. actually uses the Apple FairPlay Protection Policy to add protection to the content that they have. With this encryption (DRM protection, as called by many), there are only authorized devices wherein you can access the files.
If you have DRM-protected iTunes songs, you can check out how you can do the iTunes export to MP3 process as you move to the second part of this article. Now, the simple procedure here – how to do iTunes export to MP3 process – will be for those files that are non-DRM or are DRM-free. Here are the steps.
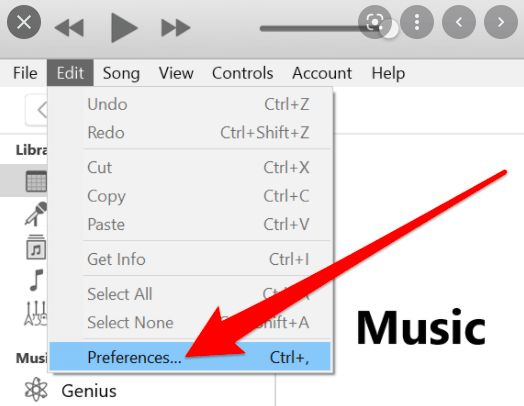
On your PC, you need to have the latest version of the iTunes app. For you to check if an update is available, you can go to the Apple Store or Google Play Store to see. You shall see an “Update” button if there’s a new version available for download. Once you are done checking this one, you may now launch the app and then hover your mouse to the “Edit” button. Afterward, click “Preference”.

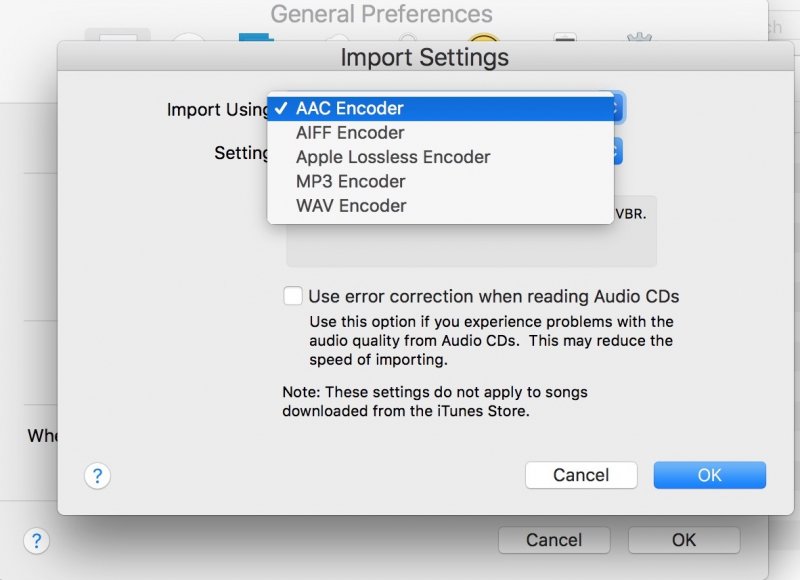
A new window shall appear wherein you can see the “General Preferences” tab. Look for the button for “Import Settings” and click it. By doing so, you shall arrive at the “Import Settings” page. Under the “Import Using” portion, there is a drop-down arrow. You just have to select the option that says, “MP3 Encoder”. Clicking the “OK” button means that you are confirming the choice selected.

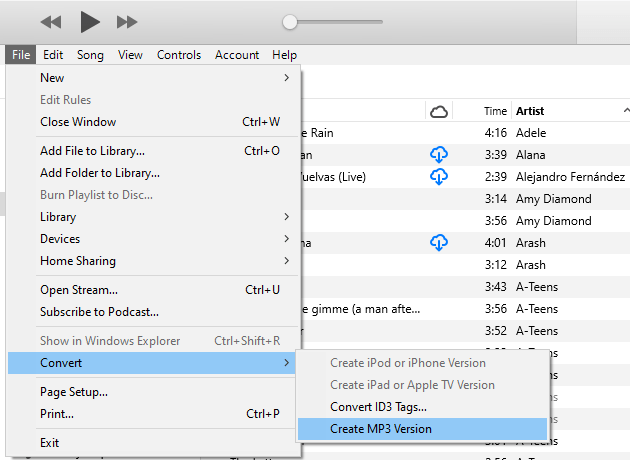
You can now do the iTunes export to MP3 process. Select the iTunes songs from your iTunes library that you wish to convert. Just tap on the “File” button afterward and then “Convert”, “Create MP3 Version”.
While the process of conversion is ongoing, please make sure to keep your iTunes app up and running – do not close the program. This iTunes export to MP3 process should be finished within just seconds or minutes (that is of course, dependent on the size of the file that is being processed).

And just like that, you can do the simple iTunes export to MP3 process! But remember that the above-highlighted procedure will only work if you are to do it on DRM-free iTunes songs.
If you have iTunes songs that are protected by Apple’s FairPlay Protection policy, you then need to check out other workarounds to do the conversion process. But don’t worry, as we have mentioned initially, we will have that discussed as well as you move on to the next part of this article.
A lot of users are complaining about the dilemma when trying to do iTunes export to MP3 process for their DRM-protected iTunes songs. Well, if this is your first time trying the process, you should know that it is actually not possible to do the conversion directly through the iTunes app but it’s actually easy so there is nothing you should worry about.
It might only be new to you but rest assured that you can do iTunes export to MP3 process easily. That is, through the help of a great software application named DumpMedia Apple Music Converter that is supported both by Windows and Mac computers.
Have you heard or read about the DumpMedia Apple Music Converter before? With professional apps like this, you can actually get rid of the iTunes songs’ DRM protection in just a few clicks letting you access the files on any device or media player that you like.
Additionally, it aids in iTunes export to MP3 process! Yes, you can have your iTunes songs converted to MP3 through this app. Not only that, but it also supports transforming your files to other output formats like MKA, AC3, FLAC, and many more.
Click to have a try! It's 100% secure!
Actually, apart from being a converter, the DumpMedia Apple Music Converter can also be a powerful audiobook converter. You can have your AA / AAX files processed and transformed to MP3 or other audio formats the app supports.
The DumpMedia Apple Music Converter is an app that’s designed to be user-friendly. Surely, users won’t have any problems while utilizing its features. It also works at a speed of 10x faster than any other app, so you won’t surely worry that much about the conversion time. More so, it can help you maintain the 100% original quality of the files as well as the ID tags and important information.
The app also requires only a few things when it comes to installation. If the app seemed to be so good to you upon reading the above features, you can go and check out the official website of DumpMedia to see the complete list of installation requirements. To guide you, we have here the detailed process of how to do the iTunes export to MP3 through the DumpMedia Apple Music Converter.
Step #1. Make sure to complete all the installation requirements. Get the app’s installer, and then, install the DumpMedia Apple Music Converter on your PC right away. This will only take some time. Once done, just launch the app and then start previewing and selecting those iTunes songs that you wish to process or convert to MP3 format.
Step #2. It is now time to set up the output settings. At the bottom of the page, you shall see the options displayed. Right away, you will see the “Output Format” option. Using the drop-down arrow, select “MP3”. There is also an output folder selection. It’s always suggested to define an output folder for easy access to the converted files after the conversion process. Additionally, you can change other settings like bit rate, sample rate, and file name, of course.

Step #3. To finally perform the iTunes export to MP3 process, you now have to click the “Convert” button that’s at the bottom area of the screen. The app will perform the conversion process as well as the DRM removal process.

Within just a few minutes, you shall expect the converted iTunes songs to be available in the output folder that you just defined in step #2. Now, since these songs are already in MP3 format, you can have them accessed and played on any device that you like without thinking about any compatibility issues!
Remember that you can always do the iTunes export to MP3 process easily using your iTunes app as long as you are processing DRM-free files. But, if you wish to convert those DRM-protected iTunes songs, there is a need for you to look for a reliable professional software application like this DumpMedia Apple Music Converter. It is always good to seek help from trusted apps!
