


How to Export iTunes Playlists to Android (2025 Guide)
Many people are fond of music applications that they can easily access even on their handy mobile devices like iPhones or Android.
If you are an iPhone and iTunes user (at the same time) for some time now and you happened to have playlists created on your account and have been wondering how you can export iTunes playlists to Android devices, we will show you the four basic methods on how to do it successfully in this article.
Although iTunes is known to have a successful collaboration with Apple devices, this does not mean that you can’t have all those iTunes favorites on your Android phone.
You should be thankful enough that the web became a large market where you can see all the available tools and options you can use to do everything as long as you have your personal computer, internet connection, and your fingertips! Well, your devices are very much capable of a lot of things. You might not just find all those yet.
Be ready as we are about to start the discussion about the procedures you can check to export any iTunes playlists you love to your Android device.
Contents Guide Part 1: Exporting iTunes Playlists To Android Using USB CablePart 2: Move The iTunes Playlists To Other Streaming ServicesPart 3: Exporting iTunes Playlist to Android Using Software ApplicationPart 4: Download The iTunes Playlists to Save on Android DevicesPart 5: To Sum It All
Part 1: Exporting iTunes Playlists To Android Using USB Cable
The easiest and most common method of getting your iTunes playlists to your Android gadget is with the aid of a USB cable. Probably, you have thought about this procedure already as this is the most basic.
Since iTunes songs are as well protected by DRM, maybe you are wondering if it is even possible to have the files transported from the iTunes app (iPhone) to an Android device. The answer to that is a “Yes”. You can’t move those protected but you can have the others exported.
Here are the three basic steps in exporting iTunes playlists to Android devices.
- Check the “Copy files to iTunes media folder when adding to library” option.
- Choose songs to save from your personal computer to Android.
- Perform the transferring of songs under the iTunes playlists.
The details are as below.
Step #1. Check The “Copy Files To iTunes Media Folder When Adding To Library” Option
In using this first method, you just need to ensure that this option - “Copy files to iTunes media folder when adding to library” you can see in your iTunes application has been marked as “checked”.
You need to have this reviewed so that all those iTunes files like music and videos will be kept automatically on your iTunes folder in the personal computer you are using. If you are wondering where the iTunes songs or any files will be saved, you can refer to the below snapshot.
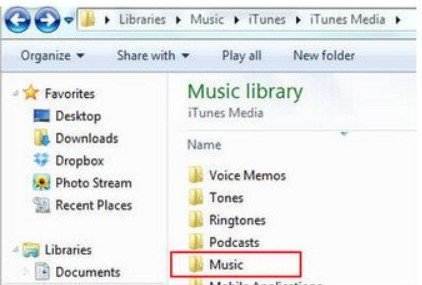
Step #2. Choose Songs To Save From Your Personal Computer To Android
In the above snapshot, you will see the folder wherein all the iTunes songs from your loved playlists are saved. Choose all those you wanted to transfer to your Android device.
Step #3. Perform The Transferring Of Songs Under The iTunes Playlists
After finishing the first two, you can now proceed to transfer the songs or files under your favorite iTunes playlists to your Android device. First of all, make sure that your mobile device is connected to your personal computer using your USB cable. Once the device is visible, then you can now proceed with the copying of songs.
Part 2: Move The iTunes Playlists To Other Streaming Services
Apart from the first method, you can also try moving all the iTunes songs under your playlists to other streaming devices like Google Play Music or Spotify (which are both accessible on your Android device). Let us tackle how you can do this using the mentioned applications beginning with Google Play Music.
Transferring iTunes Music To Google Play Music
As mentioned, Google Play Music is a streaming site that can successfully be installed on your Android device. Actually, this might probably be in your Android device already.
This is very much loved by many because it allows the uploading of up to fifty thousand songs without costing you any penny. Since mentioned is free, you can do the uploading if you wish to.
Here is how you can process mentioned.
- Head to your Google Play Store using any browser.
- Log in using your Google account.
- Check all the iTunes songs on your Android phone.
If you are wondering about the details for the above three, you can read all texts below.
Step #1. Head To Your Google Play Store Using Any Browser
The initial thing needed is to head to your Google Play store using your web browser and look for the “My Music” section. After hitting, you will see new options on the left side of the screen. From there, choose “Upload music”. A new window will suddenly popup asking you to download the music manager in case you still do not have it. Click the button to proceed with downloading.

Step #2. Log In Using Your Google Account
After the downloading of the music manager has been completed, you will be required to sign in again using your Google account (same credentials). Make sure to mark the “Upload songs to Google Play” option and tick “Next” to proceed. In the new screen, choose iTunes as the folder to use during the uploading. After doing so, you can begin the importing of iTunes songs.

Step #3. Check All The iTunes Songs In Your Android Phone
After completing all the above steps, you can now open the Google Play Music application on your Android device. You can see all the uploaded songs from the library. You have the option to download the songs uploaded in case you wish to listen to those offline.
In case you wish to do the transferring of the iTunes songs from your most loved playlists to your Spotify application, you can refer to the below guide provided.
Transferring iTunes Music To Spotify Music Application
If you love using the Spotify application, you can also upload iTunes songs to it.
- Open your iTunes application.
- Open your Spotify application on your personal computer.
- Open the Spotify application on your Android phone.
Below are the descriptions corresponding to each step.
Step #1. Open Your iTunes Application
The first thing needed is to open your iTunes application on your personal computer. Once you are at the main interface, hit the “Preferences” button followed by “Advanced” and then “Share iTunes Library XML with other applications”.
Step #2. Open Your Spotify Application On Your Personal Computer
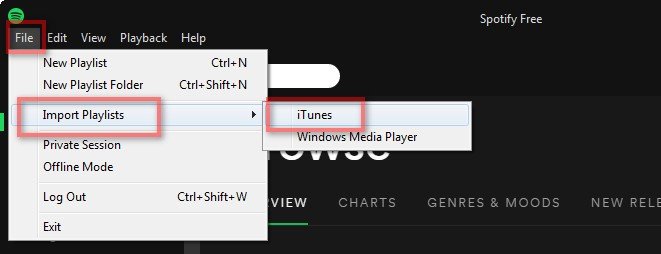
You need to open your Spotify application on your personal computer next. You will see the “File” button in the top area. Tick it then look for the “Import Playlists” button. You will notice two new options, choose “iTunes”.
Step #3. Open The Spotify Application On Your Android Phone
Lastly, you need to launch the Spotify app on your Android phone. Log in using your Spotify credentials. After completion, head back to your desktop application and make sure to select your Android phone or tablet (in case you are using the tablet version) from the list of devices. This is to allow the syncing of the iTunes playlists you imported to Android.
Part 3: Exporting iTunes Playlist to Android Using Software Application
Another option one can try in order to export iTunes playlists to Android devices is by relying on third-party syncing applications such as this Syncios Data Transfer. It has the capability of supporting the transferring of iTunes songs as well as other phone content like messages, photos, videos, contacts, and more.
For you to use this, you need to complete all the below procedures.
- Install this Syncios Data Transfer on your computer. This is compatible with both your Windows and Mac computers.
- Perform the connection between the Android device and the computer. You can do this using a USB cable.
- Once a device has been detected by the application, it will perform some review and analysis (which will happen automatically).
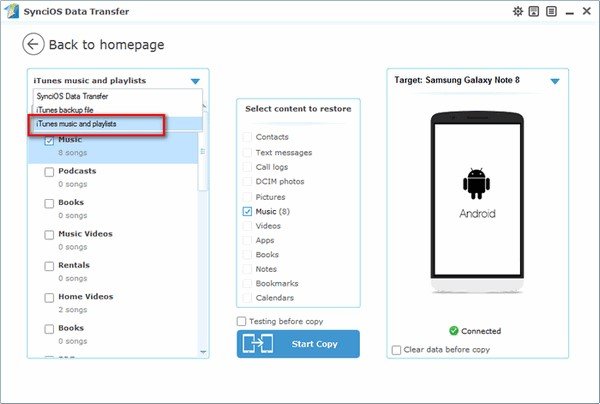
- After the device has been detected, you need to hit the option stating, “Restore Phone from iTunes”.
- A new popup window will show on your screen. Make sure to click “iTunes music and playlist” from the list that you will be seeing.
Then, after finishing, hit the “Start Copy” button below. The exporting of iTunes songs will now begin.
This is as well very effective for some users. Another method will be discussed in the next part.
Part 4: Download The iTunes Playlists to Save on Android Devices
This fourth and last option is the most recommended among all. By downloading iTunes songs using tools like DumpMedia Apple Music Converter, you can have all the freedom to save those not only on your Android devices but in any player you want.
Apart from downloading and easy removal of the DRM protection, you can have the files shared with anyone and even transform those to any format desired. Below are the steps to accomplish for your reference.
- Choose the iTunes playlists to be downloaded.
- Specify the target output format and other settings.
- Finish through conversion.
The above three were explained in detail in the below texts.
Step #1. Choose The iTunes Playlists To Be Downloaded
Once DumpMedia Apple Music Converter has been installed on your personal computer, you can begin the whole process by choosing the playlists containing all the songs to be downloaded for saving on your Android gadget. Note that you can process as many songs you want so you can upload a number on the platform if needed.

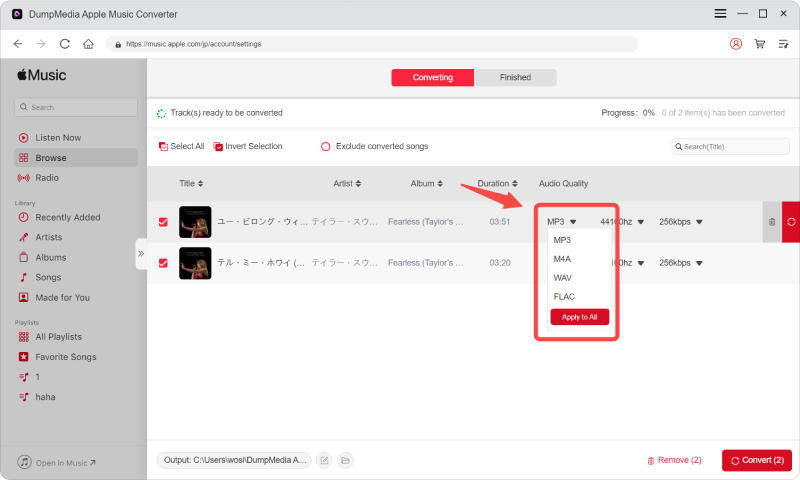
Step #2. Specify The Target Output Format And Other Settings
Once songs have been chosen and uploaded, you need to choose the output format from the formats available in the tool. For the complete list, you can check it out here. Other output settings must be specified as well including the bit and sample rates as well as the output path.
Step #3. Finish Through Conversion
Finally, the downloading and conversion will start once you click the “Convert” button at the lower right portion of your screen.

After a few minutes, the songs will be readily available in the output path (folder) you had specified initially. If you wish to monitor the progress of the conversion, you can use the status bars that will be shown on the screen.
Part 5: To Sum It All
Presented in this article are the four alternatives and procedures which you can choose in order to successfully export your iTunes songs from playlists to your Android devices – transferring using a USB cable, moving the songs into other streaming sites like Google Play Music or Spotify application, using a third-party syncing application such as Syncios Data Transfer, and downloading of iTunes songs to your computer using tools like DumpMedi Apple Music Converter.
Among the four discussed, the most recommended and effective is the last option. Well, you can get the advantage of sharing all files to anyone you like once songs have been downloaded and saved on your personal computer.
Hopefully, this blog post had helped you in any way. If you wish to add more details or information which you also would like to share with other readers, you can freely leave some comments or ideas in the below section. We will be very happy to see and know what is on your mind.

30% Off >>>