“I am streaming using my iTunes app and account but suddenly, I noticed that there are unavailable tracks. It seems like I am facing this “iTunes songs greyed out” issue. What should I do to listen again to those songs?”
Perhaps, the above concern is familiar to you especially if you already experienced the same. In fact, a lot of community platforms have this, and are already considered one of the most asked questions about the iTunes app.
The iTunes application is indeed a great platform providing us with a great music streaming service. However, there are really instances that such issues - “iTunes songs greyed out” – might arise. It would surely irritate you in case you encountered this problem especially if you are so hooked, and in the mood to stream your iTunes favorites.
But this is a simple problem and can be fixed right away. Yes, this post will show content that is related to the solutions you can try to solve the “iTunes songs greyed out” issue.
Contents Guide Part 1. Why Are Songs No Longer Available on iTunes?Part 2. How To Fix iTunes Songs Greyed Out?Part 3. Bonus: How to Remove DRM Protection from iTunes Songs?Part 4. Conclusion
Once you encountered the “iTunes songs greyed out” issue, perhaps, there would be lots of things on your mind. You would surely ask why this keeps on happening or maybe why you encountered this for the first time.
Well, we have here the possible reasons why the “iTunes songs greyed out” issue keeps on appearing.
All the above could cause the greying out of some iTunes songs. Now, let’s find out about the remedies you can try for this dilemma.
In this section, you will be finding out more about how this “iTunes songs greyed out” issue can be solved. We will be presenting the basic fixes here that we know would be effective in solving the problem. Let us start with the first one.
One reason why this “iTunes songs greyed out” issue keeps on happening is that you are trying to play files that are unsupported or DRM-encrypted.
In order to review and see if the unavailable or greyed-out track is DRM protected, you just have to check it via your iTunes app. Once you are on your iTunes app, look for that song and then right-click. From the options listed, tick “Get Info”. You have to search for “Kind” that you shall see under the “File” menu. You’ll know that the song is encrypted once you saw the “Protected” word.
You must know that there is no direct way you can remove the DRM encryption of files. You need to have a powerful software application that can help you with that. In this case, you can try using the DumpMedia Apple Music Converter. It can help you transform the iTunes songs into the supported format and even lets you remove the DRM protection right away.
To know more details about this app, you can go ahead and read the third part of this post.
The “iTunes songs greyed out” issue could also happen because of some settings in your iTunes app that you weren’t aware what’s about. Here’s how you can probably fix it.
Step #1. On your iTunes library, choose the greyed-out track and then right-click on it.
Step #2. There will be options listed and shown on your screen. Look for the “Check Selection” button and tick on it.
A tip for you: This option is not that noticeable so you should be keen to see it.
Another method that you can try to finally stream those greyed-out iTunes or Apple Music songs is to check if they were included in the list of the items you brought from the iTunes Store. If they are, you can just have them re-downloaded.
Here’s a procedure in case you need it.
Step #1. On your iTunes app, head to the iTunes Store you should be able to see at the top right portion of the screen.
Step #2. Just tick on your account and look for the option corresponding to your purchases using the drop-down menu that is available.
Step #3. You then see all the items you purchased. Look for the specific song and then just re-download the again from the iTunes Store.
At times, the reason why this “iTunes songs greyed out” issue is happening could be due to syncing issues. You must know that once a track is removed from your library when you try syncing it on your iPhone, it would be displayed as a greyed-out song. Here’s a tutorial to correct this problem.
Step #1. You have to delete the greyed-out iTunes songs first.
Step #2. Have your library and playlists refreshed.
Step #3. Try to do the re-syncing to your iPhone from your iTunes app via a USB cable. It is recommended to use a USB cable during syncing instead of utilizing your WiFi as there might be network issues along the syncing process.
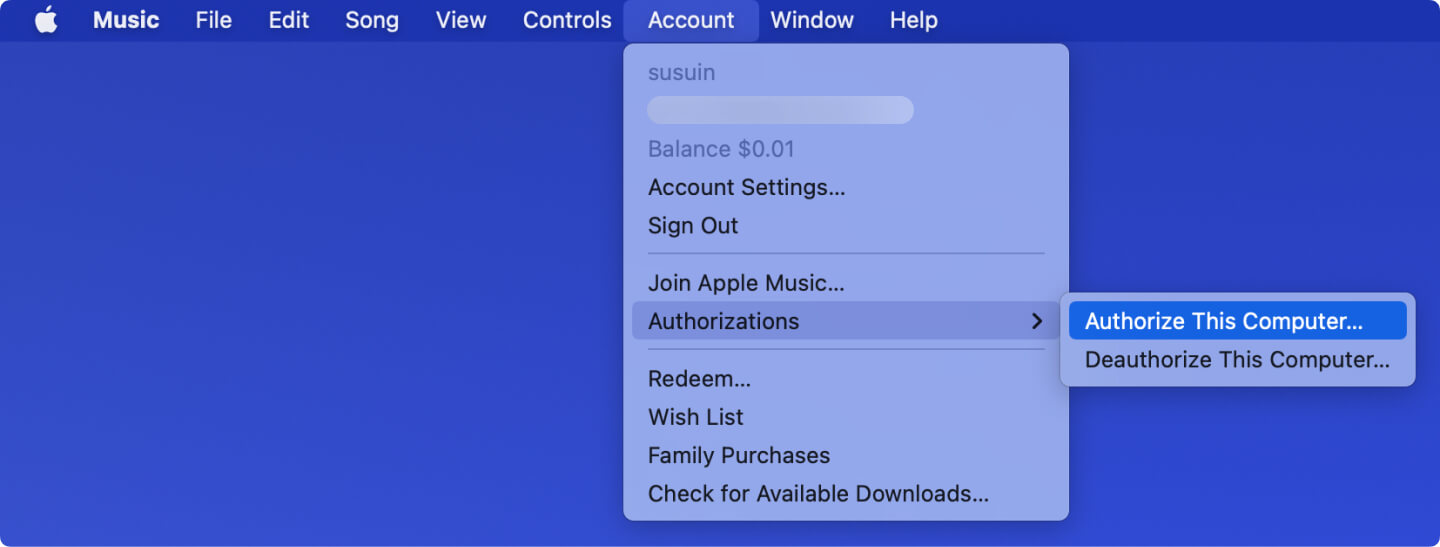
If upon trying all the four solutions presented and the “iTunes songs greyed out” issue is still there, you can try re-authorizing your computer and see if it will fix the issue. Here is what you need to do.
Step #1. Head to your iTunes app and then tick the “Store” button
Step #2. There will be new options listed. From those, choose the “Deauthorize your computer” option. Next, log out from your iTunes account.
Step #3. You need to restart your computer. Once up again, head to iTunes and then choose “Store”. Afterward, select “Authorize This Computer”.

There might be some settings that need to be checked and reviewed.
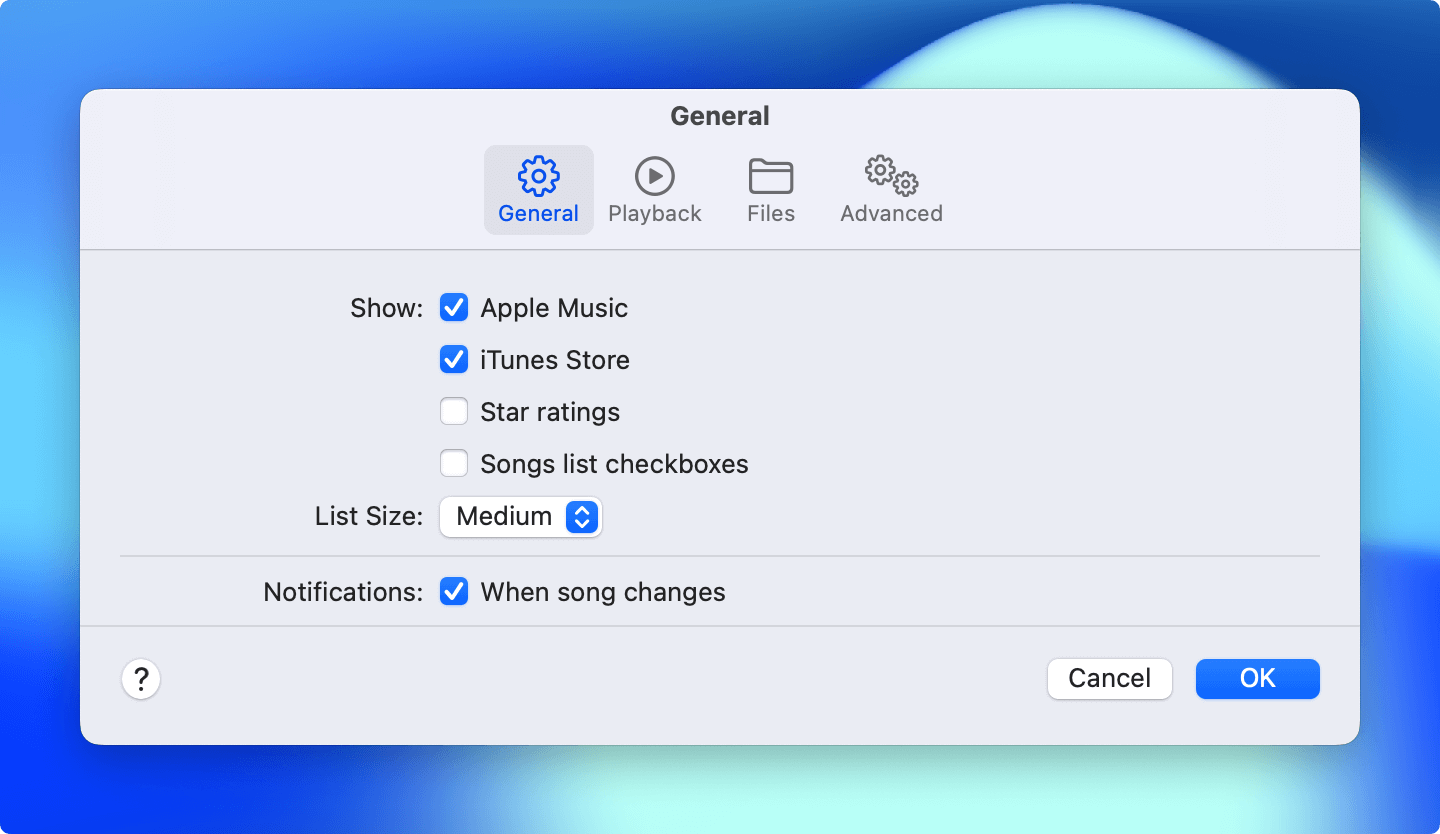
Step #1. Open your iTunes app or Apple Music and then go to “Library”. Choose the “Songs” button and immediately check is a checkmark next to the song.
Step #2. If there is no “check”, head to the menu and then click “Music”, then tick “Preferences” if you are using a Mac computer. Tick “iTunes” then “Preferences” if you are doing this on a Windows computer.
Step #3. Now, head to the “General” tab and then select “Songs list checkboxes”. Tick “OK” to finish.

We’ve presented here these solutions that we know would help you resolve this “iTunes songs greyed out” issue.
If you are using an iPhone or an iPad, you can also check the permission settings and have it fixed to finally play the greyed-out iTunes songs. You can follow the below guide to have it done.
Step #1. On your iPhone or iPad, go to the “Settings” icon.
Step #2. Find the “Screen Time” button and tick on it.
Step #3. Now, edit the permissions in this portion.
If still, none of the above gave you satisfaction regarding the solving of this “iTunes songs greyed out” issue, you can try contacting the Apple Support Team for help.
There is a portion on your iTunes app to report a problem and finally talk to one from the Apple Support team. You just have to select some important details to make sure you are reporting the correct problem.
You will be asked to provide your contact details including your full name, your e-mail address, and your contact number. You should be able to receive a call from them afterward.
If you wish to remove the DRM protection of the iTunes or Apple Music songs that you have, as mentioned in the first solution, we have an app that we recommend using. And important details about that app will be further highlighted as you continue reading the third section of this post.
If you wish to avoid experiencing this “iTunes songs greyed out” issue or any other iTunes or Apple Music issues, the best thing to do is to keep the tracks with you forever and have them streamed even in offline mode wherever you are and whenever you prefer listening to them.
As you may have known, Apple Music or iTunes songs are protected by Apple’s FairPlay protection. This is causing the difficulty of saving the tracks on any device and having them streamed offline. To remove this, a professional tool like the DumpMedia Apple Music Converter must be used.
Well, it’s true that there could be a bunch of professional converters that can do the same job but this portion will be highlighting lots of reasons why you should use this app over the others.
We actually have so much to talk about this app, DumpMedia Apple Music Converter, but we suggest you visit the official DumpMedia website for more details!
To sum it up, the “iTunes songs greyed out” issue is not really a difficult iTunes dilemma to solve. In fact, as we have presented here, there are a bunch of things that you can do to have this resolved right away. Also, do you know that you can keep any Apple Music songs that you love on your device forever? That’s what we presented in the third section.
