There are a lot of music streaming services in town. You can have Spotify, Tidal, Google Play Music, or Apple Music along your way and find the best song or type of music you wanted to listen to from the millions available.
If you are an Apple Music lover, you would want all those favorite songs played on any type of platform including Kodi. If you are a user of Kodi as well, you should be wondering by now why it cannot play those Apple Music songs you love.
If you are one of the many who have been looking for a way to play Apple Music on Kodi, you are too lucky to arrive on this page because we are about to present a solution to that in this article.
Contents Guide Part 1: Reason Why You Can’t Play Apple Music on KodiPart 2: How to Play Apple Music on Kodi?Part 3: Wrapping It All
Although Apple Music has been made available in many media players and platforms, there are still some players which do not support it. One of those is Kodi.
Unfortunately, up until now, there is no available plugin that allows people to play Apple Music on Kodi. This is why people keep on asking how they successfully play Apple music on Kodi.
If you are not a Kodi user, do you have any idea what this platform is? Check out some information below.
Kodi is an application that has been made available to the public in the year 2002. By then, it was known as Xbox Media Player. By the year 2003, this was developed and was called Xbox Media Center which has been maintained up until the year 2014 before it became popularized as “Kodi”. Kodi is an application that provides access to users to streaming media content such as music and videos.
In terms of music, Kodi is very much capable of playing content in MP3, AAC, and OGG format and comes with smart playlists with the capability of tagging different tracks. Talking about its ability to cater to movie files, Kodi could work with formats including ISO, 3D, and H.264. Apart from that, Kodi also supports television shows and streams even pictures.
Kodi has been developed to run on devices like Android, Windows, iOS, Linux, macOS, and Raspberry Pi. If you are not sure how you can run and set this up, the step-by-step guide is too easy to follow.
Apart from the above, you should also be aware that there is a range of add-ons that you can easily download and install for you to be able to access a wider range of file formats and other resources. If you are wondering if using Kodi is legal, the answer to that is an absolute “Yes”. You just need to ensure that those you are watching are not pirated content.
As initially mentioned, since Kodi does not support the playback of Apple Music songs, we will be helping you find the best solution to solve it. And that will be exposed in the third part of this post.

For you to successfully play Apple Music on Kodi, you should be using one amazing software application that can download and transform those songs to specific formats supported by Kodi. Let us know some ideas about the mentioned application.
DumpMedia Apple Music Converter is one of the many amazing tools created by DumpMedia, which has been known as one of the best in the industry offering great software applications for users.
Apart from having both audio and video converters, an offline video downloader, and a Spotify Music converter, it also introduced an application capable of transforming Apple music as well as audiobooks in several formats desired by every user.
Here are the features you can enjoy in the mentioned converter.
Here are the simple guides to use this DumpMedia Apple Music Converter.
Let us look into these three steps further.
Of course, we need to ensure that DumpMedia Apple Music Converter has been downloaded and installed on your personal computer. Once installed, open and launch the program. Once the program has been launched, iTunes will also be activated. No need to worry about this just proceed with the process.
Under the “Library” menu, tick “Music” if you wanted to copy the songs you have. Once done, you will now be seeing all the songs and playlists stored in your iTunes library. To be able to choose the songs to be downloaded and converted, you can either tick the checkboxes right next to each or make use of the search bar to easily find the specific songs you wanted to be downloaded.

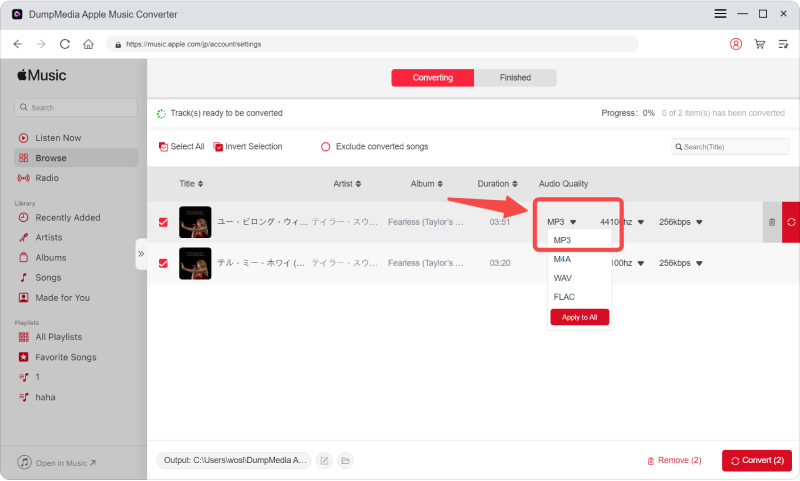
The next step that should be done is to perform the adjustments on the settings of the resulting output. You can choose any format from those that would be listed. The application supports many DRM-free formats including MP3.
This as well supports those in AC3, M4A, M4R, AIFF, FLAC, AU, and even MKA format. Selecting MP3 or any other format as the output format would, of course, depend on you as long as the resulting file will be playable Kodi.
The tool will also allow you to change other options such as the bit rate and sample rate. You can as well perform the renaming of the resulting file. In this step, you would also need to specify the output path or the target location wherein the files will be saved.

Upon completing all the adjustments wanted for personalization or customization, the final step would now be the conversion process. You can just hit the “Convert” button which is located at the bottom right corner of the screen.

Upon doing the above three easy steps, you can have all those Apple Music songs you love transformed and converted. You can have those shared with anyone or play on any device since DRM protection will be removed alongside conversion.
Once Apple Music songs have been made ready, the next thing you need to do is to add those converted files to Kodi. To do that, you must follow the below guide.
For you to add the songs to Kodi, you need to accomplish three simple steps as well.
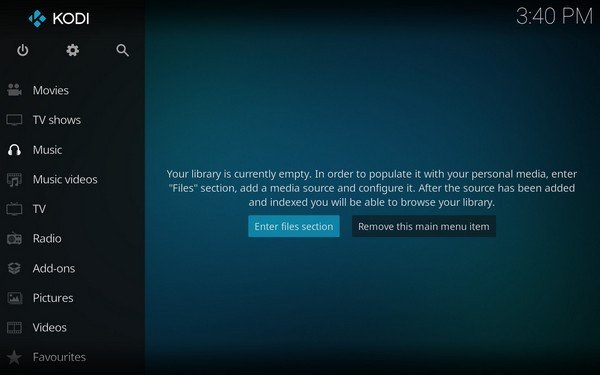
The first thing you need to do is to launch your Kodi application on your personal computer. Once you arrived at the main interface, you just need to head to the “Music ” section which you can find at the left panel. Once done, hit the “Enter files section ”.

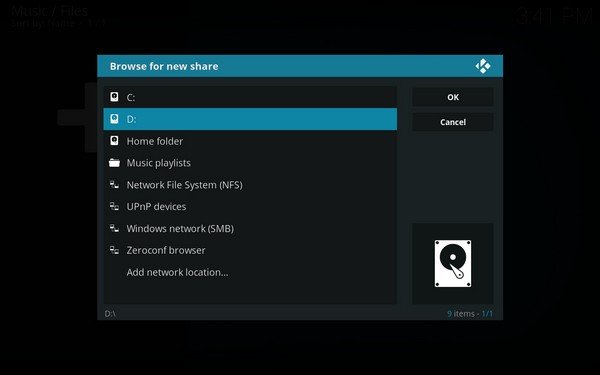
Once you have completed the first process, you need to click the “Add Music ” button and from there, a new window will pop up. This is the time wherein you got the chance to choose the converted music files you wanted to be added. You can look for the folder wherein those were saved.

Lastly, you can just hit the “OK ” button and finally play Apple Music on the Kodi application.
If you are one of the many Kodi lovers out there and an Apple Music lover as well, then finding this article should be helpful to you. In the above, we have explained the method you should use to finally play Apple Music on the Kodi application. We truly recommend the use of DumpMedia Apple Music Converter to transform those favorite songs of yours!
Apart from the above solution, can you offer another way to solve the case?
