Have you ever heard about smart speakers? Alongside with amazing innovations in the technology industry is the creation of powerful gadgets such as those mentioned. And, in the line of smart speakers, one of the most popular and most used is the Lenovo Smart Assistant Speaker.
If you happened to have one and if you are as well an Apple Music subscriber, this post is absolutely for you. In this article, we are to offer a guide on the easiest way you can stream Apple Music to Lenovo Smart Assistant.
Contents Guide Part 1: What Is Lenovo Smart Assistant Speaker And Its Functions?Part 2: How to Stream Apple Music to Lenovo Smart Assistant SpeakerPart 3: To Sum It All
A smart speaker has been introduced just lately and it has aided in the efficiency and enjoyment of users. Smart speakers gave way to people to enjoy and explore music to a higher new level. Imagine? You can get to listen and control the songs you will be listening to just with your voice.
How is that even possible? Well, the answer to that is that smart speakers are integrated with a wireless voice activation feature and virtual assistant software that captures the information requested by users. With these smart speakers, streaming music has been made easier.
As initially mentioned, the topic for this discussion, the Lenovo Smart Assistant speaker, is as well part of the smart speaker family.
The Lenovo Smart Assistant speaker is one of the many creations of Lenovo company. It has been announced in May of the year 2017 and released to the public the same month and year as well. It is one of the devices they created belonging to what is so-called “smart home appliance”. You can have any commands played into it as it uses “Alexa ” to accomplish all those.
Of course, there would be a need for you to use the Alexa companion application. If you wish to play music, turn on your lights, or even your to-do list, you can make use of this device. It is one of the largest competitors of Google Home and Amazon’s Echo.

This Lenovo Smart Assistant speaker has been integrated with 8 microphones which makes it easier for users since there are lots of portals making their commands highly heard and captured. It was created that way so that the device can clearly hear all commands at different angles and even at far distances.
Apart from these eight microphones, it also has a WiFi chip, an Intel processor, and standard speaker. If you wish to get to the next level, you can even have the improved version which comes with Harman Kardon premium audio speakers unlike the standard and universal speaker mentioned. You can have the gadget in several different colors such as gray, orange, or green.
However, although this Lenovo Smart Assistant speaker is very much amazing and contains a lot of features, it still has some drawbacks. What are those?
Sadly, Lenovo Smart Assistant speaker does not support the connection with any other device’ Bluetooth. It actually supports much music streaming services such as Pandora, Tidal, Amazon Music, Prime Music, TuneIn, and even Audible Audiobook but it does not support the Apple Music application.
Unfortunately, if you are an Apple Music application lover and you used to listen to songs using this music streaming service, you can’t have such songs streamed on your Lenovo Smart Assistant speaker directly. What are you going to do then? Well, even though you are subscribed and is playing a monthly fee, that still would not work.
So here is what you need to know – you need to find the best tool which will let you open the capability of having all your favorite Apple Music songs played on your Lenovo Smart Assistant speaker.

There are actually a lot of tools you can find whenever you browse and look over the web. If you just key in the keywords relating to the title of this post, you are surely going to see a bunch of tools consolidated in a list. If you are in look, the best that we recommend is this DumpMedia Apple Music Converter.
DumpMedia Apple Music Converter is a great tool which has the capability to remove the DRM (Digital Rights Management) protections of the Apple Music songs. Because Apple Music songs are DRM protected, it is impossible for users to download the songs directly and have those played on any other unauthorized devices. But, no need to worry about that.
In addition, with this DumpMedia Apple Music Converter, you can have as many Apple Music songs you wanted to be converted and downloaded for offline streaming! Plus, you got to have a way to share those songs with friends not worrying about file formats since this converter can also perform the conversion of files!
Now, if you ask on how you can simply make use of this, we are of course to discuss the steps needed in this post as well.
Here are the simple guides to use this DumpMedia Apple Music Converter.
Let us look into these 4 steps further.
Of course, we need to ensure that DumpMedia Apple Music Converter has been downloaded and installed on your personal computer. Once installed, open and launch the program. Once program has been launched, iTunes will also be activated. No need to worry about this and just proceed with the process.
Under the “Library” menu, tick “Music” if you wanted to copy the songs you have. Once done, you will now be seeing all the songs and playlists stored on your iTunes library. To be able to choose the songs to be downloaded and converted, you can either tick the check boxes right next to each or make use of the search bar to easily find the specific or certain songs you wanted to be downloaded.

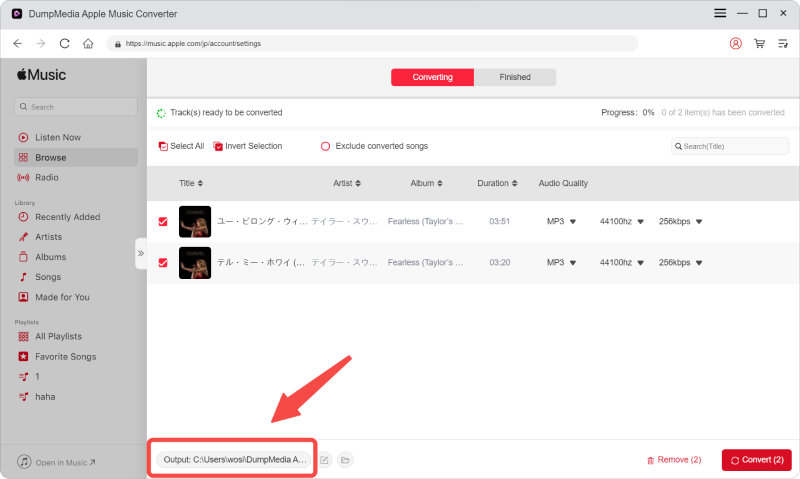
The next step that should be done is to perform the adjustments on the settings of the resulting output. You can choose any format from those that would be listed. The application supports many DRM-free formats including MP3. This as well supports those in AC3, M4A, M4R, AIFF, FLAC, AU, and even MKA format. Selecting MP3 as the format would be the best option for you.
The tool will also allow you to change other options such as the bit rate and sample rate. You can as well perform the renaming of the resulting file. In this step, you would also need to specify the output path or the target location wherein the files will be saved.

Upon completing all the adjustments wanted for personalization or customization, the final step would now be the conversion process. You can just hit the “Convert” button which is located in the bottom right corner of the screen.
After few minutes, your songs will now be converted and finally downloaded. In addition to this, alongside with conversion, the DRM (Digital Rights Management) protection mentioned will also be removed at the same time the file was transformed.

Once you have the converted songs, the next thing you need to accomplish is to have those uploaded and imported to your Amazon Music account (since this is supported by Lenovo Smart Assistant Speaker).
You can just open your account, head to the “Preferences ” button, go to the “General ” tab, and then tick the “Select Folder ” to finally choose and select the desired converted songs. Once upload has been completed, you can just simply look for the songs in the “My Music ” tab and enjoy listening to those using your Lenovo Smart Assistant Speaker.
This post had highlighted the easiest way you can resort to in order to finally stream your favorite Apple Music songs to your Lenovo Smart Assistant Speaker. Well, you only need to have an amazing software application to do the job. And, our best recommendation is this DumpMedia Apple Music Converter.
Do you also have a Lenovo Smart Assistant Speaker? Are you having the same difficulty (streaming Apple Music songs into it)? If you do, you can just use this article as guide and finally solve the issue!
