Are you thinking about how you can stream music from a computer to iPhone? That’s an easy task that you can do just with the tip of your fingers and some clicks on your keyboard. If you have been looking for a reference article to help you out, you opened the right page.
We’ll guide you in the thorough steps that you must follow. Owning an iPhone is surely a good thing but learning how to stream music from computer to iPhone or any other tasks might bother you in some way but that’s the reason why we are here.
To give you an overview of what to expect from this article, we want you to know that this post will highlight some apps to help you stream music from computer to iPhone and will explain how streaming can be done with the help of iTunes Home Sharing. Additionally, bonus information to have your Apple Music songs playable on any device will also be shared.
Contents Guide Part 1. Can I Stream Music from my PC to my Phone? Part 2. How to Stream Music from Computer to iPhone via iTunes Home Sharing? Part 3. Best Apps to Stream Music from Computer to iPhonePart 4. Bonus: How to Play Apple Music Songs on Any Device?Part 5. Conclusion
If you will be asking if you can stream music from your personal computer to your mobile phone, that is of course, possible! And it is so easy to do if what you own is a mobile Android device. This is because you can just do the plug-in and out method.
By just connecting your Android phone to your personal computer via a USB cable, you can easily copy the music files and then have them pasted and saved on your Android phone.
But the case would be different if you have an iPhone. With this, is it possible to stream music from a computer to iPhone? Well, that’s a “YES”. But how can it be done?
That is the main purpose of this post. As you go along and read the content of this article, you’ll know how to stream music from computer to iPhone via iTunes Home Sharing in the next part. If you are eager to find out more about the steps, jump out and head to the next section right away.
In this section, as mentioned, we will be sharing information on how to stream music from computer to iPhone via iTunes Home Sharing.
In this method, there is no need to install any other third-party software applications. What you only need here is to make sure your iTunes Home Sharing has been turned on. The installation would happen if you do not have yet an iTunes app on your Windows PC.
But if you own a Mac, the iTunes app is surely in it already. If you are a Windows user and you want to download iTunes, you just have to go to the Apple Store. Once everything is set, you just have to follow these steps to be mentioned in the next paragraphs.
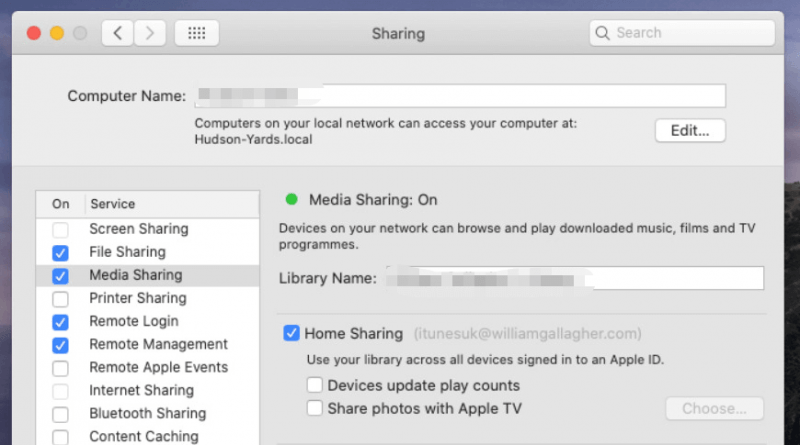
Step #1. You have to open and launch your iTunes app. On the main screen, look for the “File” button and then tick “Library” then make sure to tick the “Turn On Home Sharing” menu. By doing this, you are making sure that streaming wireless will be possible.

Step #2. After making sure that your iTunes Home Sharing menu has been turned on, you now have to go to your iPhone and then look for the “Settings” icon. From the options, choose “Music”.
Tick on it. Scroll down until you see the “Home Sharing” menu. After clicking the button corresponding to “Home Sharing”, you will be required to sign in using your Apple ID credentials. Just provide the information needed to continue.
Step #3. Now, you have to open your Music app. There is a drop-down button next to the song of your choice or the name of the artist. A new menu will be displayed wherein you’ll see “Home Sharing”. Tap on it to have it turned on. A music library will be shown. You have to option to choose which library you want to synchronize. After doing so, you can have the music on your PC played on your iPhone.
Isn’t it so easy to stream music from a computer to iPhone using iTunes Home Sharing? Why don’t you try doing it now?
Now, what if you find using iTunes Home Sharing a bit inconvenient? Is there any other method you can use to stream music from a computer to iPhone? We’ve got a list of apps to share in the third part so hop in and keep reading.
Understandably, many would find it a bit hard to use the iTunes Home Sharing feature to stream music from computer to iPhone. So, we prepared this section to highlight some applications that can let you do the same. Here are those.

With this WiFi2HiFi, your iPhone can be transformed into an audio receiver if you wish to use it as a device for streaming. You don’t have to worry about the cables lingering around (that you need to plug into your computer and iPhone). You can still stream music from a computer to an iPhone wireless!
Just install this WiFi2HiFi and you can just sit on your couch comfortably while listening to the music of your choice. Once downloaded and installed, after opening your personal computer, this application will automatically detect your iPhone and you can stream all the audio on your computer’s library.
Apart from WiFi2HiFi, there is also this app named “Simplify”. To use the app, you just need to download the software and then have it installed on your PC. Launch it afterward. You will be required to agree to its license before you can proceed with the use of the app. Just tick the “I Agree” button.
You will be asked about your screen name and password. Just sign in or tick the option to create one. Provide all the details needed to have an account.
After successfully doing it, a pop-up screen will appear. The music folder on your PC is automatically selected. You are also allowed to have your iTunes playlists shared. There is a check box corresponding to it. Just provide a checkmark if you want to. Once done, tick the “Save” button. There would also be a need to enter your email address.
The app will scan your directories and once done, you just have to click “Next”. Another window will be displayed wherein you just have to click the “Done” button. You also need to have the app on your iPhone and then establish the connection.
Once the connection has been established, you can see all the songs on your PC’s music library on your iPhone. You just have to play and stream them!
You also got this “Signal” app. This can also help you stream music from your computer to your iPhone. It can make your iOS devices turned into a wireless remote control for the iTunes application on your Mac PC or even for the Windows Media Player on your Windows computer. With just your fingertip, you can control the playback of tracks and even search in your library. Editing of playlists is possible as well!
Upon knowing so many details about how you can stream music from computer to iPhone, we are offering here some bonus notes for you. Do you know that you can even play Apple Music songs on any device that you own? That is possible if you got a partner with you!
Yes! With apps like DumpMedia Apple Music Converter, offline listening to Apple Music songs is possible as well as having them available not only on your PC but on other gadgets that you own.
The DumpMedia Apple Music Converter is one of those great third-party software applications that let you enjoy Apple Music tracks offline. It can remove the Apple Music songs’ DRM protection. Thus, allowing access to tracks on any device. This also works too fast at 10X level faster than the other converters out there.
Apart from being a converter that supports multiple output formats, it can also act as a powerful audiobook converter. So, if you happen to be fond of listening to audiobooks and you wish to transform them to a different format, the app can be a good help to you.
When it comes to the interface, the DumpMedia Apple Music Converter has a simple one! Even if you are going to use it for the first time, you’ll surely easily understand how it works. Plus, the whole conversion procedure is so easy.
Here’s an overview for your reference.
Step #1. Complete all the requirements needed to proceed with the installation of the app on your PC. Visiting the official website of DumpMedia should help you out. Listed here are the things you need to complete. Proceed with the installation properly and then launch the app. You can now begin selecting which Apple Music to convert.

Step #2. You now have the option to choose which of the supported output formats you wish to utilize. The drop-down menu in the “Output Format” section will show you the options. Added to this, you’ll notice as well that there are areas wherein you can alter the settings of the output files.
Set it up the way you want to. It is always suggested to provide an output path for easy access to files after having them converted (although you can see a preview of the processed files under the “Converted” section).

Step #3. Simply tick the “Convert” button and the app will eventually do the converting job. The removal of the DRM protection is simultaneously being done with the conversion. After a while, the converted files will be ready and saved on your PC under the path you initially defined in the second step.

You can now enjoy the Apple Music tracks (converted and downloaded) on any device you own! Play them offline anytime!
By just referring to the second and third parts of this article, you can immediately stream music from your computer to your iPhone! There is this iTunes Home Sharing that you can utilize as well as other apps that you can download.
After sharing this information with you, we are also glad to even highlight a good app, the DumpMedia Apple Music Converter in the previous part. If you know any other methods to help stream music from computer to iPhone, we’d love to read some thoughts in the comment section!
