Are you also looking for a YouTube to Apple Music converter to use? We can’t deny how amazing the YouTube app is. If we are to talk about video streaming, YouTube is one of the best. It is popular with people around the globe because it is totally free of use (well, you can now get the premium version and avoid seeing ads).
The good thing with YouTube is it is not only a platform intended for people who like watching videos. There is actually this YouTube Music. This was developed for music enthusiasts to see and browse libraries from YouTube containing music of different genres. Apple Music, on the other hand, is a paid music streaming platform wherein you can get to enjoy songs after purchasing them from the store or subscribing to the paid version.
Since YouTube is free of use, there are surely songs from YouTube that you wish to be streamed on your Apple Music app. With a YouTube to Apple Music converter, you’ll be able to do that. So, continue reading to learn more about YouTube to Apple Music.
Contents Guide Part 1. Differences between YouTube Music and Apple MusicPart 2. How to Download YouTube Music for Apple Music?Part 3. How to Transfer YouTube Music to Apple Music?Part 4. Bonus: How to Convert Apple Music to YouTube MusicPart 5. Summary
Before you learn how to convert Apple Music to YouTube Music, it's wise to have a second look at the differences between YouTube Music and Apple Music. YouTube Music and Apple Music are both popular streaming platforms, but they have some key differences.
1. Content: YouTube Music offers a vast library of official songs, albums, playlists, and artist radio, as well as a vast catalog of user-generated content such as covers, remixes, and live performances.
2. Integration with YouTube: YouTube Music is closely integrated with the regular YouTube platform, allowing users to seamlessly switch between music and music videos.
3. Personalization: It uses Google's recommendation algorithms to offer personalized playlists and recommendations based on user's listening habits.
4. Subscription Tiers: YouTube Music offers a free ad-supported version and a premium subscription with additional features such as ad-free listening, offline playback, and background play.
1. Content: Apple Music also boasts a large library of songs, albums, playlists, and radio stations. It includes exclusives such as music releases and content from the Apple Music 1 radio station.
2. Integration with Apple Ecosystem: Apple Music is tightly integrated with the Apple ecosystem, including Siri voice control, HomePod support, and seamless integration with iOS, macOS, and other Apple devices.
3. Curated Content: It features human-curated playlists and exclusive content like documentaries, concert films, and other original programming.
4. Subscription Tiers: Apple Music offers a similar premium subscription model without a free ad-supported tier.
In summary, while both platforms offer extensive music libraries and premium subscription options, YouTube Music emphasizes user-generated content and YouTube integration, while Apple Music focuses on its integration with the Apple ecosystem and exclusive content. Users' choices may depend on their preferences for content curation, platform integration, and the types of content they enjoy.
Browsing through your web will suggest a bunch of YouTube to Apple Music converters but how sure are you that the first search result will give you the best output? This is a bit challenging at some point unless you research and compare one app with the others.
Applications like TunePat YouTube Music Converter can help you export those YouTube music files that you like to have added to your Apple Music library. It can help you save YouTube songs in several different output formats like FLAC, AAC, WAV, MP3, and more. Here’s how you can use it.
Step #1. You need the TunePat YouTube Music Converter to be installed on your computer first. Once you have it, launch the app and then tick the “Open YouTube Music Web Player” that you shall see right away once you open the app. Sign in to your YouTube Music account to see your library content.
Step #2. Head to the “Settings” portion wherein you will be setting up the output format of your YouTube Music to a format supported by Apple Music. You can also have the other options customized – like bit rate, sample rate, and others.
Step #3. Now look at the YouTube songs you wish to be added to Apple Music and then just tap the “Add to list” button. Once done, tap the “Convert Now” option.
Step #4. You can see all the converted files once you head to the “History” section. There is this folder icon that you can see on the screen. By tapping it, you can see the list of the songs stored on your computer.
Here, we will be sharing a free YouTube to Apple Music converter. Apart from what we shared in the first part; you’ll get to know another app to use in this section. We will be presenting this YouTube Video Downloader for Free.
It is a user-friendly program with an easy interface. You can have any YouTube Music downloaded with just a few clicks from your keyboard. Take a glimpse of the whole procedure of converting YouTube to Apple Music.
Step #1. Get the YouTube Video Downloader Free and have it installed on your computer and then just launch it once installation has been completed.
Step #2. Once you see the interface, a button for “Settings” can be seen right away in the upper right section wherein you can have some options customized as you like including the output path.
Step #3. You have the option to put the name of the specific music you wish to download or just paste the link of the song. After doing so, tap the “Enter” button on your keyboard.
Step #4. The downloading process will start once you tap the “download” icon.
Once the downloading process ends, you can tap the “Library” portion. This is where you will find all the audios or videos that you downloaded from YouTube. After using this free YouTube to Apple Music converter, you have to perform the procedure to finally add the YouTube Music downloaded to your Apple Music library. Here are the steps that you need to perform.
Step #1. Open the iTunes app on your computer and then log in to your Apple Music account.
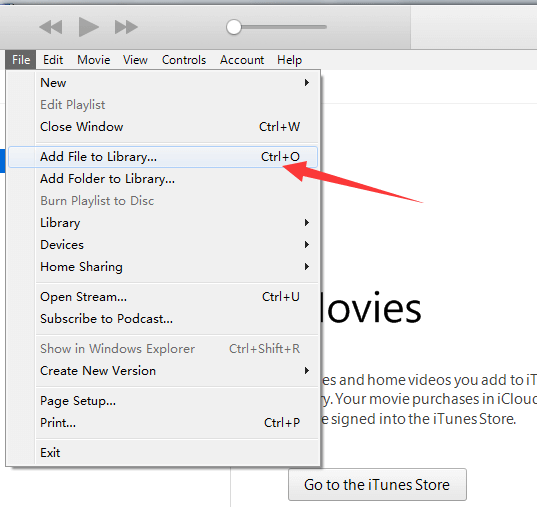
Step #2. Tap the “File” button and then choose the “Add File to Library” menu. Afterward, choose the YouTube Music files that you just downloaded.

As simple as that, you can have all the songs saved to your Apple Music library. If you have a bunch of YouTube Music songs downloaded, you can just follow the same procedure to have them made available on your Apple Music library.
Apart from getting songs from YouTube Music through a good YouTube to Apple Music converter, here, you will also learn a lot about the DumpMedia Apple Music Converter. This is a converter that lets you process Apple Music songs and convert them to a format that you like (depending on the supported ones).
It is totally compatible with both Windows and Mac computers so if you wish to install them on the PC you are currently using, there would not be issues with compatibility.
This is an app that works at a pretty fast speed while keeping the 100% original quality of the songs and their ID tags. It also lets you customize the output profile settings and change some options as you wish. You can have your Apple Music songs converted to flexible formats like MP3, WAV, AC3, AAC, and more.
Apart from being an Apple Music Converter, the DumpMedia Apple Music Converter is also a powerful audio converter. If you are into audiobook streaming, you can also use this app to transform the audiobooks that you have into another output format. It supports AA, AAX, and M4A formats.
More so, it helps with DRM protection removal making it possible for you to have the files streamed on any device or saved forever on any storage drives that you like.
Once you subscribe to it, you have a one-month refund policy. More so, you can actually try the app first before subscribing. Of course, this DumpMedia Apple Music Converter is easy to use as it has functions that are easy to understand as well. For your reference, here is an overview of the procedure you must perform to convert and download Apple Music songs using this DumpMedia Apple Music Converter.
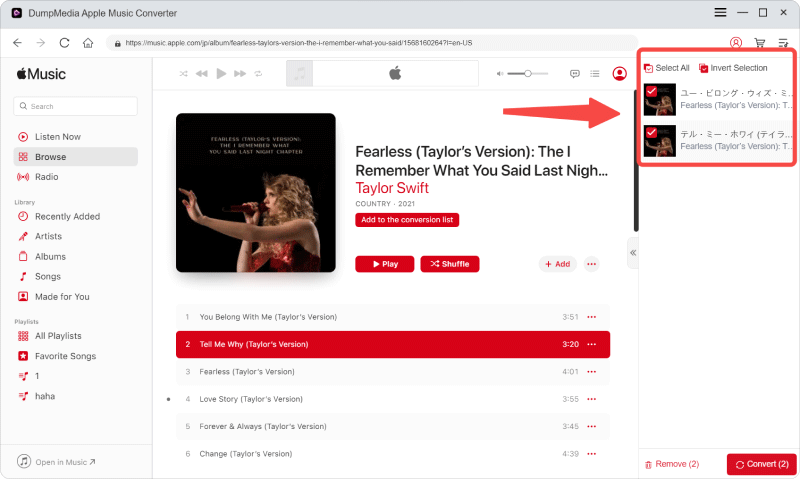
Step #1. Complete all the needed requirements prior to the installation of the DumpMedia Apple Music Converter. If you aren’t aware, you can find the detailed list of the things you need on DumpMedia’s official website. Launch the app once done installing it. Start selecting and previewing the Apple Music songs to be converted and downloaded.

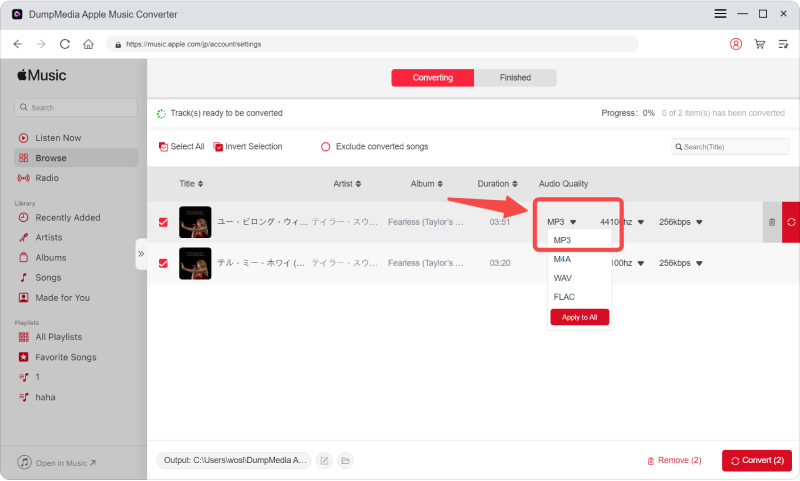
Step #2. Choose an output format to use and modify the output profile settings as you wish. Options are displayed at the bottom portion of the main interface.

Step #3. Once you hit the “Convert” button at the bottom area of the screen, the app with start the conversion process as well as the DRM removal procedure. This will only take a while as the app works at a fast speed.

Since the app will remove the DRM protection of the Apple Music songs chosen, you can have the songs played on any device or media player already or transfer and share them with others.
Apart from highlighting a YouTube to Apple Music converter in this part of the article, we’re glad to share an app that helps you with Apple Music conversion, the DumpMedia Apple Music Converter. This app is totally useful and, in the future, if you find the need to have your favorite Apple Music songs converted to another format, always remember to use this DumpMedia Apple Music Converter.
It is good to know that there are several YouTube to Apple Music converters that you can use to export or get the YouTube Music files that you like to add to your Apple Music library. There are paid versions as well as free apps that you can utilize.
Moreover, after having them downloaded, it is also a relief that they are easy to import to Apple Music via the iTunes app. Apart from discussing good YouTube to Apple Music converters, we do hope you also learned a lot about an app that can aid with Apple Music song conversion, the DumpMedia Apple Music Converter.
