It’s worth giving Apple Music a try. With their free trial, you can easily see for yourself what this particular music streaming service has to offer. Needless to say, they do have a lot to offer. You’d be missing a lot if you didn’t give it a try.
Here’s how to get Apple Music free trial so that you can easily gain access to 50 million songs.
Contents Guide Part 1. How to Get Apple Music Free TrialPart 2. How to Keep Apple Music after Free TrialPart 3. Conclusion
It’s a fact that Apple Music is one of the most popular music streaming services. Some folks out there would probably consider it the best. That’s a pretty valid consideration. If you look at Apple Music, it’s hard to beat what it can offer.
If you want to see what they can offer, you can go for their three-month trial. The steps below will show how to get Apple Music free trial for three months.
Before you download Apple Music, you need to make sure that the device you’re using is updated. If you’re using an Apple device make sure you’re on the most current macOS. If you’re using Windows, make sure your iTunes is the latest version.
On an Apple mobile device, you just need to tap the icon of the Music app to launch Apple Music. If you’re using your desktop, go to iTunes and tap For You.
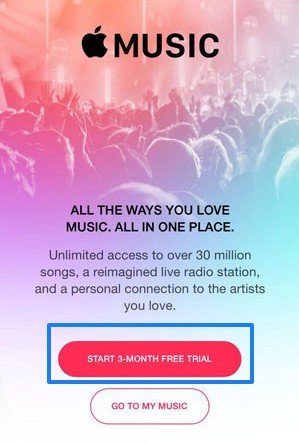
Once you open the Apple Music app, you will be brought to a page where you will see two options. These two options are Start 3-Month Free Trial and Go To My Music. Choose the former.

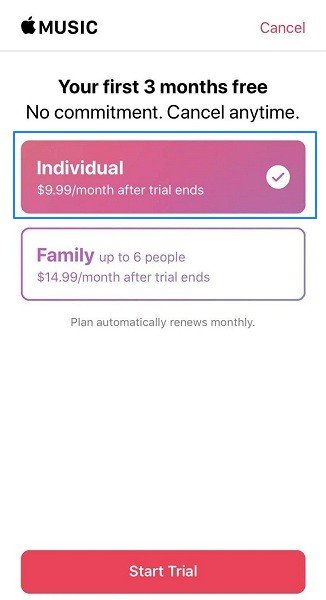
You will be brought to a new page where you would have to choose between a family membership or an individual plan. Choose the Individual Plan.

Keep in mind that the Individual Apple Music Plan is priced at $9.99. What this means is that when you end your three-month trial, you will automatically be charged that amount if you don’t cancel your subscription.
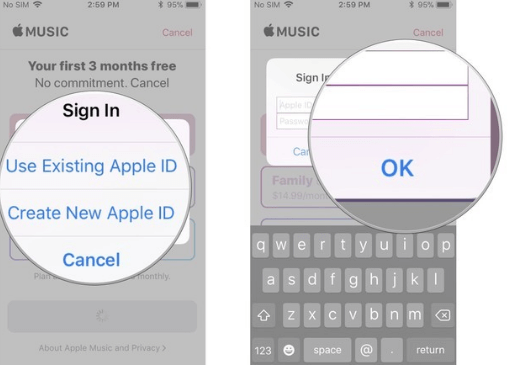
You will have to fill in your Apple credential on the next page. You would have to enter your Apple ID and password. If you don’t have an Apple ID yet, you can also create it on this page.
Once you have filled in your Apple credentials, you will be brought to a new page where you would have to fill in payment details. You would need to put in a credit card to finish signing up for a free trial.

When you’re all done, make sure to confirm payment details. That means you will automatically be charged after the three-month trial.
Tip: In case you will have other problems with Apple Music, we have found some solutions for you, check if you can solve your question is in this link: https://www.dumpmedia.com/tricks/apple-music-problems.html
If you want to extend your three-month free trial to six months, then you can opt for the Family Sharing Plan. However, you would have to get one of your family members to sign up so that you could be included in the group.
You could resort to this process after your three-month free trial ends. Keep in mind that after the free trial ends, you will automatically be charged since you have put your credit card already in the billing details. And if you cancel Apple Music, all downloaded songs will lose. So you need to learn how to keep the songs.
If you don’t want to pay for Apple Music, knowing how to get Apple Music free trial is the first step, and then learn various ways to save the songs from your free trial. Let's look at three options below to consider.
Three months is long enough for you to have a feel of Apple Music. Even after a month, you’re probably decided that you want to stick to Apple Music. The thing is, what if you don’t want to pay for it? Paying a monthly subscription is no joke.
You can do away with the monthly subscription with the DumpMedia Apple Music Converter. This program will help you save all your favorite songs from Apple Music by converting and downloading them so that you could play them anytime and anywhere.
This particular program makes it very easy for you to transfer the downloaded songs to other devices since it removes the DRM.
So, while you’re on your free trial, make sure to use it to start saving all the songs that you love. The steps below will show you how you can use it.
You can download this particular program by clicking on this link. Install and launch it soon as you’re down downloading it.
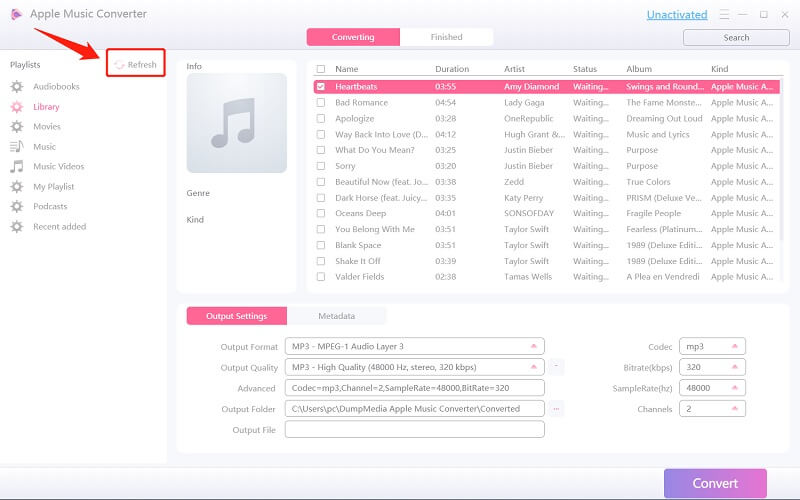
One of the awesome things about this particular program is that it’s very easy to use. Adding songs is as easy as clicking on the Music icon you see on the left-hand side of the screen. Once you click on it, you will see all the songs from your Apple Music on the main screen.

Go ahead and adjust the settings of the output on the bottom part of the screen. Take your cursor to the Output Setting area. You will easily see this area since it’s labeled Output Setting. Choose a location for your songs and most importantly, choose a file format for your output.

Once you’re all done with the output settings, click on the Convert button you see on the right, bottom part of the screen. The moment you click on it, all the songs will be converted and downloaded to your hardware.

Don’t forget to cancel your Apple Music subscription to avoid charges after the free trial ends. That is how easy it is to use the DumpMedia Apple Music Converter.
There is a mod version that you can also use to enjoy songs from Apple Music for free. Although they will not save the songs for offline listening, you will be able to listen to them for a very long time. You can access this mod version from Ogapps.com.
The DRmare Audio Converter can also be used to save the songs from your Apple Music free trial. The steps below will show you how to use it.
Tip: If you are looking for a playlist for your Apple Music, you can select one in this article.
You can now easily avail yourself of the free trial of Apple Music. You now know how to get Apple Music free trial. You just have to keep in mind that Apple will automatically charge you after the free trial. So, if you don’t want that to happen to you, use the DumpMedia Apple Music Converter now and cancel your subscription afterward.
Are signed up with Apple Music? How do you download your favorite songs? Our readers would love to hear from you.
