“I have been thinking about what method of how to add Audible books to iTunes I should try. Can you help me check the available options?”
Audible is one of the best music streaming applications that has been introduced to the public. There is no doubt that audiobook lovers will keep their subscription because Audible offers great perks and advantages. If you have been using the Audible app, surely, you already have lots of audiobooks downloaded under your account. The same with other Audible subscribers, are you also thinking about some ways how to add Audible books to iTunes?
People ought to find methods of how to add Audible books to iTunes due to a bunch of reasons. Some users prefer the interface of the “Books” app under iTunes compared to Audible’s. Others just like keeping all their downloaded Audible audiobooks on their iTunes library while some just won’t like to download the app and use existing apps like iTunes. Don’t worry, there are several ways that you can do to sync those downloaded Audible audiobooks to your iTunes library. We’ll share all those in this post.
Contents Guide Part 1. Add Audible Books to iTunes Using Audible AppPart 2. Add Audible Books to iTunes Use Audible Download ManagerPart 3. Download Audible Books to iTunes on MacPart 4. Import Audible Audiobooks into iTunes Without LoginPart 5. Summary
There is this app named “Audiobook from Audible” that is available for Windows users. This is very useful when it comes to downloading audiobooks even to iOS devices and syncing those to iTunes for streaming using the “Books” app. This is one method of how to add Audible books to iTunes. To use this method, simply follow these steps.
Step #1. Of course, you need the “Audiobook from Audible” app to be installed on your Windows computer. Use this application to download those Audible audiobooks that you wish to transfer to your iTunes app.
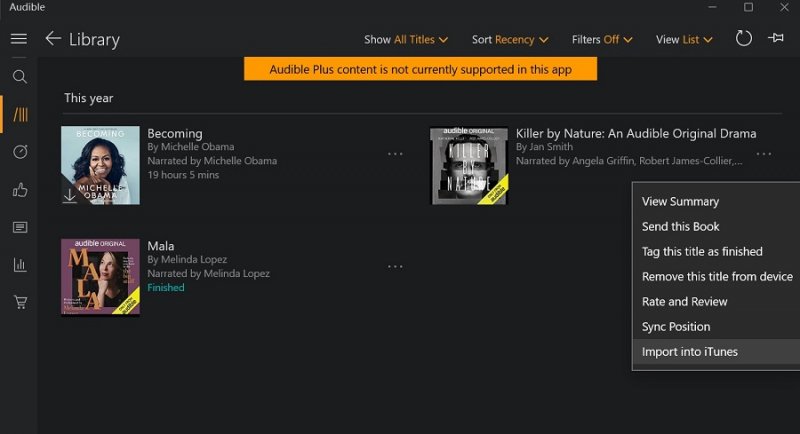
Step #2. Don’t get rid of your Audible app yet as you still need that in this step. Launch the app and then hit the “Library” button. You shall see right away the list of all your audiobooks (in the right window).
Step #3. Look for the audiobook that you like to transfer and then tick the “three-ellipse” icon that you will see alongside the book. A drop-down menu will be displayed. Choose the “import into iTunes” option from the list.
Step #4. You must activate your iTunes first to continue. Tick the “OK” button on the menu that will show up. You will be asked to enter your password to sign in. By doing this method, your iTunes and Audible account will be connected. Afterward, you’ll be able to see that the chosen Audible audiobooks were now imported to your iTunes library.

You just have learned one method of how to add Audible books to iTunes in this part, brace yourself, we still have three more to share in the next sections.
In the process of how to add Audible books to iTunes, you can also utilize “Audible Download Manager”. We will explain further the whole procedure of using this method below.
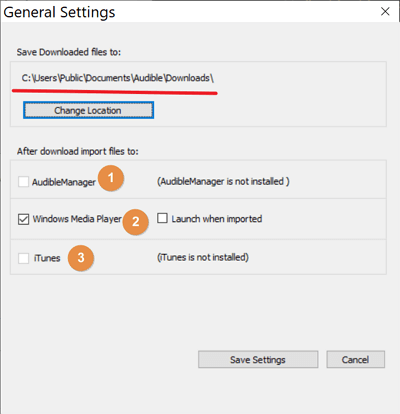
Step #1. You need to install the Audible Download Manager on your computer first. Hover your more to the “General Settings” section. There is a need to confirm that you chose “iTunes” under the “After download import files” menu.
Step #2. You have to log into your account on the Audible website. After seeing which audiobook you wish to be downloaded from your library, hit the “Download” button.
Step #3. A window popup will be shown on your screen asking you to perform the authorization of your computer. Continue by tapping the “OK” button. After doing so, the chosen Audible audiobook will then be added to your iTunes library.

The two methods of how to add Audible books to iTunes that we have presented in the first two parts only apply if you are using a Windows computer. For Mac users, the “how to add Audible books to iTunes” process is too simple as they can directly download the Audible audiobooks either from the app or from the website.
You can follow the below steps to download your favorite Audible audiobooks to your iTunes library on your Mac PC.
Step #1. On your Audible app, hit the “Library” button and then search for the Audible audiobook that you wish to sync to your iTunes app. Hit the “Download” button next (this is just under the “Other Actions” menu). Afterward, you will notice that the .aax file will then be downloaded.
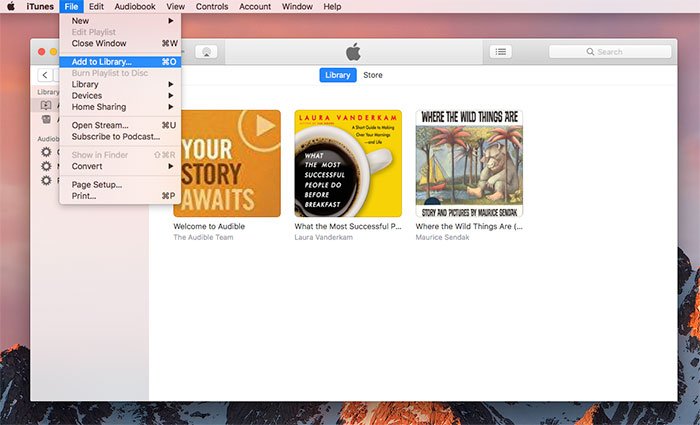
Step #2. After downloading the AAX file, you have an option to open it on iTunes or manually add it to your iTunes library. Launch the iTunes app, select the “File” button, then tick “Add to Library”. Browse the folder wherein you have saved the Audible audiobook.
Step #3. You will be required to authorize your iTunes app to play those audiobooks from your Audible account. A two-factor authentication (if enabled) will be required to proceed or, if you have another Amazon account, you can also use the verification code that will be sent to your account.

As simple as following the above three steps, you can have your favorite Audible audiobooks added to your iTunes library using your Mac computer.
All the previously discussed “how to add Audible books to iTunes” processes will work perfectly if you have an active Audible account that’s registered under a subscription plan. Now, what if it happens that you have received lots of Audible files that you want to add to your iTunes library but unfortunately, you don’t have access to the sender’s account? What if you have a bunch of Audible audiobook files but you suddenly forgot your login information? How can you add Audible books to iTunes then?
The mentioned concerns are actually very easy to solve. With the right tool, you shouldn’t have any more issues. Professional software applications like the DumpMedia Audible Converter will be a very great help. It is a very useful converter that lets you convert the AA / AAX files you own to the most flexible file formats such as MP3. Apps like this also have this special feature that lets the users remove the DRM encryption of the Audible files.
If you have been using the Audible app, you are surely very aware that those audiobooks are protected files. Thus, you can’t access them on all devices if protection won’t be removed. During the transformation of the Audible audiobooks via this DumpMedia Audible Converter, you can also assure keeping lossless audio quality ensuring an amazing audiobook streaming experience while keeping the audiobooks’ ID tags and chapters.
This app also works at a very notable speed helping you save some time. Of course, this is also very easy to use. To show you how to add Audible books to iTunes through the help of this DumpMedia Audible Converter, you can just follow the below simple procedure.
Step #1. Visit the official website of DumpMedia to check out the list of the requirements for installation. After completing those, proceed with the installation process and then launch the app. On the main page, you can start adding the Audible audiobooks to be converted by tapping the “Add Files” button or dragging and dropping the audiobooks. You can process a number of Audible audiobooks in one go so adding a lot is acceptable.

Step #2. You can now customize the output setting parameters. You can modify some options under the output settings if intended. Make sure that you have set the output format to MP3 and that an output folder has been defined already.

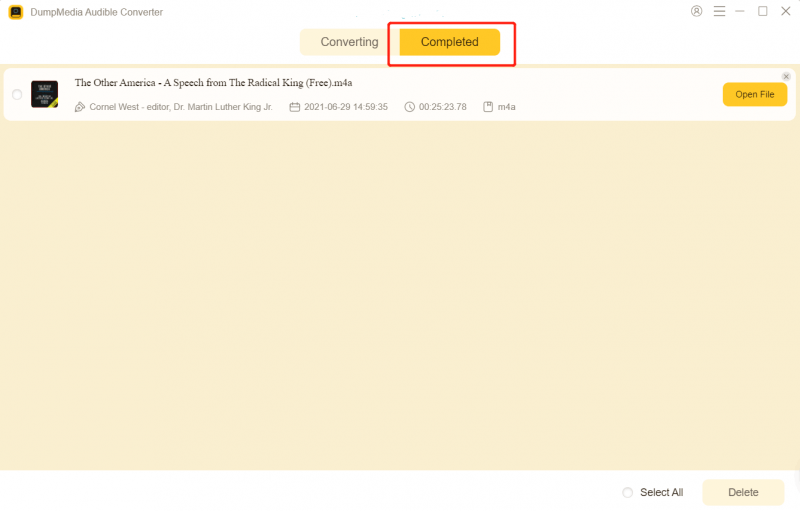
Step #3. The app will start converting those Audible audiobooks uploaded once the “Convert” button has been tapped. Also, the DRM removal procedure will be done by the app simultaneously.

In just some minutes, you shall expect the transformed Audible audiobooks to be readily available on the output folder that was defined in step 2. Since those are already DRM-free, you can now manually add them to your iTunes library! What is even better here is that you can also access the files on any device or media player or just save them on external drives for forever keeping!
There are really a bunch of methods of how to add Audible books to iTunes. You can do this if you have an active Audible subscription or even if you don’t (through the help of professional apps like this DumpMedia Audible Converter.
If you have further questions about the procedures presented, the team is more than willing to give you answers. Leave your queries in the section below and we’ll surely get back to you!
