In today’s digital age, taking screenshots is an essential skill for capturing important information, sharing content, or documenting issues. If you're using an HP laptop or desktop, you might be wondering how to easily take screenshots on your device. This guide will walk you through the different methods of how to screenshot on HP laptops and desktops, ensuring you can efficiently grab and share any screen content you need.
Contents Guide Part 1. Why You Might Need to Take a ScreenshotPart 2. How to Screenshot on HP Laptop and Desktop: Basic MethodsPart 3. Summary
Before we get into the details, let’s talk about why it’s important to know how to take a screenshot. Screenshots can be used to:
Here are two different ways to take a screenshot using the Print Screen Key:
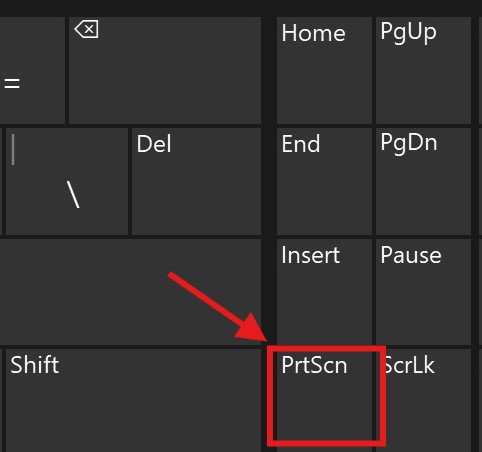
Step 1. To take a screenshot, press the PrtScn key, which is often found in the upper right corner of your keyboard.
Step 2. You copy the whole screen to your clipboard.
Step 3. Paste the screenshot (Ctrl+V) into an image editing tool (such as Paint or Photoshop) to edit or save it.
Step 4. You can edit and save the screenshot that was taken using Microsoft Paint.
Step 5. Although this process is simple, there are extra steps needed to save the image.
Step 1. Press PrtScn and the Windows key at the same time.
Step 2. If the capture is successful, your screen will momentarily darken.
Step 3. Your "Pictures" folder's "Screenshots" folder is where the screenshot is automatically saved.
Step 4. If you want to store rapid catches right away, this method works well for you.
There are two screenshot tools that come with the Windows system:
Snip & Sketch is a versatile tool available for capturing screenshots on Windows, offering more flexibility than the basic Print Screen function.
Step 1. Hit the Windows key + Shift + S simultaneously.
Step 2. Your screen will darken and the cursor will transform into a crosshair.
Step 3. Click and drag to highlight the area of the screen you wish to capture.
Step 4. The screenshot will be copied to your clipboard, and a notification will pop up.
Step 5. Click on the notification to access Snip & Sketch for further editing and saving.
Step 6. Within Snip & Sketch, you can add annotations, crop, or make other adjustments to your screenshot before saving it.
While Snip & Sketch is the newer tool, the classic Snipping Tool is still available and useful for many users.
Step 1. Search for “Snipping Tool ” in the Start menu.
Step 2. Click “New ” or press Ctrl + N to create a new snip.
Step 3. Choose from rectangular, free-form, window, or full-screen snip.
Step 4. Select the area you want to capture.
Step 5. Save the screenshot as a PNG or JPEG file.
Step 6. The Snipping Tool also allows for basic annotations before saving.
Some HP laptops include a built-in screenshot tool; the instructions are as follows:
Step 1. Check your keyboard for a camera icon; it may allow you to take a screenshot immediately.
Step 2. If so, press the function key with the camera symbol to take a screenshot.
Step 3. This built-in tool may have capabilities like real-time saving and cloud uploading.
The three methods mentioned above are all affected by the device and may not be applicable to every device, but the third-party software mentioned now is not affected by the device. It is applicable to various models of devices as long as you are using Windows or macOS. This is DumpMedia Screen Recorder.
Free Download Intel Mac M-Series Mac Free Download
Applicable systems are as follows:
Windows OS: Windows 11/10/8.1/8/7/Vista/XP (32 bits & 64 bits)
Mac OS: Mac OS X 10.12 or above (macOS Ventura)
The steps are as follows:
Step 1. Download and Install
Click the download button to download the program and install it on your computer for free.
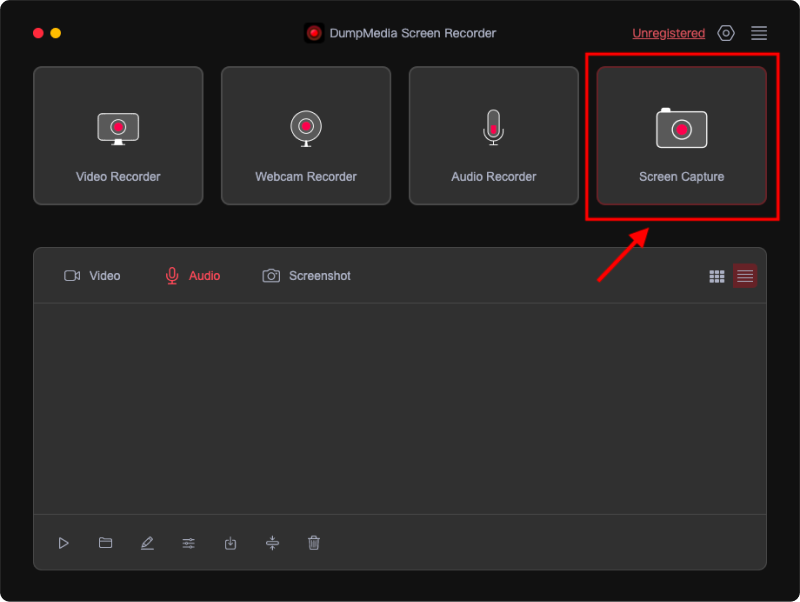
Step 2. Launch and Select Capture
Open the program and select the screen capture option.
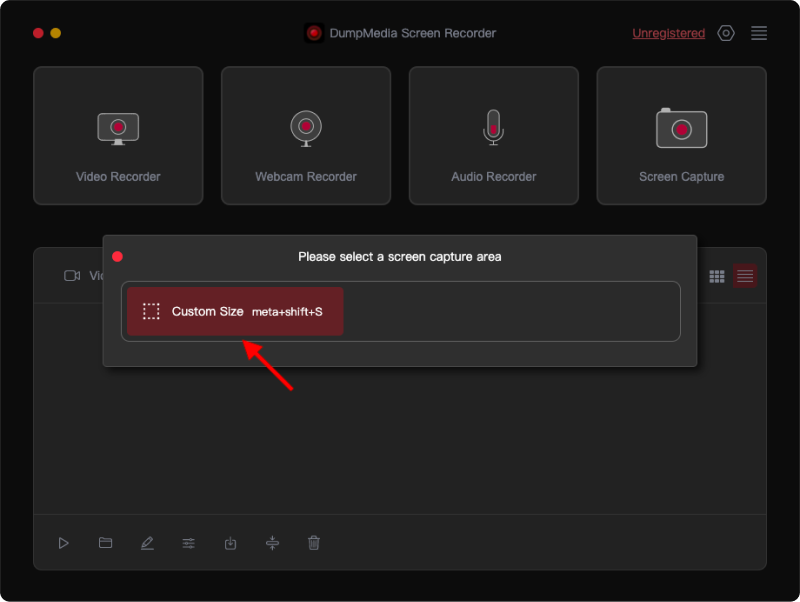
Step 3. Set Custom Size
Click on the "Custom Size " option to choose a custom size. Hold down the left mouse button and drag to select the desired area. Release the mouse button to reveal a panel with editing tools.
Step 4. Complete the Capture
Click the check mark to finalize the screenshot, which will be automatically saved to your computer. To copy the screenshot to your clipboard and save it simultaneously, click the Copy button. To discard the current screenshot and take another, click the Cancel button.
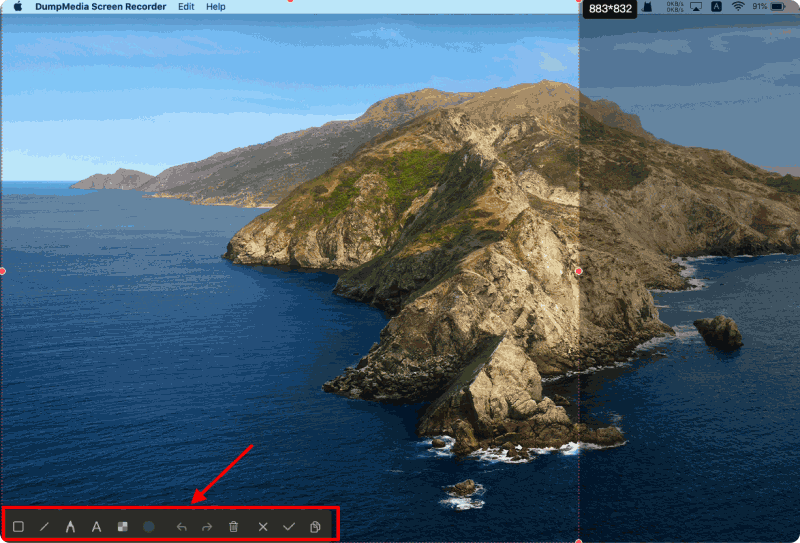
Step 5. Edit Screenshots
Use the toolbar’s annotation tools to edit your screenshots. Tools include lines, circles, rectangles, triangles, arrows, text, brushes, and erasers.
In conclusion, taking screenshots on an HP laptop or desktop is an essential skill that can be achieved through several convenient methods. Whether you opt for the basic Print Screen function, utilize Windows tools like Snip & Sketch or the classic Snipping Tool, or choose to use third-party software like DumpMedia Screen Recorder, each method offers unique advantages to meet your specific needs.
From capturing your entire screen to selecting specific areas, you can easily document important information, troubleshoot issues, or share content with others. By mastering these techniques, you'll be well-equipped to efficiently capture and save any screen content on your HP device.