
Spotify has always been a good idea as a music streaming service for anyone. Having subscribed to a Spotify premium is a habit for most music and Spotify lovers. Once you have subscribed, you are allowed to enjoy the feature of downloading your most-loved songs.
However, although you can enjoy songs offline, there is still a problem to burn CDs from Spotify. Many users who are fond of both Spotify and CDs have been complaining about such concern. And, if you are one of those who have been facing such difficulty, you are lucky enough to have seen this post.
Contents Guide Part 1. Reason Why You Can’t Burn CDs From Spotify DirectlyPart 2. How to Burn CDs From SpotifyPart 3. In Summary
Do you have an idea why you are experiencing such an issue? Here is why.
If you are not that aware, Spotify songs are encrypted by protection named Digital Rights Management or DRM is what most know, which hinders one to play songs and transfer those to other unauthorized devices and gadgets. This is the main reason why you can’t have your Spotify songs burned directly to CDs.
Now, if you are not that informed about what DRM protection is we will be giving you a brief idea and information about it.
FairPlay Digital Rights Management protection or popularly known as DRM protection has been created and introduced by Apple Inc. This was made to be able to avoid the unauthorized transfer, copying, playing, and listening in other gadgets and devices. Materials and items which are DRM protected are considered as copyrighted items that must be authenticated first.
Now that you have an idea about DRM protection, let us further dig in your knowledge about the main topic of this most efficient and easiest way to burn CDs from Spotify.
The first that would be needed to be done to be able to burn CDs from Spotify is to have those Spotify songs downloaded and converted to a more used format such as M4A, MP3, or any other popular and format playable in any device. And, to be able to do this, there would be a need for an amazing tool. In this part of the post, we are to recommend the use of DumpMedia Spotify Music Converter.
DumpMedia, aside from being a great tool offering video and audio converters for those in need, also has other amazing features. Having the capability to convert Apple Music to any format possible, they also launched the ability to use it as a Spotify Music Converter!
This DumpMedia Spotify Music Converter lets you easily remove DRM (Digital Rights Management) protection which will result to easy downloading for streaming even offline.
With this tool, you will be capable of converting your favorite Spotify songs to any format you desire – MP3, WAV, FLAC, or even M4A. In addition to that, this offers faster downloading and conversion speed without thinking about losing the original quality of each song. Being too user-friendly, you cannot find any other amazing converter.
How will you be able to use this DumpMedia Spotify Music Converter to transform your Spotify songs to any other format such as MP3 or M4A and eventually have those Spotify songs downloaded and burned to CDs?
Here is how you can do it.
Step 1: Download and install DumpMedia Spotify Music Converter.
Step 2: Choose any you desire as the resulting one.
Step 3: Proceed with conversion by ticking the Convert button.
Step 4: Burning converted Spotify songs to CDs.
Let us look into these steps in detail.
Of course, the first thing you need to do is to have this DumpMedia Spotify Music Converter downloaded and installed on your personal computer. Once done, just open and launch the program to start as well as your Spotify application.
You can begin adding the files by performing dragging and dropping or even adding just the song’s URL (link). For a Spotify playlist, you just need to directly drag the whole playlist. This program supports batch conversion which makes it possible to convert not only a file but a number.

Upon importing and uploading the songs to be converted, the next step would be the selection of the output format. Make sure that you will choose any format you desire among those that you will be seeing on the screen.
In this case, we ought to convert the songs to any format which is supported by most devices such as M4A or MP3. You can do this by heading to the “Convert All Tasks To” button located at the top right corner of the screen.

The last step would be hitting the “Convert” button to begin the conversion process. This will only take some time since the program is designed to function five times faster than any other converters.
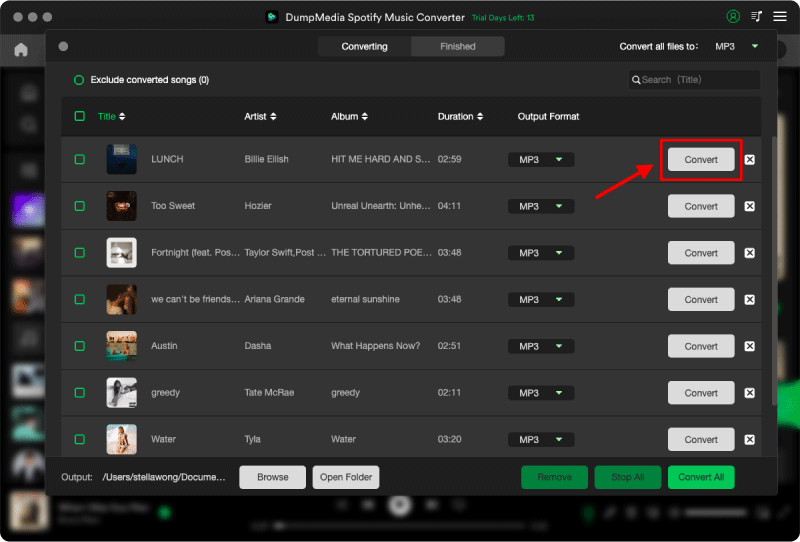
While conversion is being done, status bars will be shown in the screen wherein you can monitor the progress of the process for each song.
By performing just these three easy steps, you can have your Spotify songs converted to any format you desire.
Once done with the conversion process, you can just open the folder wherein the converted Spotify songs are saved and stored on your personal computer. Once copied, you can now proceed with the burning process immediately.
But, before burning the songs to CDs, there would be a need for some tools for a successful process.
As initially mentioned, before having your most loved and favorite songs saved and burned on a CD, you would need below things.
Now that you are good to go, here is how you can do the burning process easily.
If you are currently using a Windows personal computer, there are actually a lot of software applications you can use which has the capability of burning your Spotify songs to CDs. One of the best is this ImgBurn application.
Just to give a brief overview, this ImgBurn is an optical disc burning program that lets one record a number of DVDs, CDs, and even Blu-ray images. This was actually released last October of the year 2005. Many are still utilizing this tool.
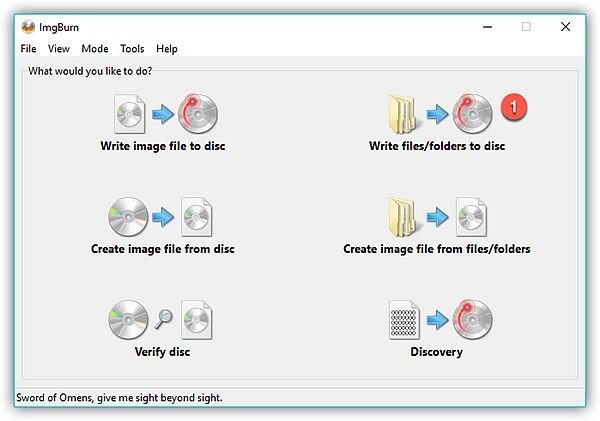
If you wanted to try using this as well, you can check the below guide for the easiest process to do it.
Step 1. Of course, the first thing you need to do is to have this ImgBurn application downloaded and installed on your personal computer. Luckily, you can have such downloaded for free on the web.
Step 2. Once the application has been properly installed, there would be a need to launch and open it. Once opened, you would need to hit “Write files/ folder to disc” in the main interface that you will be seeing. Doing this will allow you to enter the Burn CD mode.
Step 3. Next step is to click the “Browse” button to open the folder wherein the converted Spotify songs were saved.
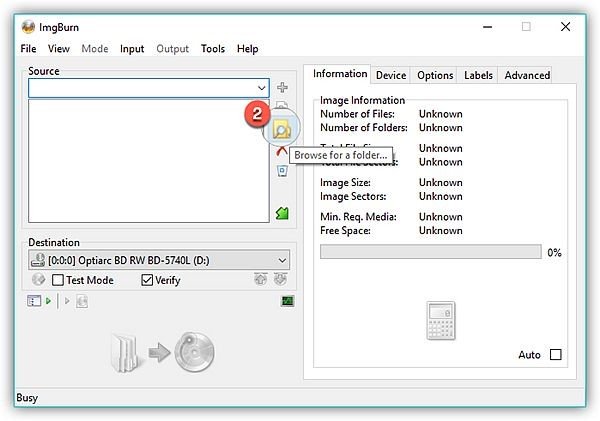
Step 4: Now, you must tick the folder-to-disc-shaped button to finally begin the burning of the Spotify songs to CD. Once you hit such, you will be seeing a popup window which will ask you the folder before burning. You must click the “Yes” button to finally proceed.
After doing these four easy steps, the only thing left is for you to wait for a few minutes. You do not have to worry for you will be seeing status bars showing the progress of the burning process.
What if you are using a Mac personal computer? Which tool is the best to use?
If you are using a Mac personal computer, you should not worry as well. We have prepared an amazing application that will help you in the burning process.
The application’s name is Burn.
Burn has been known as one of the best applications you can use in your Mac computer. It contains advanced settings that let you burn your most loved media and files without much hassle and worries.
Here is how you can utilize this Burn application.
Step 1. Ensure that Burn application has been properly downloaded and installed on your Mac.
Step 2. Once installed, launch it and you will be arriving in the main interface. Hit the “Audio” button followed by “+” to proceed with the importing of converted songs from your computer. Make sure to select the CD type from the list by hitting the “Select” button. The most recommended ones are MP3 disc or Audio CD.
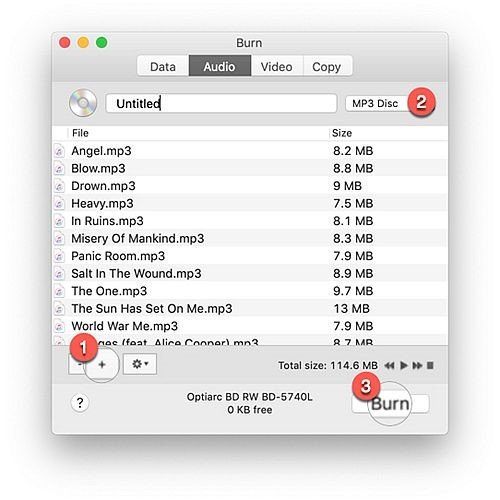
Step 3. Once done with the above, you can immediately click the “Burn” button to get ready with the process.
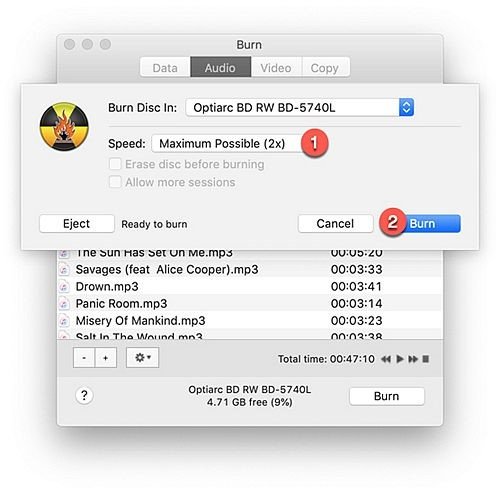
Step 4. You have the option to choose the burning speed. It is best recommended to choose the maximum speed possible.
Too easy isn’t it? Status of the process will also be known since progress bars will be seen on the screen.
This article had helped you know the best software application to download and convert your most loved Spotify songs even if you are using a Mac or Windows personal computer.
DumpMedia Spotify Music Converter has been introduced in this post as well as the guide to use it for your easy reference. Why not try this if you have been encountering the same issue?
