If you were to name a music streaming service, probably Spotify comes to mind or Apple Music. Google Play Music is one of the tech giant’s products under the Google Play line of services. Google Play Music entered the audio streaming scene about three years after Spotify, currently the biggest and most popular by subscriber count.
Google Play Music’s selling point is its secondary function as an online music locker that allows you to store up to 50,000 songs on your personal library at no cost. You might want to export Spotify playlist to Google Play for this reason or another. Nevertheless, this article will guide you on how to do just that! If the idea seems improbable, let’s consider some facts about transferring streaming music to another service or application.
Contents Guide Part 1. Can You Export Spotify Playlist to Google Play?Part 2. How to Export Spotify Playlist to Google Play?Part 3. Conclusion

A streaming service swap is an easy decision when you have preferences on one over the other. But there’s a catch—the playlists you have created (built over a long period and have gone through different phases of your musical journey) will not be transferred, which means you have to curate your collection again on the new service. Very inconvenient, right?
Spotify protects its music with DRM. You may download audio content with your premium subscription, but the protection allows playback only on its app. To remove the DRM, you will need a software tool to decrypt the Spotify Ogg Vorbis format files. So you can’t directly export Spotify playlist to Google Play Music. However, this music transfer is not impossible.
The previous section mentioned a tool that can read Spotify’s protected audio files to overcome your migration hurdle. The highly recommended DumpMedia Spotify Music Converter provides the complete solution to your software problem.
It can download and convert your Spotify songs even without Spotify premium subscription. The software removes the DRM protection that hinders you from playing and transferring your Spotify music on another app or device.
Export Spotify playlist to Google Play by following the steps provided below.
Step 1. Download and Install the converter program
Download the installer for free on your Windows or Mac, then execute the installer. Installation takes a few minutes only.
Step 2. Run DumpMedia Spotify Music Converter and add your Spotify playlist
Launch the converter. Your Spotify app will also open if not yet running. On Spotify, click and drag the playlist to the converter’s input box. You can copy and paste the link from Spotify as well.

Step 3. Configure the output format
Select the output audio format. Google Play Music supports MP3, AAC, WMA, FLAC, Ogg, or ALAC. So MP3 or FLAC would be appropriate. You can also set your preferred Sample and Bitrate. Then, browse for your output folder.

Step 4. Convert Spotify playlist
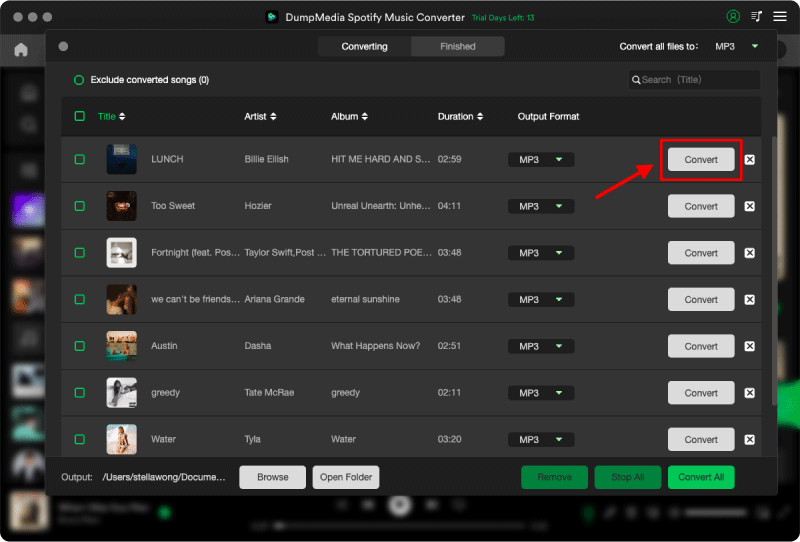
Click on the Convert button to start the conversion process. You will be prompted on the completion.

DumpMedia Spotify Music Converter will download your Spotify playlists, songs, or albums at a high-speed rate without losing the original quality. It will also include the ID3 tags and metadata, so you keep the song’s information like title, artist, artwork, etc.
So having a vast collection of Spotify music won’t be an issue, considering the fact that Google Play allows up to 50k tracks for storage. DumpMedia Spotify Music Converter’s full version supports your export with full-length song conversion, no time limitation, and other benefits.
Read on to export Spotify playlist to Google Play Music completely.
Step 1. Log in to Google Play Music
Visit the Google Play store on your web browser and log in with your Google account details. On the left, click on ‘Music’ then choose “My Music.”
Step 2. Use Music Manager
In My Music, click on the hamburger (3-line) menu icon on the upper left and select Listen Now. Click on “Upload Music,” found at the bottom of the menu. Sign in to Music Manager with your Google account, or be ready to download it when not installed yet.
Step 3. Start the upload
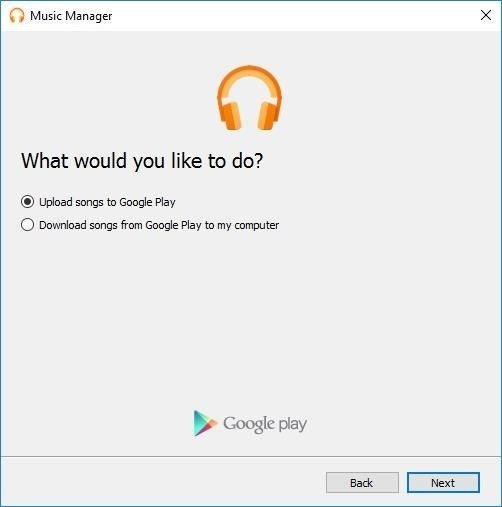
Click on ‘Menu’ then “Upload songs to Google Play,” then the Next button.

Step 4. Select folder for your playlist
You can now select the destination folder to store your converted playlist. Music Manager will find, scan and display the playlists and the number of music available on your folder.
Step 5. Complete upload
After selecting the upload folder, Music Manager will prompt a question: “Do you want to automatically upload songs that you add to your selected folders in the future?” Click ‘Yes’ and proceed to upload your playlist songs. When the upload is interrupted, for instance, by browser termination or power off, don’t worry. Music Manager will resume the process automatically when it can execute again.
There you go, your Spotify playlist has been exported to Google Play Music!
Google Play Music proves not to be beaten by competitors with its simple interface, equally large music and album collection, audio search engine, and especially its free cloud storage to supplement the already huge streaming archive. Sign up is almost instant when you have an existing Google account. (Reported current Gmail users have reached about two billion and still growing!)
To help you make the switch to Google Play, the tutorial from this article provided the steps to transfer your Spotify tracks and make use of Google’s free online music storage. More importantly, you have been introduced to DumpMedia Spotify Music Converter. This tool will ease up a large part of the work when you export Spotify playlist to Google Play Music.
