Do you know a lot about Kinemaster for Chromebook?
Well, Kinemaster is actually an application that is available for use on your Android device, on your iOS devices such as iPads and iPhones as well as on your personal computer. This is being referred to by many as a powerful app and is an easy-to-use tool for video editing.
With the lots of features, Kinemaster has including its amazing tools, cutting, splitting, or reversing video clips, as well as adding effects, filters, transitions, and more can be made possible. Additionally, if you want to add images, another video clip, or audio files to a video of yours, Kinemaster can also handle that.
If you have been a video editor ever since have you tried Kinemaster for Chromebook? And, have you thought about the idea of adding and using Spotify songs as BGM to your Kinemaster videos? Don’t worry, this post will walk you through the whole process of how you can download Kinemaster for Chromebook as well as how you can use and add the Spotify songs that you like to your Kinemaster videos.
Let’s get right into the content of this article then!
Contents Guide Part 1. Download KineMaster For ChromebookPart 2. How to Add Spotify Music to KineMaster For ChromebookPart 3. To Sum It All
Kinemaster is a video editing application that works too well on several devices including your Chromebook. A lot of video editors and content creators love using Kinemaster because of the lots of free features it has. Of course, there is a way you can upgrade the usage by paying a fee but if you are okay with using just the free features, then you are good to go.
To guide you, we have here a method to install Kinemaster for Chromebook.

Step #1. Head to Kinemaster’s main website. There is this “Download” button that you shall see. Tap on it and then you’ll arrive at the download page for Kinemaster for Chromebook.
Step #2. On your screen, just scroll down until you see the “Download for PC” option. By doing so, you will be able to get the APK file or installer to your computer.
Step #3. Make sure you won’t press the “Start Now” button as this will only lead you to see ads and other programs for installation on your computer. It is suggested that you have an Android Emulator such as this Blue Stacks downloaded on your PC.
Step #4. Once the downloading of the APK file has been completed, just double-click on it to install the emulator.
Step #5. After some time, you shall see the Kinemaster for Chromebook icon displayed on your desktop. Just tap on this icon to launch the app and for you to be able to use it right away.
As simple as that, you can have the Kinemaster for Chromebook downloaded and installed!
Now, as you move to the second part, you will be exposed to the process of adding your favorite Spotify music to Kinemaster for Chromebook. If you are excited to find out more about this topic, then immediately jump to the second portion of this post!
Downloading Spotify songs might be a bit challenging for some since Spotify tracks are protected by DRM encryption. Thus, direct saving won’t be possible even if you are using a Premium Spotify account. Additionally, you can’t have the songs moved or played on any music player or device that you like as some are categorized as “unauthorized”.
With the help of professional software applications like this DumpMedia Spotify Music Converter, the downloading of Spotify music for use on your Kinemaster for Chromebook can be made possible.
Using apps like this DumpMedia Spotify Music Converter, you will be able to remove the DRM encryption of the Spotify songs and eventually convert them to any of the formats supported by the app. This app lets you use your time efficiently and conveniently as well since this works pretty fast.
It also ensures that even if processing will be performed on the songs, their audio quality would still be too good as the original ones while keeping all the ID tags and metadata information. It even has advanced features (customizable settings, easy uploading of songs to process through the drag and drop feature, multi-language). Using it won’t be a problem since it’s designed to be user-friendly.
Now, here’s the process of how you can download Spotify songs via this DumpMedia Spotify Music Converter for use on your Kinemaster for Chromebook videos.
Step #1. Once you have the DumpMedia Spotify Music Converter’s installer on your PC, you can just have the app installed right away.
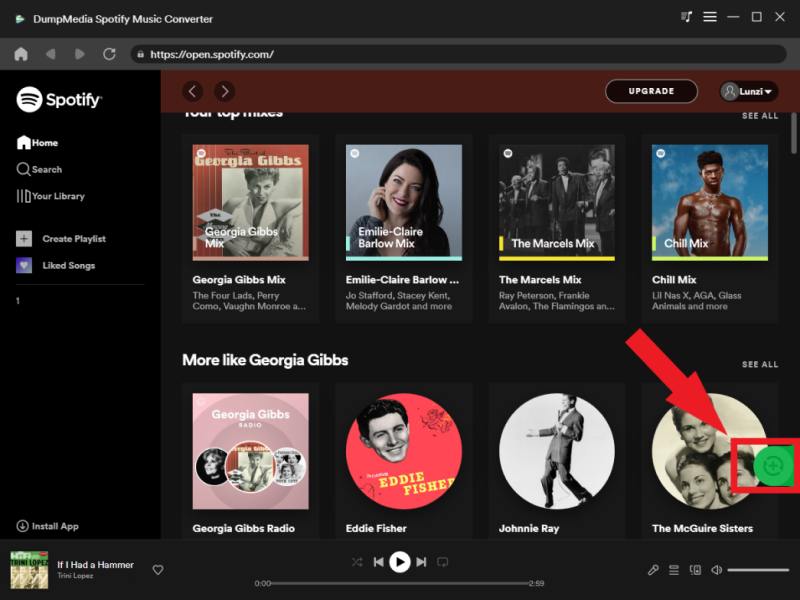
Step #2. Once launched, you can start by tapping the “Open the Spotify Web Player” option to open the Spotify page wherein you will be asked to input your Spotify credentials – username and password.

Step #3. After logging into your Spotify account, you shall see the Spotify page right away. This is where you can choose the Spotify songs to process. Just have those songs dragged and dropped onto the “green-colored” button that is on the sidebar of your screen.
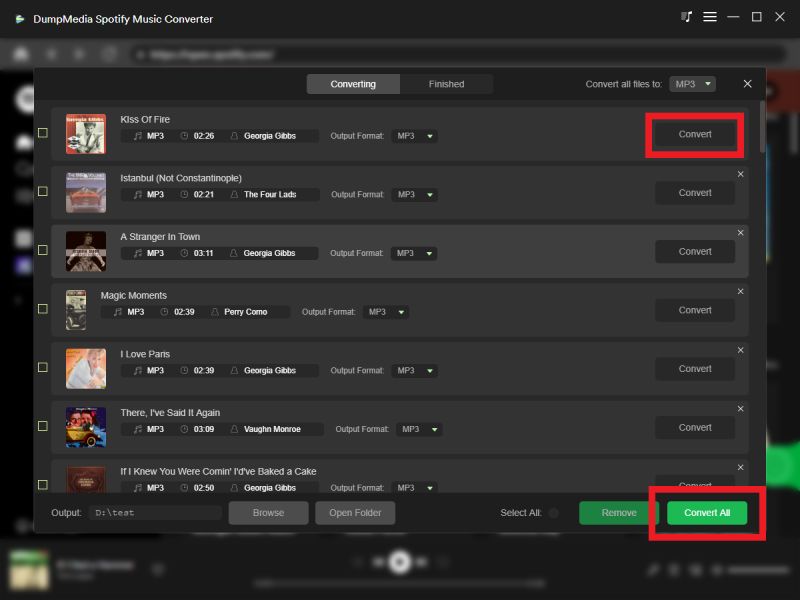
Step #4. This is now the time you can customize the output settings and define what you like. Of course, don’t forget to choose an output format (selecting MP3 is the most recommended as you are to use the songs on your Kinemaster for Chromebook app) and an output folder to use.

Step #5. Both the conversion and DRM removal processes will happen once you tick the “Convert” button that is located at the bottom area of the screen.
In just a few minutes, you can expect the converted Spotify songs for use with Kinemaster for Chromebook readily available on your PC. In fact, you can have these songs accessed on any media player or device that you own.
In the next texts, you will now learn how to add those downloaded Spotify songs for use to your Kinemaster for Chromebook app. We will be sharing the process of adding those tracks on your iOS and Android devices.
You would have to transfer the converted Spotify songs to your iOS device first.
Step #1. Open the iTunes app on your PC and then tap the “File” button that is at the top area of your screen. Afterward, click the “Add File to Library” button to start the importing process.
Step #2. Make sure your iOS device has been connected to your personal computer using a USB cable. Hit the icon of your device in use and then head to the “Music” button then choose “Sync Music”. By tapping the “Apply” button, you will be able to transfer those converted tracks to the iOS device in use.
Step #3. It’s now time you open the Kinemaster application. In order to add a transformed Spotify converted song, tick the “Music note” icon on the Kinemaster app.
Now, if you wish to use your Android device, you can also do that. And here’s the process.
Step #1. Using a USB cable, you have to connect your Android device to your personal computer. Once the successful connection has been established, you need to copy and paste those converted Spotify songs to your Android device that has been connected to your computer.
Step #2. You can now launch the Kinemaster app on your Android device. Make sure to click the “Audio” button and then afterward, choose “Add”. This will help you add or import those converted Spotify songs that you wish to use on your Kinemaster videos.
As easy as that, you can add those converted Spotify songs to your Kinemaster application that is installed on your mobile devices (iOS or Android). Importing Spotify songs to your Kinemaster for Chromebook would be so easy to do as well since you already have the transformed songs saved on your PC’s folder.
Using Kinemaster for Chromebook is indeed a great way to make your video more incredible and appealing to your viewers. With the features it has, video editing can be done so easily and effortlessly.
Also, you can use applications like the DumpMedia Spotify Music Converter if you want to incorporate some of your favorite Spotify songs with your Kinemaster videos. Downloading songs and using them would be so easy through this app. Now, that you finished reading this post, you can now further utilize Kinemaster for Chromebook and make your videos more presentable than before!
