
Alongside with iTunes or Apple Music, Spotify has been a great music service provider serving millions of users worldwide. Spotify contains numerous features which could be unknown for many. Up to now, there are still some users who only see Spotify as an application which can provide a number of songs to users.
Do you even know that Spotify also allows the users to mix up songs and add their touch on the current playlist they are listening to? Yes! You can add music to Spotify from your personal computer! Therefore, if you have been storing good music on your personal computer and you wanted those to be incorporated on your Spotify application, you should not worry that much as this guide is for you.
Contents Guide Part 1. Can You Add Music To Spotify?Part 2. How To Add Music To Spotify?Part 3. Additional Tip: How To Convert Spotify Songs To Any Formats?Part 4: In Summary
Maybe you are wondering why there would be a need to add music to Spotify playlist though Spotify already contains millions of songs. If you have created your own songs or tracks which are not present in Spotify application, this amazing feature of being able to add local songs to Spotify would definitely be a great thing for you.
Actually, once Spotify application has been successfully installed on your personal computer, the application will automatically search and look for the songs which are already stored on your personal device. The problem arises in case you got songs in MP3 format which were saved and stored not only on one folder but in numerous. This is where the manual adding of songs enters.
In order for you to finally add local songs to Spotify application, you would need to have the following first.
Now that we got an idea of what you would need to finally add your most loved songs to Spotify application, below are the simple steps that must be followed.
If you are wondering on the details of these 3 steps needed, you must continue reading this post.
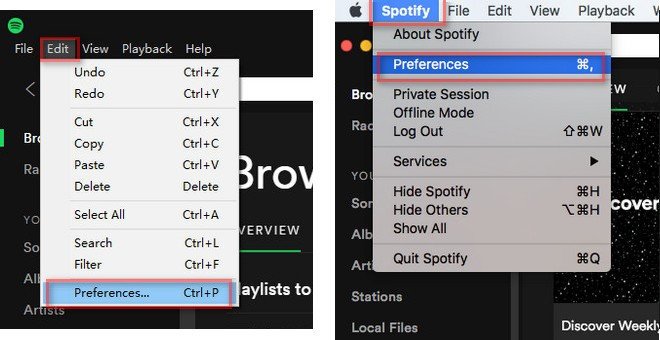
The first thing that must be done is to open your Spotify application on your personal computer to add music to Spotify. Once you have arrived at the main interface, you would need to find the “Preferences” button. Looking for this button is quite different depending on the personal computer you are using.
If you are utilizing a Windows personal computer, you can hit the “Edit” button to see the “Preferences” button. As for the Mac users, you can just hit the “Spotify” button located at the left most portion of the screen and you will immediately see the “Preferences” button under it.
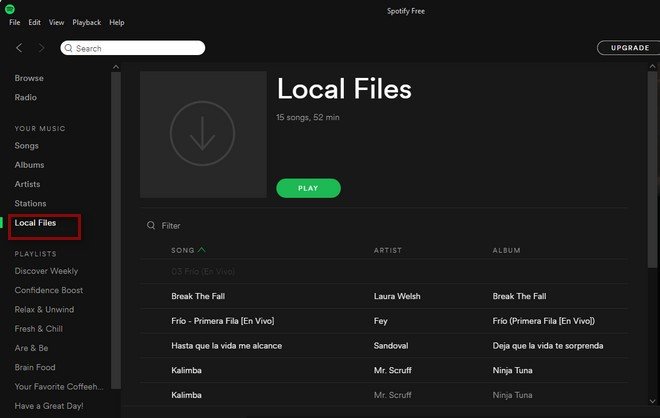
The next thing that you would need to do upon finishing the first one is to look for the “Local Files” button wherein you will be seeing the “Add A Source ” button. Just hit this button and a new popup window will show. You can just hit from which folder you will import.
Once this has been completed, the importing of songs will now be finished. And, you can immediately see those on your Spotify library under the “Local Files” tab located at the left portion of the screen.
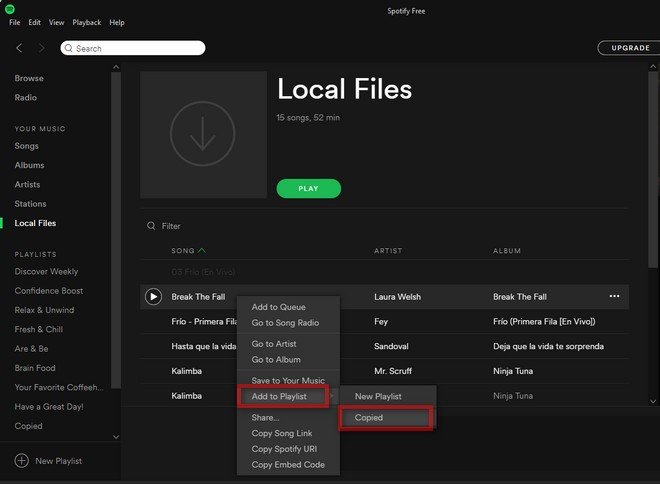
The third and final step would be the creation of a new playlist on your Spotify application to add music to Spotify. You can do this by hitting the “New Playlist ” button which is located in the bottom left corner of the screen. Once you clicked it, you can have your new playlist named depending on what you wanted it to be named.
Now that you have completed the creation, you can head back to your “Local files ” tab and choose any songs and add songs to Spotify. You can add the songs by hitting right click for each and look for “Add to Playlist ” followed by hitting the name of the playlist created.
Well, the last thing that you would do is to finally enjoy all those songs you add music to Spotify application. Tough you have synced those on your personal computer’s Spotify application, you can have those accessed using your mobile gadgets and even tablets and any other available devices.
Just only take note that Spotify only supports a number of formats including MP3, MP4, M4P, and M4A files.
Here, we are to share additional information about an amazing tool which is capable of transforming your most loved Spotify songs to any formats. Now, if you are in the look for such, you are lucky enough to have encountered this post.
The software application’s name is DumpMedia Spotify Music Converter.
People have known this to have built great tools which served as both video and audio converters for those in need. Well, aside from having amazing video and audio converters which are as well tested and proven by many, it also has produced a tool which is capable of converting Spotify songs to any format possible, and they have also launched the ability of using it as a Spotify Music Converter!
You read that right! The DumpMedia Spotify Music Converter enables one person to easily remove the DRM (Digital Rights Management) protection which enables one to download Spotify songs for offline listening. This is usually the issue of many every time they are trying to download DRM protected files.
Using the tool initially mentioned, you will be capable of converting your favorite Spotify songs to any format you desire, all those popular and even the unknown ones. After that, you are able to add music to Spotify.
In addition to that, you should not worry about the speed of the conversion process because this offers faster downloading and conversion speed without thinking about the idea of losing the songs’ quality. This has been proven as well to be user-friendly and can be used easily by anyone. Controls are too easy to navigate.
Here is how you can use this tool in the conversion process.
Let us look into these steps further.
Of course, the first thing you need to do is to have this DumpMedia Spotify Music Converter downloaded and installed on your personal computer. Once done, just open and launch the program to start as well as your Spotify application.
You can begin adding the files (which in this case, are the songs you ought to convert from your Spotify application) by performing dragging and dropping or even adding just the song’s URL (link). This program supports batch conversion which makes it possible to convert not only a file but a number. Converting a lot at a time is not an issue.
Upon importing and uploading the songs to be converted, the next step would be the selection of the output format. Make sure that you will choose any format you desire among those that you will be seeing in the screen. In this case, we ought to convert the songs to any format desired by the user such as FLAC or MP3. You can do this by heading to the “Convert All Tasks To ” button located in the top right corner of the screen.

The last step would be hitting the “Convert” button to begin the conversion process. This will only take some time since the program is designed to function five times faster than any other converters.
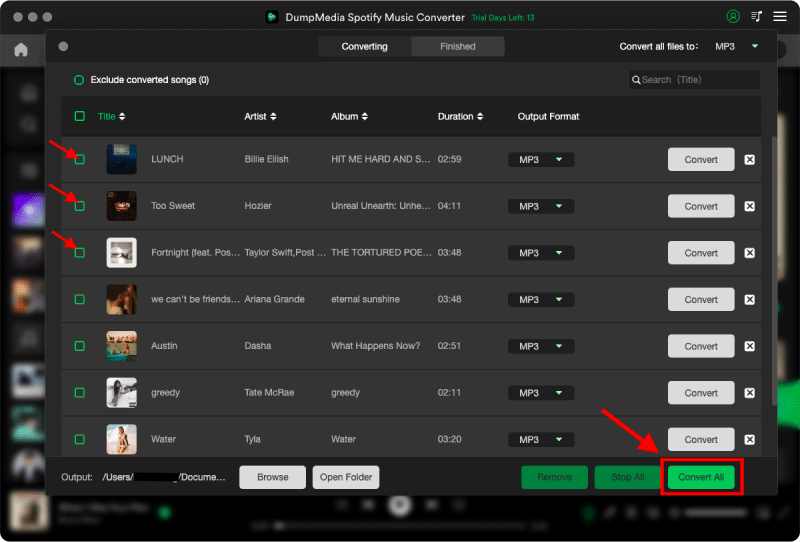
While conversion is being done, status bars will be shown in the screen wherein you can monitor the progress of the process for each song.
By performing just these three easy steps, you can have your Spotify songs converted to any format you desire and finally save those to any devices you have and even add music to Spotify!
It is no longer an issue to add music to Spotify now! Yes! You can use the above methods discussed in the first part of this post to do that finally. In addition, we have also given an additional tip highlighting an amazing tool, the DumpMedia Spotify Music Converter in the latter portion.
If you have found any other option to add songs to Spotify which you think could also be beneficial to users like you, you can have those listed on the comment section below for others’ reference. We would love to hear from you!
