
If you are new to Spotify application, you are surely still in the midst of exploring what you can actually do in this application. One of the basic things you should know once you created a Spotify account is to create playlists in order to easily group all the songs you love and want. We wanted to show you how to create a Spotify playlist easily in this article.
Contents Guide Part 1: What Is A Spotify Playlist And Its Advantage?Part 2: How to Create A Spotify PlaylistPart 3: How to Share Your Created Playlists without Spotify PremiumPart 4: to Sum It All
Spotify has been known to be one of the premier and most used music streaming services in the world alongside iTunes or Apple Music, Tidal, Pandora, Amazon Music, Google Play Music, and more. It is a music streaming service offering millions of songs produced by several artists. Premium Spotify users and free Spotify users can get to experience amazing and limitless features being offered by Spotify.
Among the many features of Spotify is being able to create your own playlists and making it easier to have those edited anytime you want to.
A Spotify playlist is basically a group of songs created by every Spotify user for the sole purpose of grouping the songs or music on certain classifications intended by every user.
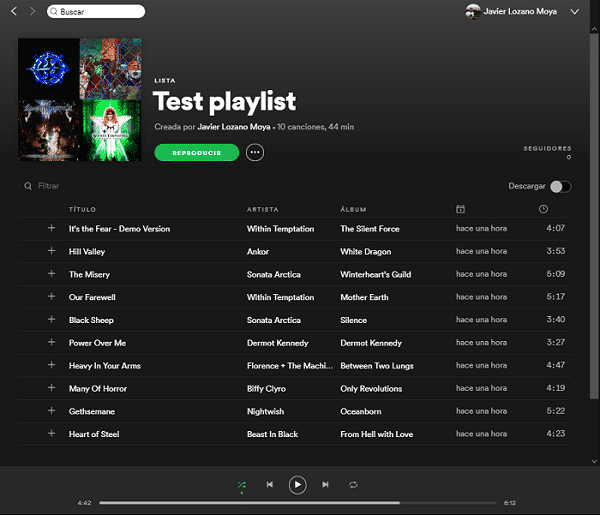
There are a lot of advantages to having a Spotify playlist.
If you are a new Spotify user and you do not have much knowledge about how to create a Spotify playlist, then you should keep on reading this post.
In this portion, we will be highlighting the methods to how to create a Spotify playlists both on mobile devices or personal computers. Take note that even if you are a free or a premium user, you have the capability to create playlists on your Spotify application.
If you wanted to know the procedure of Spotify playlist creation on your mobile devices, here are the three basic steps.
Let us know more about each.
the first thing you need to ensure is that you have the Spotify application downloaded on your mobile device. Once you have successfully installed the application, log in using your Spotify account’s credential and information including your username and password.
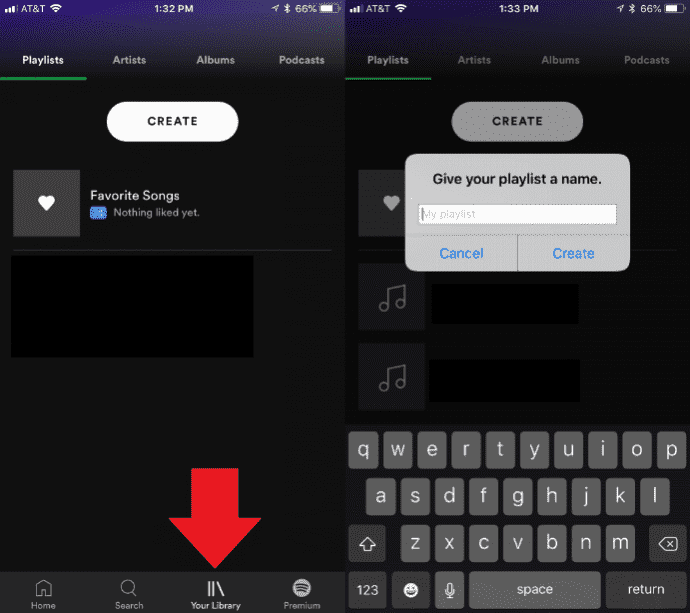
Once you have successfully logged on, you can now proceed with playlists’ creation. the initial step is to head to the “Playlists” section by hitting the “Library” button located at the bottom portion of the screen and hit the “Create” button which you can easily see in the screen. Once you have ticked it, you will be asked to give your playlist a name. Just type in any keyword or name you wanted to use.
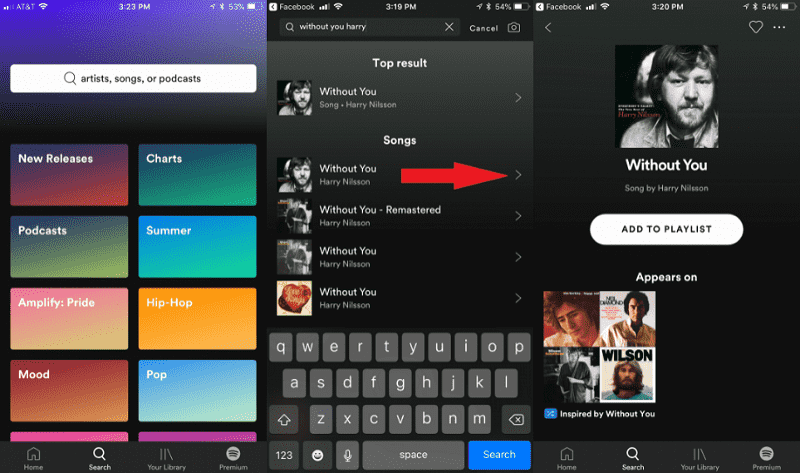
Now, the next thing to be done is to look and search for the songs to be added to the playlist you created. You can do this by heading to the search button or icon and typing in the title of the song, name of the artist, or even the album.
Once you have seen the song you wanted to be added to the playlist, hit the “+” button you will see on the right side of each song. By ticking this, the song will be added automatically on the playlist. If you are looking to the idea of adding songs later on, just do the same – searching, and then hit the “arrow” alongside the songs once found.
the last thing you need to do is just to go ahead and enjoy listening to those songs you have saved on the playlists you created! You can create as many playlists as you want for the organization and grouping of songs you love.
Now, the discussion will be circling about the creation of the Spotify playlist on your personal computer.
Here are the details pertaining to each step.
In creating Spotify playlists, you, of course, need to ensure that you have the Spotify application downloaded and installed on your personal computer. Once you have logged in properly and arrived in the main interface, you can now proceed with the playlist creation.
In the “New Playlist” button which you will see at the bottom left corner of the interface, you can have the process started. Hit the mentioned button and you will be arriving on a new window. This is when you will be asked to key in the name of the playlist and once done, click the “Create” button.
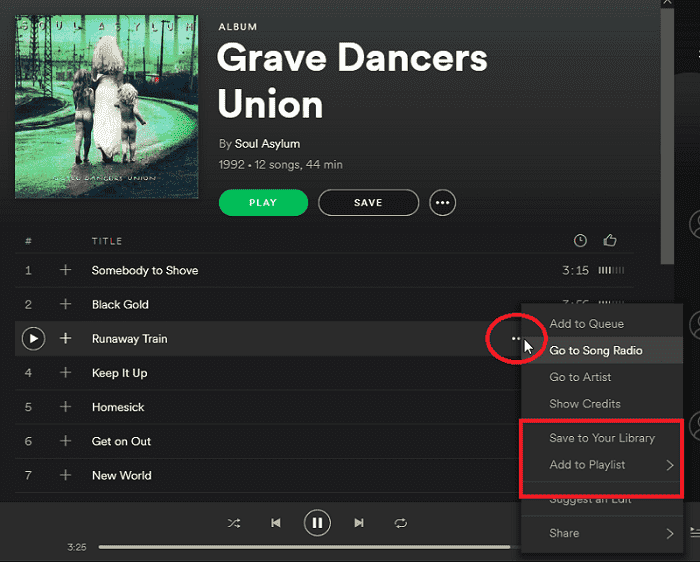
the next step upon finishing the creation of the playlist, you can now search and look for the songs to be added to it. Same with your mobile device, you need to search for the songs to be added using the “Search” bar. Once you have seen the specific song, you can just hit the “three-dot” icon alongside each song. Once done, new options will be shown on the screen. From those shown, make sure to hit the “Add to playlist” button. Your Spotify will show all the names of the playlists you have created. Choose one wherein you wanted the chosen song to be saved.
Now, you can just enjoy the songs you have added on the playlist you created!
We do not get to learn the methods to be undergone to have the playlists created both on your mobile devices and personal computer. In case you wanted to edit your playlist, that would also be possible. You can just open the playlist you wanted to be edited, choose the song to be removed, hit the “three-dot” icon, and choose the “Remove from this playlist” option.
So when you get the ways that how to create a Spotify playlist, In case you are looking on ways you can do in order for you to share those playlists you created to your friends and family members, then you should know about this amazing software application – the DumpMedia Spotify Music Converter.
DumpMedia Spotify Music Converter is a tool developed and created by DumpMedia. This software application has the ability to transform or convert your favorite Spotify songs to any format you want. It supports a lot including the most used and most popular including MP3, WMA, WAC, AAC, FLAC, and many more.
In addition to this, during conversion, the removal of DRM (Digital Rights Management) protection will also be done. This means that you can have those songs streamed and played in other devices easily without having to worry on whether the songs will play or not.
the steps are actually quite easy. Here are those.
Let us look into these steps further.
Of course, the first thing you need to do is to have this DumpMedia Spotify Music Converter downloaded and installed on your personal computer. Once done, just open and launch the program to start as well as your Spotify application. You can begin adding the files by performing dragging and dropping or even adding just the file’s URL (link).
This program supports batch conversion which makes it possible to convert not only a file but a number. Converting a lot at a time is not an issue.
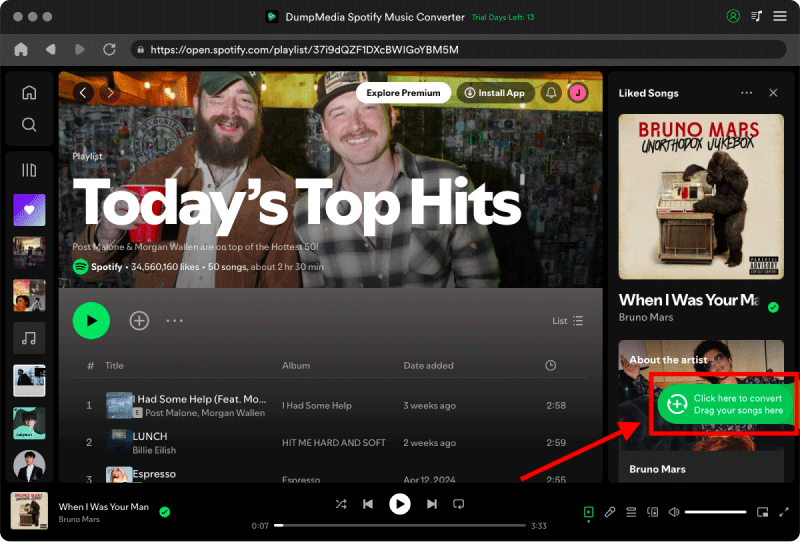
Upon importing and uploading the songs to be converted, the next step would be the selection of the output format. Make sure that you will choose any format you desire among those that you will be seeing on the screen. In this case, we ought to convert the songs to a format that has been generally supported by numerous media players.
You can have the songs converted to MP3 format. You can do this by heading to the “Convert All Tasks to” button located at the top right corner of the screen.

the last step would be hitting the “Convert” button to begin the conversion process. This will only take some time since the program is designed to function five times faster than any other converters. While conversion is being done, status bars will be shown on the screen wherein you can monitor the progress of the process for each song.
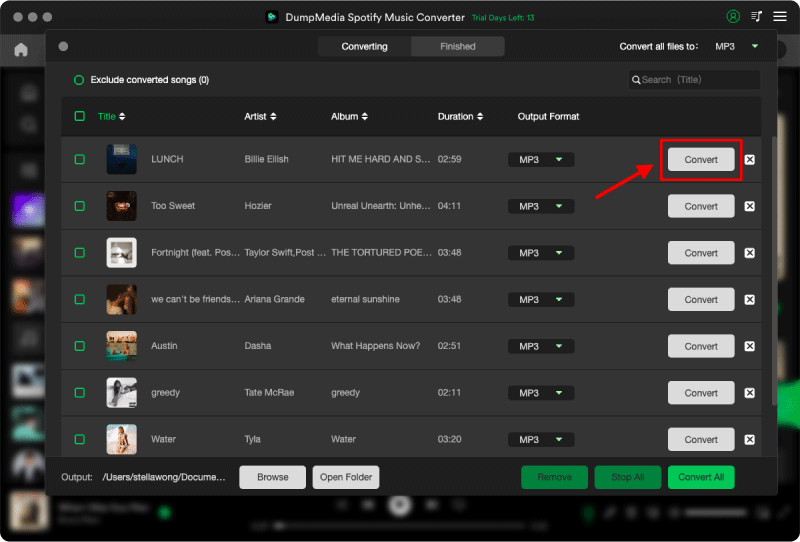
By having these three steps performed, you can have your favorite Spotify songs downloaded and shared with any person you want!
This article had discussed the ways on how to create a Spotify playlist on your mobile devices and personal computers easily. Apart from that, you also got to learn about a software application named DumpMedia Spotify Music Converter.
Have you learned much from this article?
