Have you ever thought about the idea that files such as songs can take much of your storage space? So some people will think that why can’t Spotify be moved to SD card? The answer is of course you can move it. We are going to teach you how to move Spotify to SD card.
Nowadays, people would just want to listen to songs using earphones or headphones. Using speakers or even your car’s stereo would possibly be outdated as of today. But how are you to enjoy your favorite Spotify songs without thinking that those will take so much space out of your device’s storage capacity?
The answer is that move Spotify to SD card. But how to move Spotify to SD card? In this issue you can finally learn the steps needed to be undertaken to move Spotify songs to your SD card, we are first to discuss some ideas about Spotify and its downloading restrictions.
Contents Guide Part 1: Spotify Overview and Its Downloading RestrictionPart 2: Downloading Spotify Songs to SD Card for Premium UsersPart 3: Download Spotify Songs Using DumpMedia Spotify Music ConverterPart 4: How to Move Downloaded Spotify Music to SD CardPart 5: To Sum It All
Spotify application has been widely known as one of the best music streaming services in town. If you belong to the many Spotify users out there, you are probably one of the many premium account holders. If not, then surely, you are a free user. Being a premium account user lets one download Spotify songs for offline playing and streaming. This is one disadvantage of the free users.
However, although premium users have the chance to download songs, all those will disappear once their subscription has ended. If you are asking whether Spotify application allows how to move Spotify to SD card, the answer is “Yes”. But this is only applicable if you are a premium user.
And, you should also keep in mind that Spotify songs are DRM (Digital Rights Management) protected which means that a user is not allowed to play those in any unauthorized devices. For your reference, we would be discussing how to move Spotify to SD card if you happened to be a premium user on the next part.
For premium users, you can know how to move Spotify to SD card below simple steps.
You will be seeing the details corresponding to the above steps mentioned.
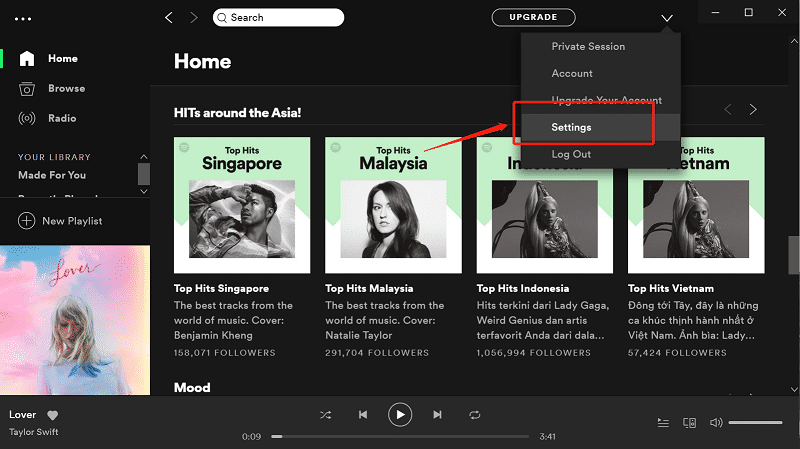
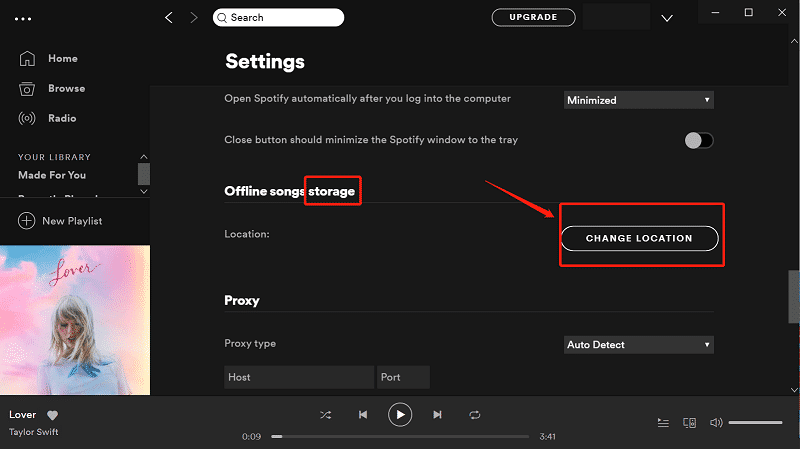
The first thing you need to do is to have your Spotify application installed on your device. Open and launch it and once done, you should head to the “My Library” option. You will be seeing the gear icon which is as well the “Settings” button on the screen. Make sure to tap it followed by hitting the “Storage” button.

Upon doing the first step, you can now tap the SD card to set it as the storage location once you decided to download songs from Spotify.

But since most of us are not premium users, then you should look for an alternative way on how you can solve the case. In next portion, the method to be presented will allow you to directly download the songs from Spotify application, remove the DRM protection of those songs, and finally have those saved on your SD card for playing even in your car’s stereo or even in usual home speakers and media players.
Get to know more about how to move Spotify to SD card in the next part of this post.
As initially mentioned in the previous part of this post, there is definitely a way for you to easily download the Spotify songs and remove the DRM protection of those for saving and playing in many other devices and gadgets especially if you are only using the Spotify application for free. So how to move Spotify to SD card if you are only the free user of Spotify?
Here, we are to present an amazing third-party software application that has been known to be trusted and most reliable. The application’s name is DumpMedia Spotify Music Converter.
Let us gather some more information about the mentioned software application.
DumpMedia Spotify Music Converter is a tool developed and created by DumpMedia. This software application has the ability to transform or convert your favorite Spotify songs to any format you want, so you can know how to move Spotify to SD card. It supports a lot including the most used and most popular including MP3, WMA, WAC, AAC, FLAC, and many more.
In addition to this, during conversion, the removal of DRM (Digital Rights Management) protection will also be done. This means that you can have those songs streamed and played in other devices easily without having to worry on whether the songs will play or not.
The steps are actually quite easy. Here are those.
Let us look into these steps further.
Of course, the first thing you need to do is to have this DumpMedia Spotify Music Converter downloaded and installed on your personal computer. Once done, just open and launch the program to start as well as your Spotify application.
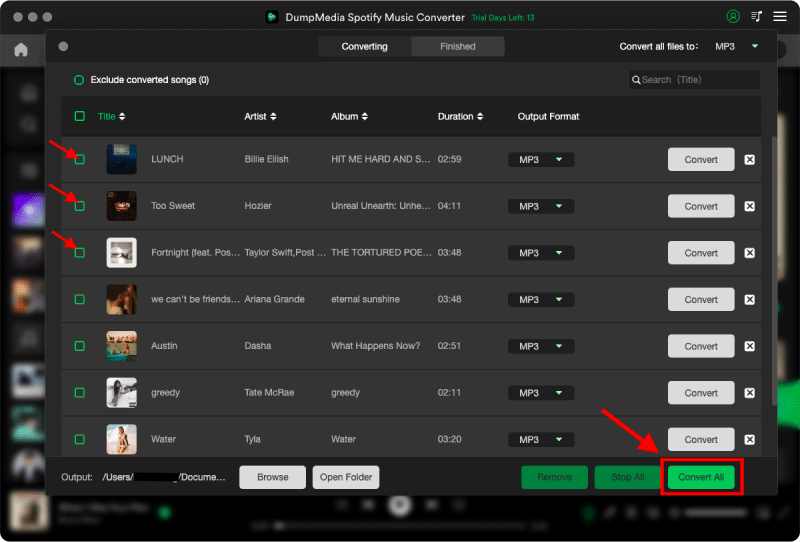
You can begin adding the files by performing dragging and dropping or even adding just the file’s URL (link). This program supports batch conversion which makes it possible to convert not only a file but a number. Converting a lot at a time is not an issue.
Upon importing and uploading the songs to be converted, the next step would be the selection of the output format. Make sure that you will choose any format you desire among those that you will be seeing on the screen.
In this case, we ought to convert the songs to a format that has been generally supported by numerous media players for you to be able to play the converted songs in any type of device. You can have the songs converted to MP3 format or any other formats mentioned in the first paragraph of this part. You can do this by heading to the “Convert All Tasks To” button located at the top right corner of the screen.

The last step would be hitting the “Convert” button to begin the conversion process. This will only take some time since the program is designed to function five times faster than any other converters. While conversion is being done, status bars will be shown in the screen wherein you can monitor the progress of the process for each song.

Upon completion of the three steps mentioned, you can have the downloaded songs ready for playing in any device. Alongside the transformation, you can as well be assured that the DRM (Digital Rights Management) protection has been removed from all those songs which means that you can have those copied in any storage devices and shared to anyone you wanted to.
In the next portion, we are to explain the basic steps needed to be done in order to ensure that those downloaded Spotify songs will be successfully of how to move Spotify to SD card.
Since we already finished downloading all those favorite Spotify songs, we are now ready to know how to move Spotify to SD card. You can do this by following below.
Look at below brief explanation for each.
You need to make sure that you have successfully inserted the SD card to be used on your personal computer. To do this, you must have a card reader. Once the SD card has been recognized, head to your “My Computer” option and look for the name of it. Once seen, double click to open.
Now that you have your SD card ready, you can just simply perform the dragging and dropping of converted songs to have those saved on your SD card. Now, you can listen to your all-time favorite Spotify songs as long as you have your SD card with you.
We have learned about the steps that how to move Spotify to SD card for playing in any device you have. You just need to ensure that you have the available Spotify song downloaded and converted using this DumpMedia Spotify Music Converter.
Would you want to try the above? Or, have you done this before? What was your experience?
