Times have changed. These days, you can hear songs with explicit words. It’s almost as if it’s natural to hear songs that have shocking words. Kids can easily hear them. Hence, parents have to be more careful about what their kids have access to.
Since Spotify is free and it’s very easy for kids to sign up on it, they can easily access songs with explicit content. There just has to be a way for parents to make Spotify block explicit songs.
Truth be told, some songs have bad messages and kids shouldn’t even be hearing them.
Contents Guide Part 1. The Importance of Knowing How to Make Spotify Block Explicit SongsPart 2. Two Ways to Make Spotify Block Explicit SongsPart 3. Create Child-Friendly PlaylistsPart 4. Conclusion
There is no doubt that Spotify has millions of songs. With its vast database of songs, there are some or maybe even a lot that’s not suitable for kids to hear.
The thing is, Spotify could easily be accessed by kids. Since it’s free, they can sign up anytime. Add to that the easy navigation of Spotify’s interface just makes it very easy for any kid to join the platform. As a parent, what can you do to keep your kids from hearing such explicit content on Spotify? Continue reading to know what you can do about it.
Make sure to read until the end since there are alternatives for you to consider. It’s important to keep the kids away from explicit content because it can influence their way of thinking.
There are two ways to make Spotify block explicit songs. The first way is to enable a button to make sure the kids don’t hear any kind of explicit songs.
There is a button that you, as a parent, can turn on to make Spotify block explicit songs. The steps below will show how parents can find and enable this button.
Launch the Spotify app and sign in to it. If your kid has his or her own Spotify account, you need to log into it.
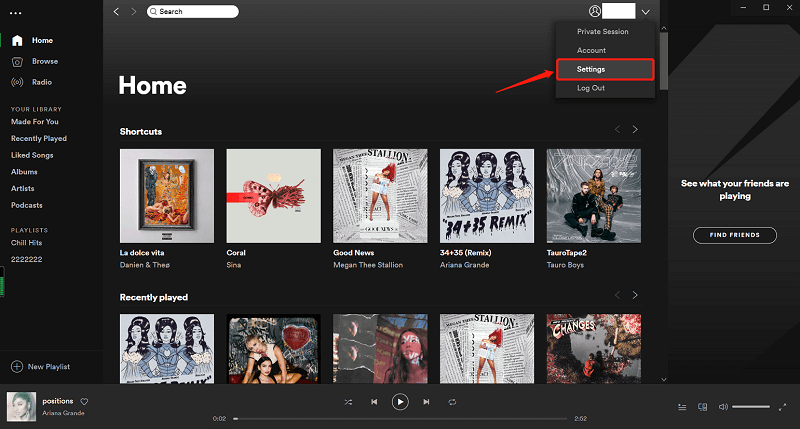
Once the Spotify app is launched and log on to, take your cursor to the profile on top of the page. Click on it to see the drop-down list. Once you see the drop-down list, choose Settings. This is the second to the last option. Click on it to launch the page.
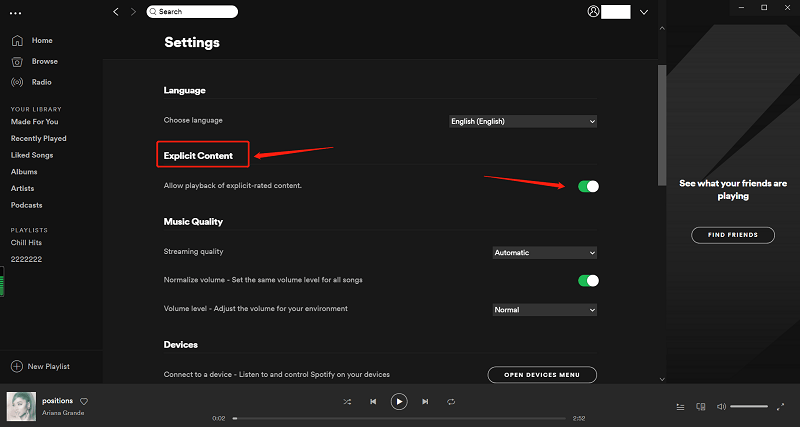
Once you’re on the Settings page, scroll down. After Language, you will find the Explicit Content. Opposite it is a button that you can slide to turn green. Once it turns green, it is enabled to make Spotify block explicit content.
The explicit filter on Spotify blocks all the explicit words on songs. While it does not block the songs, the explicit words are blocked. Read on to see how you can use the explicit filter on Spotify.
Choose an album from the playlist. As you scroll down on the songs, you might see the word Explicit opposite the title of the songs. If you see it, then the songs contain explicit words.
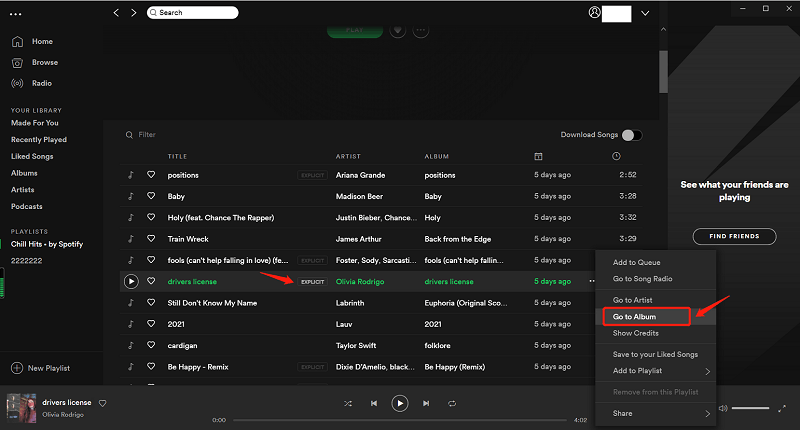
Should you see the word Explicit opposite the title of the songs, click on the 1 More Release button you see at the bottom of the page. Then click on the album seen underneath the 1 More Release button.
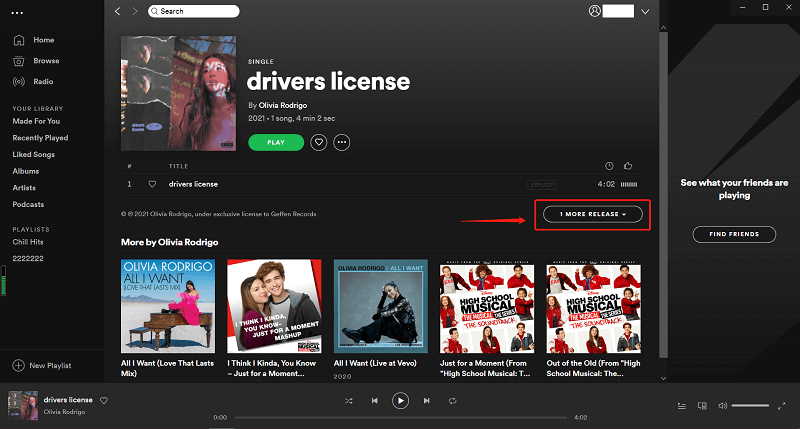
Scroll back up to check the list of songs. The word Explicit should disappear from the list. Hence, the songs will be non-explicit, blocking the bad words.
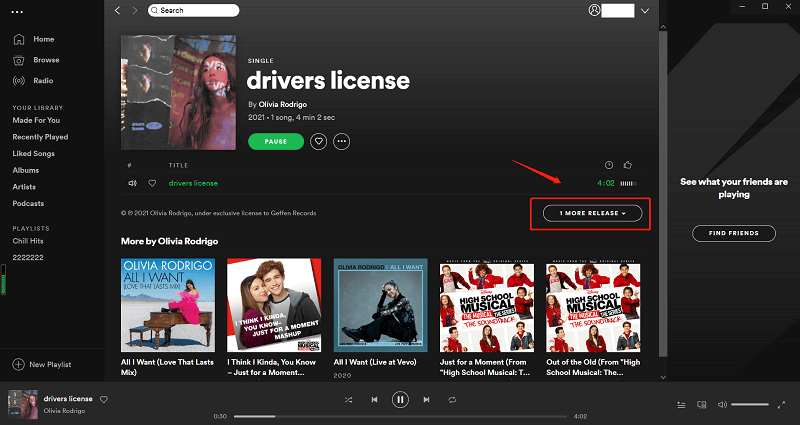
The non-explicit list of songs should be automatically saved. However, to make sure that it’s saved, click on the button beside the green Play button. This option might be too tedious for you. Going through all the albums on your kid’s playlist is going to take some time. Keep in mind that kids also share playlists so it would be hard to go through each and every single playlist they listen to. It’s more practical to enable the Explicit Content button.
You can create child-friendly playlists. You can create them right within Spotify or outside the app as well.
The steps below will show you how to create child-friendly playlists within the Spotify app
Open the Spotify app and make sure to log into your kid’s account. To be sure, check if the Explicit Content button is enabled.
Look for the menu and click on Your Library tab. Take your cursor to Playlist. You will find this under Your Daily Mix.
Look for Edit on the top right-hand side of the screen. Tap on it. Then you will see a Create tab on the top left-hand side of the screen. Tap on it as well.
A pop-up box will appear where you can name your new playlist. Provide a name for your new playlist and click on the Create button.
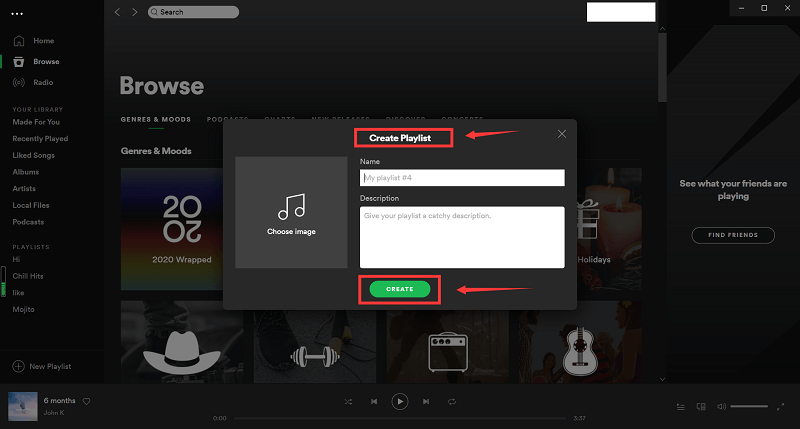
You now have a playlist but it’s empty. It does not have songs yet. You can start searching for child-friendly songs within Spotify. Then you can add those songs to your new playlist. If your kid is on a premium account, then he or she will be able to listen to the playlist offline.
Since Spotify is also a platform where users can share content, it’s going to be hard to keep your kids from sharing with other people. On your part, it’s going to be a lot harder to keep your kids from explicit content. Even if you have enabled the Explicit Content button, they can still be exposed most especially if they’re on a free account.
So, if you think that your kids are just too young to use Spotify, you can create a child-friendly playlist for them that they can listen to offline. With the songs you can get from your Spotify account, you can download all the Spotify songs from Spotify and create a 100% child-friendly playlist that can be played offline. Read the steps below to see how you can do that.
Step 1. Download a Program called DumpMedia Spotify Music Converter
Step 2. Add Child-Friendly Song from Spotify
Step 3. Choose a File Format for Songs
Step 4. Convert Songs
Here are the detailed steps on how you can use the DumpMedia Spotify Music Converter to create child-friendly playlists.
You can download the DumpMedia Spotify Music Converter using this link. The link takes you directly to the page where you can download the program. No need to click on the menu. After you download, make sure to launch the program.
While you have the DumpMedia Spotify Music Converter opened on your computer, you also have to make sure that Spotify is also launched on your computer. You can use your own Spotify account for this purpose. Choose child-friendly songs on Spotify. Copy their URI. Then paste it on the field of the DumpMedia Spotify Music Converter.

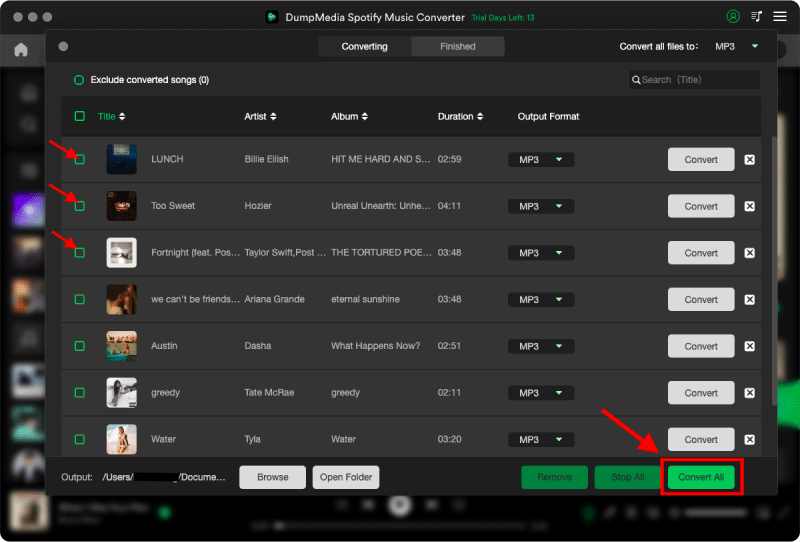
Once you have added the child-friendly songs onto the DumpMedia Spotify Music Converter, choose a file format. Since the DumpMedia Spotify Music Converter strips off the DRM from the songs, you won’t have a hard time playing them on other devices. Hence, you can choose any format that you want. You are not limited to choosing a file format based on the models of your devices.

Once you have added the songs that you like, you can convert the songs by clicking on the Convert button. The songs will be downloaded, converted, and saved on your computer. Once they’re all there, you can create several playlists that you can play on any device. Your kids can listen to them all day long.
As a parent, it’s important to know how to make Spotify block explicit songs. Some songs are just too violent and there is no way you can control these songs from getting on Spotify. You just have to make sure your kids don’t gain access to such songs.
You have to explore all means to ensure that your kids are protected. If you have to keep them off Spotify, then do it. They can still enjoy wholesome music if you choose to download it with the DumpMedia Spotify Music Converter.
Are you a parent? Do you let your kids listen to songs on Spotify? Share your thoughts with us. We would love to hear them.
