
There are a lot of music streaming sites that were introduced to the public. You have Spotify, SoundCloud, and of course iTunes. iTunes has been a great media streaming platform that has been proven by many users nowadays. Having the capability to store different forms of files – be it songs, videos, shows, games, audiobooks, or movies, many are really into using iTunes.
However, if you ever faced the dilemma of having so much in your iTunes library and you now lack some phone storage for other media files, you probably would find ways on how to delete music from iTunes to free up some space for others.
Songs, as we all know, eat a huge percentage on your device’s storage. Keeping a lot would definitely be enjoyable at a time (since you can get to listen to several songs anytime you want to). However, a moment wherein you wanted to delete some from what you have will surely come. This is the main reason why this post was created. We will, of course, help you out!
If you ever faced the difficulty of doing the above, you are lucky to have seen this article.
Now, make sure to hop in.
Contents Guide Part 1. Delete Certain or Specific Songs From iTunesPart 2. Delete Music Albums From iPhonePart 3. Clearing All Music On Your iPhonePart 4. In Summary
In this part, two methods of deleting specific songs from iTunes will be shown – how you can do it using your personal computer and how it can be done on your iPhone.
Now, let us begin with the procedure if you are to use your personal computer.
You only need to follow three simple steps to eventually delete your iTunes songs using your computer.
Step 1. Open and launch your iTunes application on your personal computer.
Step 2. Browse and look for the songs to be deleted.
Step 3. Proceed with the deletion process.
Want to see the detailed steps? Check the explanation for each below section.
Of course, the initial step that you need to perform is to ensure that your iTunes application on your personal computer would be opened and launched.
Now that you have your iTunes application running, you can immediately begin with the process. At your iTunes application, make sure to head to the songs section wherein all those in your playlists or albums will be seen.
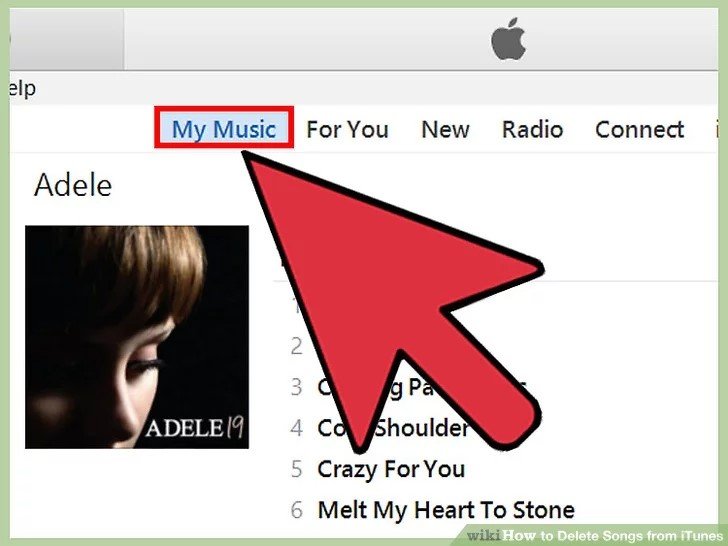
From the list that would be shown in the screen (which depends on how your iTunes was set up), make sure to choose those songs you wanted to be deleted. The selection process can be done by checking the checkboxes alongside each song.
If you are having a hard time looking for specific songs in mind, you can utilize the search bar which is just located in the upper right corner of the application’s window.
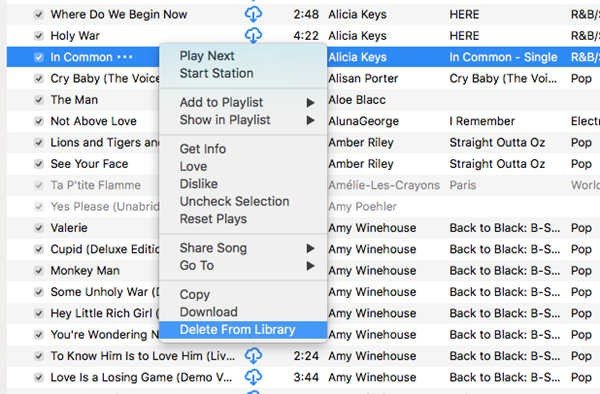
Once you have decided which among your most loved songs will be removed from your library, you can just perform right-clicking and a drop-down list will be shown. Simply choose the option “Delete From Library”. Once you have ticked this, the selected songs will automatically be deleted in your library.
Upon knowing the procedure to delete your iTunes songs on a personal computer, we are now to highlight the steps needed to be performed if you are to use your iPhone.
Actually, the method differs depending on if you are an Apple Music user or not.
For Apple Music users, if the deletion will be done following the below steps, the songs to be deleted will be removed from both iPhone device and iCloud library. This only means that the songs chosen will be removed from all devices you are using.
Here are the steps to continue.
Step 1. Open the Apple Music on your iPhone.
Step 2. Locate the songs to be deleted.
Step 3. Hit the “Remove” and “Delete from Library” buttons.
Look at these further.
Open The Apple Music On Your iPhone
Launching the Apple Music application on your iPhone device should be the first step to be performed. This is where we are going to begin.
Locate The Songs To Be Deleted
Now that your Apple Music has been opened and launched, you would now need to choose and locate the songs you ought to be deleted. To proceed, you would be needing to tap and hold the songs to see the next options you can do.
Hit the “Remove” and “Delete from Library” buttons
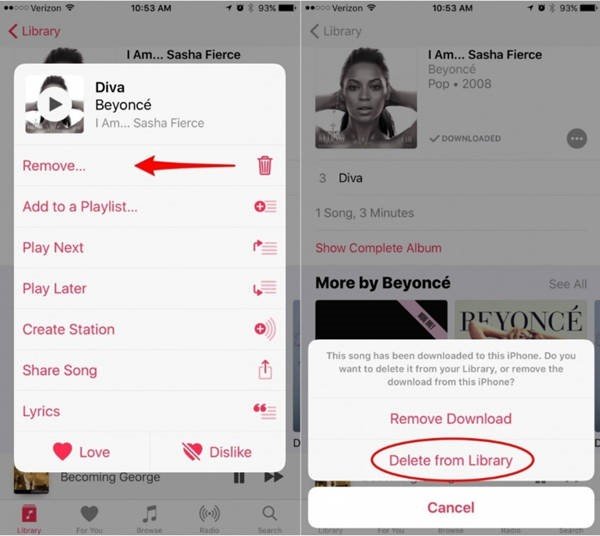
Upon tapping and holding, a new window will be seen on the screen. This shows the many options you can do with the song wherein you can choose from. The first thing that you should do is to hit the “Remove” button and then the “Delete from Library” button to finally complete the process.
The next discussion will now focus on the steps to be performed to proceed with a deletion in case you are a non-Apple Music user.
Actually, the three steps initially mentioned also apply to non-Apple Music users.
The only difference is that if you have those songs purchased from iTunes store, you have the capability to just go back to iTunes store, redownload each song and finally restore those. However, keep in mind that if you have the songs bought from any other platforms, you can only have those deleted from your iPhone.
Having the discussion on how to have your specific iTunes songs deleted either by using your personal computer or iPhone, we will now be giving additional information wherein the topic will be circling around the idea of deleting music albums from iPhone.
The procedure to be conducted is as well too easy and simple to handle.
Here is how you can do it.
Step 1. You would need to head to your music application on your iPhone to begin.
Step 2. Once you are now on your application, go to the library section (wherein your albums and playlists will be reflected).
Step 3. The next thing you should do is to choose and look at each album. Once you have decided which one to delete, you can just tap and hold it and new options will be seen.
Step 4. Among all the options that would be prompted, you will notice the “Remove” option immediately as it is the first among the selections. You just need to hit it to finally delete such an album from your iPhone device.
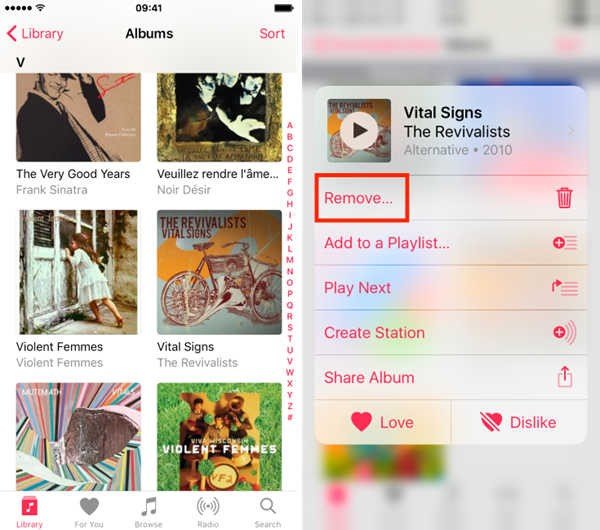
The method to be done is as well simple. If you have been looking and searching on how you can do the deletion of a music album, you can have this as your reference.
If you are really lacking storage space for important files on your iPhone device and have decided to remove all the songs you have been keeping say for a long time, probably, you are left with no option but to clear all your music or songs. If you have been wondering how to do such, the below guide to be presented would surely make way for you to do it.
You can have your songs cleared by doing only three steps.
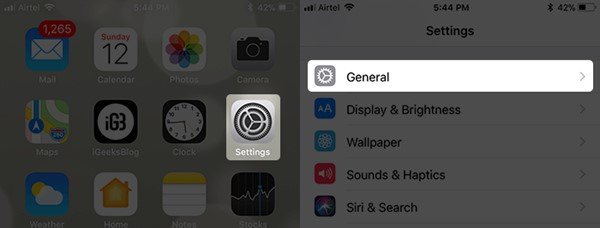
Step 1: You must head to your “Settings” application. Tick it and you will be seeing a lot of options on your screen. From there, choose “General”.
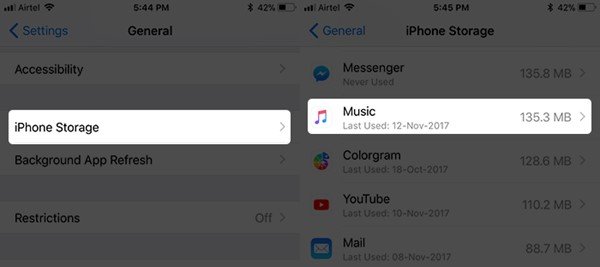
Step 2: Next thing would be choosing the “iPhone Storage” menu. Once clicked, you will be noticing that all applications eating your storage space will be shown. Look for “Music” and tick it.
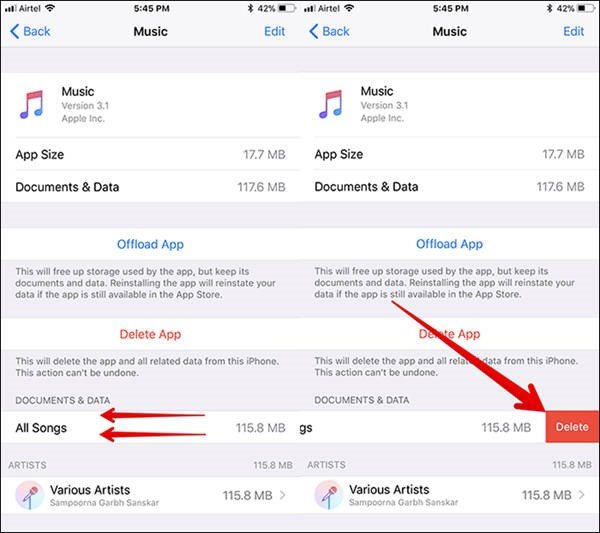
Step 3: Once finished, a new window will show below the screen. Make sure to look for the “All Songs” option. Once found, swipe to the left and you will be seeing the “Delete” button. Click this to complete the procedure.
Now that you have arrived in this section, you are now fully aware of how you can solve the dilemma of having your iTunes songs deleted in an instant. As mentioned in the introduction part, the steps are just simple and too easy to be done.
Presented in this post are ideas which are divided into three parts – methods of deleting specific iTunes songs, the procedure of deleting music albums, and lastly, the steps to be performed to clear all songs on your device.
Freeing up your device’s storage space would definitely be one of the hardest tasks to perform. Removing some from your files, most especially your most loved and favorite songs you have purchased is indeed difficult. If you can’t help but keep such, the recommendation would be extending your iCloud storage space which can be done by paying a certain amount of money. Well, this only works if you really can’t afford to delete any from what you have.
There is a software application called DumpMedia Apple Music Converter. This tool is capable of removing DRM protection and allows you to convert songs to thousands of available formats. It even lets you listen to Apple Music songs offline, and even keep your songs running although your subscription has ended! It is possible for you to download music from iTunes. You can check its official website to know more about it.
Hope you had learned something from this article. If you got questions or ideas in mind, those are all welcome here! Make sure to leave it down!
