
Some ringtones aren’t so great. Some could be downright irritating. It’s almost too embarrassing to hear them come from your phone. Naturally, you would want a ringtone that sounds good. Where else could you get some awesome ringtones but from your vast music collection from iTunes, right?
If you continue reading, you will learn how to create ringtones in iTunes. The process isn’t too hard so don’t worry about it. Make sure to read until the end so that you could also learn how to create ringtones using your songs from Apple Music.
Contents Guide Part 1. Your Ringtone Makes an ImpactPart 2. How to Create Ringtones in iTunesPart 3. Bonus: Have a Wider Selection of Ringtones with the DumpMediaPart 4. Conclusion
Don’t take your ringtone for granted. Truth be told, it does make an impact on your personality especially if you intend to personalize it.
A ringtone not only catches your attention to answer your phone; it also catches other people’s attention. So, if you want to catch other people’s attention and you don’t want to piss them off, the least you can do is to have a decent ringtone. One thing is for sure, you can find a decent song in your iTunes. Hence, you must know how to create ringtones in iTunes.
It’s time to learn the steps on how to create ringtones in iTunes. Read the steps below to start creating awesome ringtones in iTunes. Keep in mind that you can use the same process on both Mac and Windows.
Connect your iPhone to your computer using a lightning connector. Tap the iPhone icon on the top left corner. After you have clicked on the iPhone icon, take your cursor to the left-hand side of the screen. Under Settings, click on Summary. Check the box before Manually manage music and videos. After that, you can disconnect your iPhone.
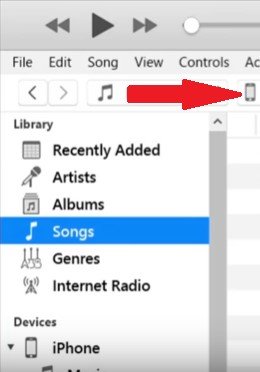
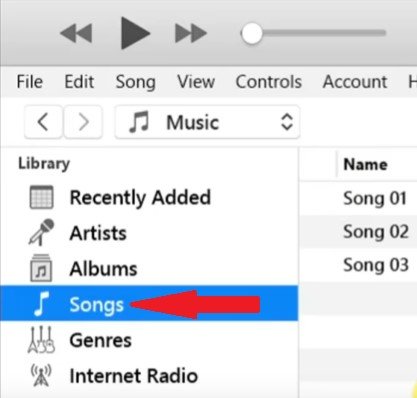
You are now on the iTunes Library page. Take your cursor to the left-hand side of the screen and click on Songs under Library. Select the song on the main screen by doing a right-click on it. Select Song Info from the drop-down menu.
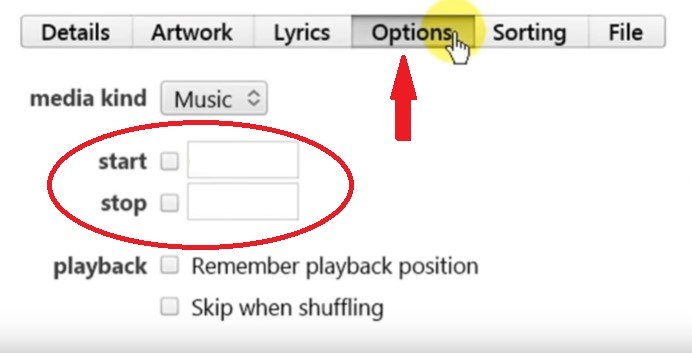
A pop-window will appear. You will find Options on the top menu. Click on it. Mark the Start and Stop checkboxes. Then change the Start and Stop time. This will depend on how long you want the song to be for your ringtone. For example, if you want it to last for 30 seconds, you could set the Start time to 0 and Stop time to 30. Take note that the first digit is for minutes and the second is for seconds. You can also set any part of the song as your ringtone but you need to make sure that the total length of the song is less than 30 seconds. Click on the OK button after setting the length of the ringtone.
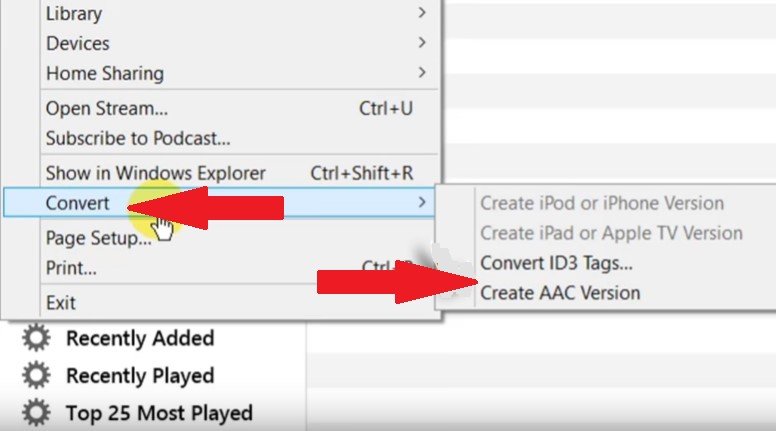
Back on the Library page of your iTunes, keep the song you selected highlighted while clicking on File on the top menu bar. Select Convert from the drop-down menu. Another drop-down menu list will appear. Click on Create AAC Version. Once you have clicked on it, look on top of the iTunes page. You will notice that iTunes is creating a copy of that particular song with a reduced time.
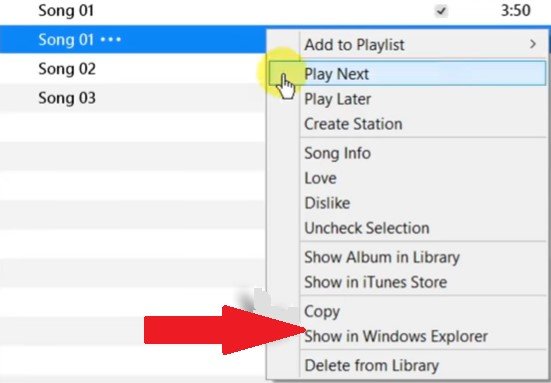
When iTunes is done converting the song, it will appear on the list of your main screen. Right-click on the song and select Show in Windows Explorer from the drop-down menu. A separate folder will be launched with the AAC version of the song. Do a right-click on it and copy it. Then paste it on to your desktop. With your newly converted song pasted on to your desktop, you can now delete it from your iTunes list.
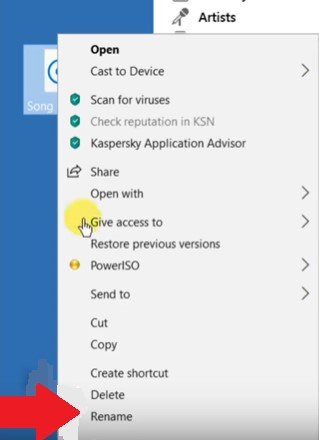
You can now change the file extension of the song you have just pasted on your desktop. Right-click on the songs and select Rename from the drop-down menu and change M4A to M4R. Then hit Enter on your keyboard and Yes on the pop-up screen that will appear.
Connect your iPhone to your computer. You will see your iPhone on the Devices section on the left-hand side of the screen. Click on Tones. Drag your ringtone from your desktop to the Tones window. Once you have done that, your new ringtone is copied on to your iPhone. There you have it. That is how to create ringtones in iTunes.
You might find it hard to convert some of the songs from iTunes especially the ones protected by DRM. Don’t let that stop you from using those songs. There is a way for you to remove DRM from your favorite songs on Apple Music and listen to it offline.
The DumpMedia Apple Music Converter can easily remove the DRM so that you could convert and transfer any song to your iPhone as a ringtone. Yes, any song! So, if you have downloaded a song from your Apple Music and you want to use it as a ringtone, you can go right ahead and do it. You just need to convert the song first with the use of the DumpMedia Apple Music Converter. Once you’re done converting it with the DumpMedia Apple Music Converter, save it to your iTunes where you can create a ringtone from it. It’s that easy. Read this link to learn more about it.
It is pretty easy to learn how to create ringtones in iTunes. Hence, there is no reason why you should be having a boring or even worse, an embarrassing ringtone. You can easily create awesome ringtones in iTunes. With the use of the DumpMedia Apple Music Converter, you now have more options for your ringtones.
What is your ringtone? Have you created one in iTunes already? Feel free to share with us your tricks on how to create ringtones in iTunes.
