
Are you one of the many Spotify users worldwide? If you are, then surely, you are very satisfied with your music-listening experience. Well, you got to listen to millions of songs anytime and anywhere and got to enjoy many different features the application has.
Apart from the above, have you ever thought about the idea of sharing your favorite songs with people you love and know? Ever asked about how to share a Spotify playlist with anyone ? If you have been wondering for quite some time regarding the answer and solution to the mentioned questions, we are actually to tackle those here.
Contents Guide Part 1: An Overview of SpotifyPart 2: How To Share A Spotify PlaylistPart 3: To Wrap It All
Spotify has been packed with numerous functions and capabilities apart from being just a music streaming service. You can get to enjoy different features such as offline music streaming and playback, building and creating great playlists, and even sharing those most loved playlists of yours to several people you know including friends and family members.
Since here, the topic would be much about how to share a Spotify playlist, we will be teaching you three ways on how to finally do it – on your personal computer, on your mobile devices, and even via email. If you are one of the many who are wishing to know more about this topic, then make sure to stay on this page to get the ideas you are longing to know.

The first thing we will be delving into would be the processes you need to undergo in order to finally share your most loved Spotify playlist to others using your desktop Spotify application. The procedure is actually too easy to perform. Here are the steps for your reference.
Next texts would be discussing the details corresponding to each step.
The initial thing that you need to do is of course to open your Spotify application on your personal computer. Once you have launched it, in the main interface, look and search for the playlists you wanted to be shared with anyone. Once you have seen the playlist, ensure that you will be ticking the “three-dot” icon located alongside each.
Upon ticking, you will be noticing new options displayed on the screen. From those, you must hit the “Share” option to proceed. Upon doing it, you will get to see the many different platforms wherein you can share your playlists.
You have social media accounts such as Facebook, Messenger, Twitter, Skype, and more. You can just hit any of this and even add some texts, messages, or captions before publishing your post.
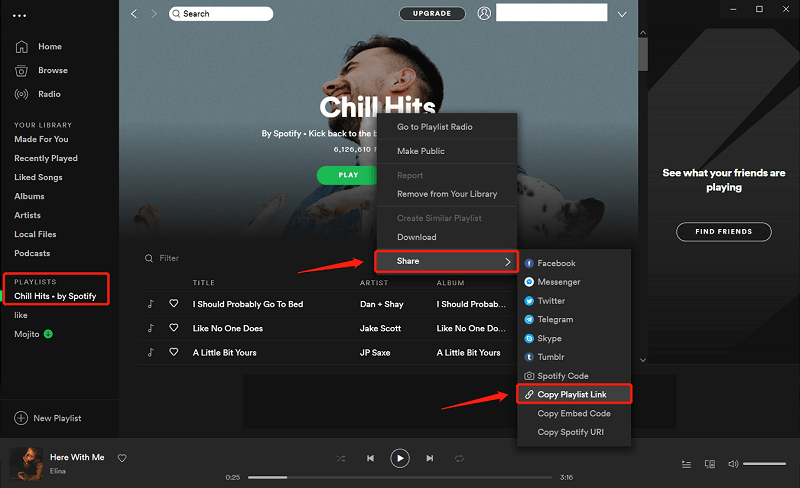
Apart from hitting any social media channels, you can also do the copying of link to the clipboard (which you can as well see on the screen). Once you ticked the mentioned option, you can immediately have the link available at hand.
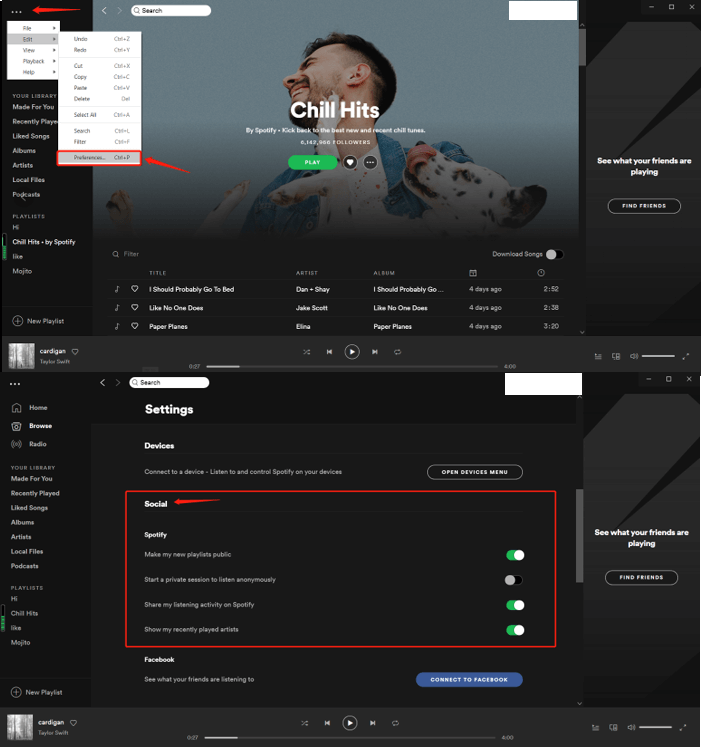
In here, you can head to the “Preference” button located at the top left corner of your screen under the “Edit” option. Tick it and you will see more options embedded on it. You will be doing this step in order to make all your Spotify music and playlists public and even proceed with scrobbling to Last.fm.
As you know, Last.fm is a platform which actually keeps track of your music listening experience and tried to recommend your song choices to others. You would not need to head to your “Social” option and make sure to have both Facebooks and Last.fm connected to your Spotify account.
The next thing we are to discuss is how to share a Spotify playlist and shared using your mobile devices.
Using your mobile phones, all playlists can easily be shared using a “QR Code”. And, this can as well be done easily and in a few minutes and in just two steps.
These are a brief description of each step.
Step 1. Have Your Spotify QR Code Ready
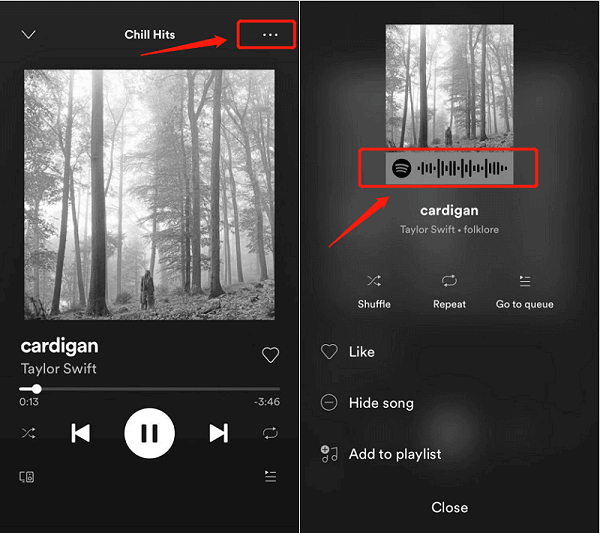
If it is your first time hearing and reading about Spotify QR code, then you must be quite surprised that Spotify actually has it. In order to have this fully utilized, you must ensure that the Spotify application you have on your phone is the latest version. Once verified, you can just open your Spotify application on your mobile device and select the music to be shared.
When you hit the “three-dot” icon alongside each, you will be arriving at a new window wherein new options are displayed. At the top of the new options, you will be seeing the below-highlighted image – that is the QR code we are talking about. You can just simply hold the screen to save the image and proceed with sending to your friends. You need to mention that they should long-press the image to recognize the code and finally play the song.
Step 2. Proceed With Scanning The QR Code
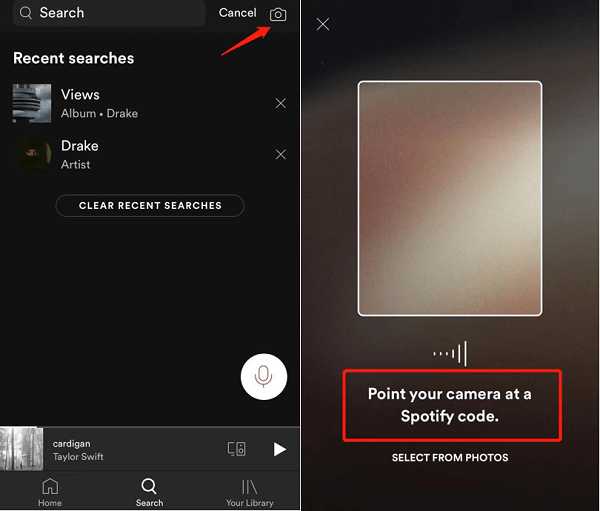
If you have the person with whom you will be sharing your songs and playlists, then you can just perform the scanning process immediately. To do this, once you opened your Spotify application, you can immediately head to the “Search” icon and hit the “Camera” icon you will be seeing at the top right corner of your screen. Make sure that you allowed access to the camera on your Spotify application. If you already did, you can just tap the “Scan” button and scan the QR code from your friend’s mobile phone.
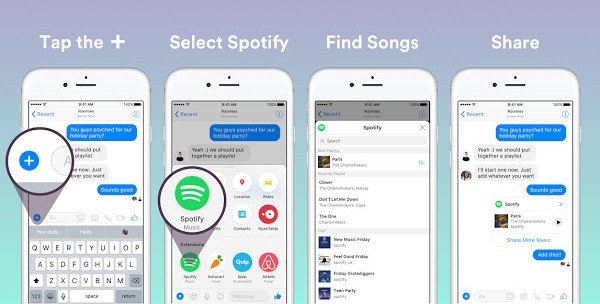
Apart from utilizing the creation of QR code, you also have the capability to share your most loved playlists and songs to your Facebook messenger using your mobile phone. You would also need to undergo only three easy steps.
Let us know more about the mentioned.
Step 1. Adding Of Spotify Extension On Facebook Messenger Application
Believe it or not, you can add an extension to your Facebook Messenger application. You can do it to share your Spotify playlists with others using the mentioned platform. In order to enable the extension, you can simply open the Facebook messenger application and select the names of your friends or create a group of people with whom you wanted your playlists to be shared. In the chatting window or screen, the “+” icon will let you access all the extensions. You just need to tap the Spotify logo to continue.
Step 2. Creation Of Playlists
The next step would be the creation of playlists. Once you have created those, the sharing would be too easy. Make sure to add all the songs you love.
Step 3. Sharing Created Playlists
Now, you can have the Spotify playlists you have shared with people and Facebook friends. The process is applicable whether you are using an Android or Apple device.
Lastly, you can have your songs and playlists shared using your email. The first two ways of sharing would only be possible in case both the person who will be sharing and the person to receive are using and utilizing the Spotify application. The problem now would be in case the other person does not have a Spotify account. What would be the best way to solve it?
The answer to the above would be by sharing the playlists via email.
In order to do this, there would be a need to make use of a third-party software application which has the capability to download Spotify songs. Here, the tool most recommended is this DumpMedia Spotify Music Converter. Apart from downloading, it can also convert the Spotify songs to different several formats making them playable in any device and media player.
How are you going to use this tool?
Let us look into these steps further.
Step 1. Download And Install DumpMedia Spotify Music Converter
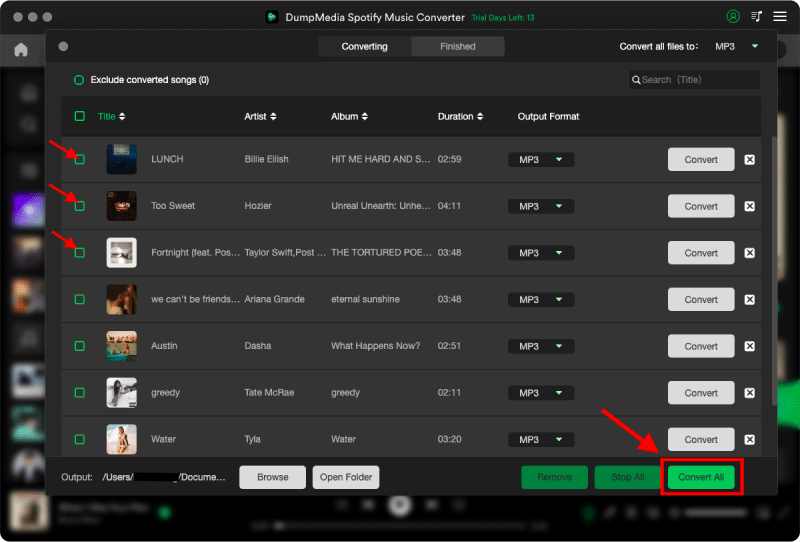
Of course, the first thing you need to do is to have this DumpMedia Spotify Music Converter downloaded and installed on your personal computer. Once done, just open and launch the program to start as well as your Spotify application. You can begin adding the files by performing dragging and dropping or even adding just the file’s URL (link). This program supports batch conversion which makes it possible to convert not only a file but a number. Converting a lot at a time is not an issue.
Step 2. Choose Any Format You Desire As The Resulting One
Upon importing and uploading the songs to be converted, the next step would be the selection of the output format. Make sure that you will choose any format you desire among those that you will be seeing on the screen. In this case, we ought to convert the songs to a format which has been generally supported by numerous media players. You can have the songs converted to MP3 format or any other depending on your preference. You can do this by heading to the “Convert All Tasks To” button located at the top right corner of the screen.

Step 3. Proceed With Conversion By Ticking The Convert Button
The last step would be hitting the “Convert” button to begin the conversion process. This will only take some time since the program is designed to function five times faster than any other converters. While conversion is being done, status bars will be shown on the screen wherein you can monitor the progress of the process for each song.
Now that we got the Spotify songs converted and downloaded using this DumpMedia Spotify Music Converter, you can have those songs and playlists shared using your email.
You can actually make use of three different ways on how you can successfully share your most loved Spotify playlists to others – using your personal computer, your mobile devices, or even via mail.
How to share a Spotify playlist? Which do you think is the easiest one to follow and use?
