Sending video files will consume large amounts of your bandwidth especially when you send the files repeatedly through your website. The solution to this is to convert your videos into animated looping GIFs to cut down the file sizes significantly. Making a GIF loop only requires simple steps through the use of third-party tools whether in a Windows or a Mac platform.
In this article, we will be showing you step-by-step guides on how to make a GIF loop online or offline using several tools. Then we will give you our most recommended tool to convert your looping GIFs into your desired formats to make them playable on whichever you are going to display them on. But first, let us discuss the reasons why your GIFs fail to loop by themselves in the next section.
Contents GuidePart 1. Why Your GIF Fails to Loop by ItselfPart 2. Make A GIF Loop Through GIF Creator ToolsPart 3. Recommended Way to Convert Your Looping GIF to Your Desired FormatPart 4. In Conclusion
Normally, the majority of the GIF memes that you will encounter will restart where they end. If yours does not, the only solution is to go back to the applications you used to create the animated GIF. Contrastingly, some people would prefer to see GIFs stopping after a single playback only. Or else, they become confused or tired about these energetic GIF images. Thus, some tools or websites for creating GIFs will set a default one-time playback limit for the saved GIFs.
But no worries. Most often, these creator tools for GIFs offer settings for multiple playback loop but you just cannot find where they are. However, this hidden function for GIF looping varies from websites and software so there is no chance to point out where exactly can you find them on yours. As an alternative, we have selected the most commonly used GIF creator tools to better show you how you can create a looping GIF from your own video in the next section.

In this method, we are going to use Photoshop to show you how you can create a looping GIF from your own video step by step:
Step 1: Add your video to Photoshop.
Step 2: Trim the video to the part where you want to turn into a looping GIF.
Step 3: Delete the extra video portions.
Step 4: Convert the remaining frames of the video into a looping GIF.
To do this, just follow the detailed steps below:
To open your video file which you want to convert into a looping GIF, launch Photoshop first. Go to the menu section and click on File. From the options, choose Open. Browse for your video and double click on it.
On the Photoshop menu bar, click on Window and choose Animation from the options to open the Animation palette. Slide the blue handles found over the movie timeline until the handles are set at the start and end of the portion of the video which you want to convert into GIF. From the Animation palette, choose Trim Document Duration to Work Area. This will cut out the portions of your video that are outside your selected start and endpoints.
Back to the Animation palette again, click on the Flatten Frames into Layers button to separate the video frames into individual ones. Right-click on the active layer of the video and click on the Delete layer option from the menu that will pop-up. This deletes the extra frames from the video.
Go back to the Animation palette again and choose the Make Frames From Layers. Go to Photoshop’s File menu and click on it. Select Save for Web & Devices from the options. Choose GIF as the output format. Click on the Looping Options menu and choose Forever to make the resulting GIF loop continuously. Finally, click Save to convert your selected video into a looping GIF.

Tip: Do you want to make a GIF with sound? It sounds so cool. Just click the right link and you will know how to make a GIF with sound, are you surprised?
This tool can only create a looping GIF from JPG, PNG, or GIF image files. To create a continuously looping GIF using GIF Maker, follow the steps below.
Step 1. Launch your browser and go to GIF Maker’s website.
Step 2. Click on the Upload Images button. Browse your image files, highlight them and then press enter on your keyboard to upload them on the website. Wait until each of your selected image files is uploaded.
Step 3. At the Control Panel located at the right side of the page, you can set the Canvas size, Animation speed, Repeat times, Begin time in seconds, and even add a YouTube Music URL. To make the resulting GIF infinitely loop, do not change the default value for the Repeat times option which is 0.
Step 4. Finally, click on the Create GIF Animation button to create a looping GIF from your selected image files.
Similar to GIF Maker, I Love Img also can only create a looping GIF from images but only JPG ones. To create a continuously looping GIF using I Love Img, follow the steps below.
Step 1. Launch your browser and go to I Love Img’s website.
Step 2. Click on the Select JPG Images button and browser for the JPG images that you want to turn into a looping GIF. Alternatively, you can also drag and drop your JPG files on the webpage.
Step 3. Arrange the JPG files into your desired order in the resulting GIF by dragging each image to your selected position in the default arrangement.
Step 4. On the Convert to GIF panel at the right portion of the webpage, click on the Animated GIF option.
Step 5. Set the number of seconds each image should appear on your GIF on the Seconds per image dropdown button.
Step 6. Tick the Loop checkbox to make the GIF loop.
Step 7. Finally, click on the blue Convert Image button.
Unlike the GIF Maker and I Love Img, LunaPic can accept a single-looping GIF file that you have previously created as an input. To create a continuously looping GIF using LunaPic, follow the steps below.
Step 1. Launch your browser and go to LunaPic’s website.
Step 2. Click on the Browse button to upload your GIF file or you can enter your GIF’s URL.
Step 3. Click on the Animation option from the top menu.
Step 4. Click on Edit GIF Animation from the choices.
Step 5. Select the number of times you want your GIF to loop from the Looping drop-down button.
Step 6. Click Apply.

For this method, we recommend using DumpMedia Video Converter. DumpMedia is a powerful and high-speed all-in-one audio and video converter, downloader, editor, and player. Enjoy the convenience of a friendly interface equipped with a lot of features to meet all of your video needs. The software supports many formats including MPEG, 3GP, FLV, MKV, AVI, WMV, MOV, MP4 along other regular video formats.
DumpMedia also allows you to improve your video’s quality by upscaling its resolution by converting it from SD to HD resolution and vice versa. To convert your looping GIF to your desired format, download the software first and follow the steps below:
Step 1: Launch the DumpMedia Video Converter
Step 2: Add your GIF file to the application
Step 3: Choose your desired output format and destination folder
Step 4: Start the conversion process
After downloading the DumpMedia installer, launch the application by following the steps below for Windows and MacOS operating systems.
For Windows users:
For MacOS users:
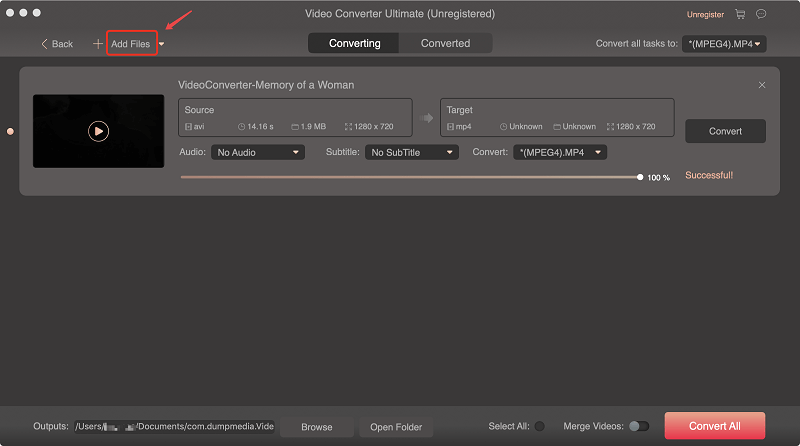
Click the Add Files button located at the top-left section of the interface to import your files or you can drag-and-drop them directly into the main interface.

Look for the Convert all tasks to text at the top right corner of the interface. Select your desired output format. At the bottom of the interface, click on the Browse button and browse your computer to the desired destination folder of the converted files.
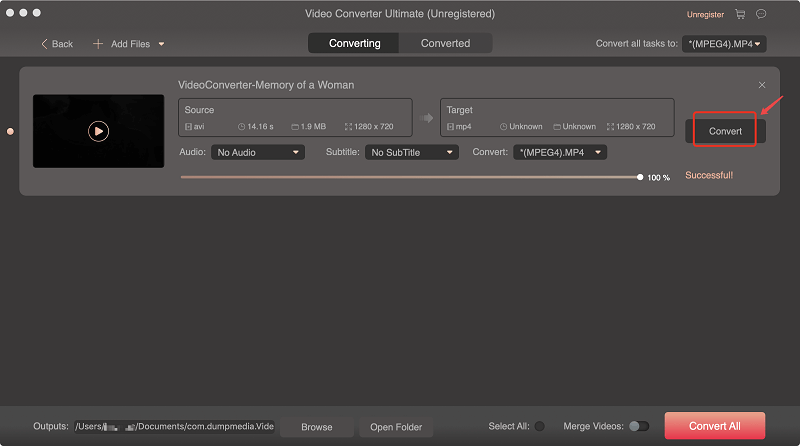
Click the Convert button to start the conversion of your GIF file. Wait for the conversion to complete.

In this article, we discussed the reasons why your created GIF failed to loop by itself. The common reason is that most GIF creator saves your GIFs with a single loop by default and the settings for multiple loops is sometimes hard to find. So to help you create a looping GIF from your own video or images, we gave you various tools you can use online or offline:
After which we gave you our most recommended tool you can use to convert your resulting looping GIFs into other formats, DumpMedia Video Converter so that they can be played on whatever platform you are planning to put them on. So that’s it! Hopefully, this guide was able to answer what you are looking for.
