We are well aware that there are a lot of video formats which are now popularized and is being used by a lot of users. We got MP4, MOV, MPEG, MTS, AVI, WMV, and many more. Each, of course, has different and unique features. In this article, the discussion would be more about AVI and WMV formats and the ways you can use to convert your AVI video files to WMV format.
So if you had ever experienced the need to convert mentioned video file formats, you are on the right page. Make sure to keep on reading this post.
Contents GuidePart 1: What Is The Difference Between AVI And WMV Video Formats?Part 2: Converting Your AVI Video Files to WMV Using Offline ConverterPart 3: Converting Your AVI Video Files to WMV Using Online ConvertersPart 4: Converting Your AVI Video Files to WMV Using VLC Media Player
Audio Video Interleave which is more known as AVI is a media container that contains video and audio data. This allows the playback of audio and video simultaneously. Videos in this format are usually of larger size.
Windows Media Video or WMV, on the other hand, is a format that only contains video data and is proven compatible with all devices running under the Windows operating system. Videos in this format are smaller in size. These could be the reasons why people somehow tend to have their AVI files converted to WMV.

The best way to convert your AVI Video File to WMV is by using an amazing video converter – DumpMedia Video Converter! It is one tool that is capable of performing a lot of functions most especially the conversion function you desire.
The main feature of this tool is video conversion to different desired formats without quality loss, even maintaining the original look. This supports numerous formats such as the popular MP4, AVI, WMA, WAV, FLAC, and a lot more! In addition, you can easily convert DVD and videos to GIF, video or audio. This as well as editing and enhancing functions wherein you can perform adjusting of brightness, contrast, saturation, and volume control. Even adding subtitles is possible! Aside from its main function, this one is software with a user-friendly interface and offers easy steps to perform the desired processes.
Downloading and even the installation of this program could be done in just a few minutes and would require only a few clicks. You got to have your converted video by just following a few and simple steps.
To proceed with video conversion, you must do this simple step by step guide.
Step 1 : Of course, you are required to ensure that this DumpMedia Video Converter would be downloaded and installed on your Windows of Mac computers.
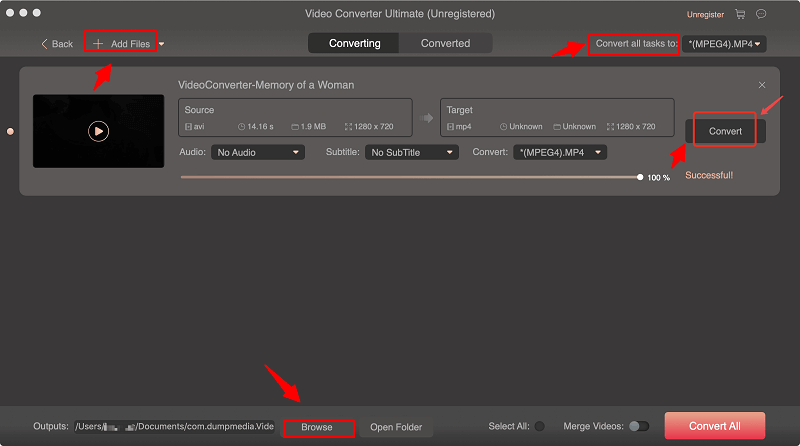
Step 2 : Launch the program and click the “Add files” button to select the AVI video file to convert. You can as well drag and drop the files directly from the location to the main interface of the application.
Step 3 : Select the desired output format by ticking the “Convert All Tasks to: ”. You got a lot of options you can choose from such as MP4, MOV, WMV, AVI and many more. In this case, you can immediately tick the WMV format.
Step 4 : Once done, choose the destination folder wherein the output or converted file would be saved by clicking the “Browse” button.
Step 5 : Click the “Convert ” button to begin with the conversion process.

Once you are done with these steps, you can preview the video and check the converted file by tapping the “Open Folder” option. By performing just these five simple steps, you go to have your converted video in just a few minutes.
Bonus Tips : Aside from converting AVI video to WMV format using the Dumpmedia Video Converter, you can utilize it to convert AVI to MP4 free.
Another professional software application that you can use in the conversion of files in this Wondershare UniConverter (originally called Wondershare Video Converter Ultimate). Same with DumpMedia Video Converter, this will, of course, let you convert your AVI video file to WMV. In addition to this, the software as well as supports other formats, up to over a thousand! You also have the chance to personalize, enhance, and customize your videos since this got editing features. Trimming, cropping, and adding of subtitles and watermarks are made efficiently. This also lets you burn your DVDs giving you access to many available menu templates. Most importantly, this is compatible with lots of devices and gadgets such as Windows and Mac.
Yes! We are as well to discuss how to utilize online converters.
If you wanted to avoid the hassle of downloading and installing software applications, this could be the best option for you. In addition, if you would just do the conversion process one-time (not that regularly), this would be the most recommended way. You just need to have a secure and stable internet connection.
In doing the conversion, you just need to follow three easy and simple steps.
Step 1: Go to the Online Converter on the web.
Step 2: Choose the “Choose Files” button to be able to browse and select the desired AVI files to be converted.
Step 3: Tick the “Convert ” button at the bottom part and you are good to go!

Once the conversion process is done, the screen will automatically direct you to the page wherein you can download the converted file in an instant.
Most of us would definitely say we got the VLC Media Player installed on our personal computers. Do you know that this application is capable as well in converting your AVI files to WMV?
You just need to follow the below guide.
Step 1: Open and launch you VLC Media Player.
Step 2: Click the “File” button. Make sure to select “Open” and look for your AVI video files.
Step 3: Next step would be choosing the "Preferences" option from the "Settings" tab. You need to mark the "Advanced Options " box which you will see in the bottom right corner of the screen.
Step 4: Tick the “Stream output " and "Sout Stream " options before selecting "Transcode." You got the option to indicate your video's height and width based on your preference. Once completed, tick the "Save” button.
Step 5: Click the "Open File" button under “File”. Click "Browse" to be able to open your AVI file. Ensure that you enabled the "Stream/Save" box before clicking "Settings."
Step 6: Once done, select your output format (WMV) and enable the "Video Codec " and "Audio Codec " boxes. Once done, click the "OK” button.

Upon doing the above steps, just tick the "Play" button on the VLC media player’s main interface. You just need to wait until the conversion process is completed. The time it will take will be based on how large your AVI file is.
Tip: Sometimes you may get an error message that says the file is not supported when playing WMV files in VLC, you can click this link to fix that issue.
In Conclusion
In this article, there are three options which were discussed. All these aimed to have your AVI files converted to WMV in the fastest and most efficient way possible. Now, the choice which among the above you will use will of course depend on your needs and wants. Have you found this article helpful? Let us know if you still got other suggestions or even comments by leaving your words and thoughts on below section.
