Netflix is awesome. You get to watch old television series and movies. In addition to that, you also get to watch a Netflix series that are very addicting. Once you start, you don’t want to stop. You just want to watch Netflix for the whole day. That could be a problem if you have work to do.
Netflix gives you the option to download. That way, you can watch even if you’re offline. The downloads don’t last forever. They disappear after a couple of hours. Furthermore, not all the series and movies on Netflix have the option for download.
If in case, you can’t see a download option, you would have to know how to record Netflix movies on your computer screen. That way, you can store it on your desktop for future viewing. So keep reading to learn more.
Contents Guide Part 1. How To Record Netflix Movies on Your ComputerPart 2. Bonus Tip: An Awesome Tool Help You Download and Convert VideosPart 3. In Conclusion
Yes, it’s possible to record video and movies streamed on your computer. But how to record Netflix movies? The best thing about it is that you can do it for free with CamStudio.

CamStudio is a free screen recording program. It’s an open-source program, which means it’s very flexible. Other computer geeks can change the code of the program to hopefully make it better.
Even if you’re not a computer techie, you can still benefit from CamStudio. This is the safest program you can use to record Netflix movies on your screen. As a matter of fact, you can record just about anything that’s streamed on your computer with CamStudio. It’s free. It will cost you absolutely nothing.
Here are the steps to record Netflix movies on your computer screen.

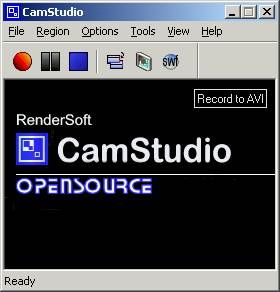
After the stop button, comes another button that can help you minimize the program. The next button is for screen annotations.
After the button for screen annotations, you will see an orange gear wheel. Click on it to see the three recording format options. You can choose your output to be in the following formats: AVI, MP4, or SWF. It’s recommended that you set it to MP4. The final button needs additional software so you can just ignore it.
Now, you can record Netflix movies on your computer screen. Follow the steps below.
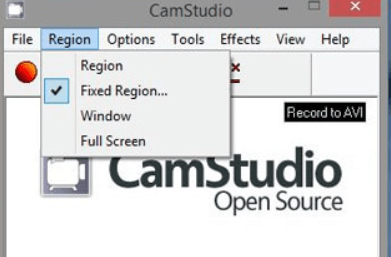
1. Go to Region on the menu bar. This gives you options. You can record a particular region of your choice. You can also record a full screen if you want. You also have the option to record a fixed region if you like. It’s up to you.

2. Play the Netflix movie you want to record.
3. Make sure your CamStudio is open. Set it to the side of your screen.
4. Click the record button. When you click on the red recording button, you will be able to click and drag the region you want to record. Once you let go of it, the recording starts.
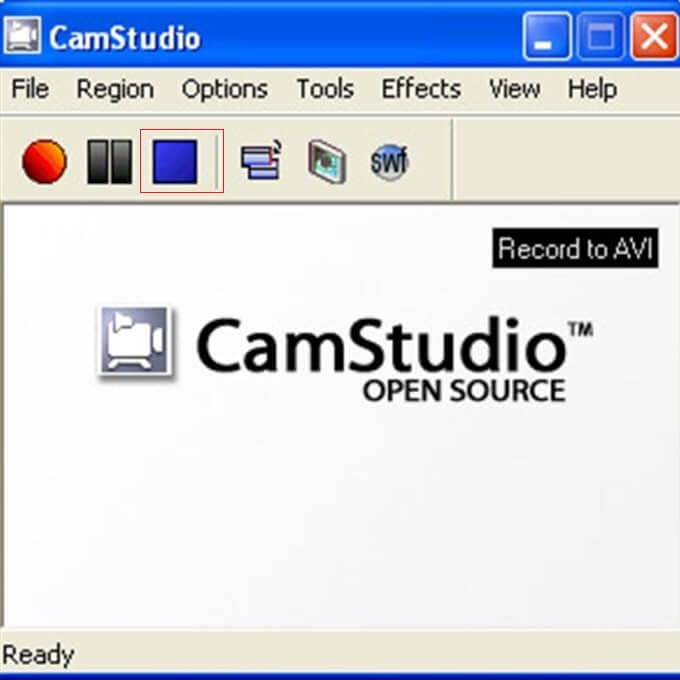
5. Click on stop. This is the third button from the red record button.
6. Save the video. Create a file name for it. Choose the format as to how you want to save it.
7. Click on the Save button. The audio file will be compressed and once that is done, it’s going to open up so that you could preview your latest video.

There you have it. You’re finally able to record Netflix movies. You can save on your computer so that you can watch it anytime you want.
The thing with CamStudio is that your video output is limited to just three formats. As previously mentioned, these formats are AVI, SWF, and MP4. You might not be able to play your Netflix movie on your other devices.
Furthermore, your new video will take up a lot of space especially if it’s in an MP4 format. So, what’s the best thing for you to do? You can always convert your video.
While it’s recommended that you choose the MP4 format for your video, that’s still going to take up a lot of space on your computer. It might not be the best format for you especially if you want to transfer it a more portable device. If you’re using a Mac, the MP4 file might not play properly. This usually happens when your Mac player is not compatible with the Mp4 format.
This is where the DumpMedia Video Converter comes in. You can make use of this particular program to convert your audio file into a more portable format. A portable format you can consider is MP3.
Not to be outdone, the AAC or Advanced Audio Coding is also considered a portable format. As a matter of fact, it boasts of better quality when it comes to audio. Both MP3 and AAC are lossy audio compression formats.
You can choose to convert your MP4 video into an AAC or MP3 file to make it more portable for you. That way you can play it on other devices.
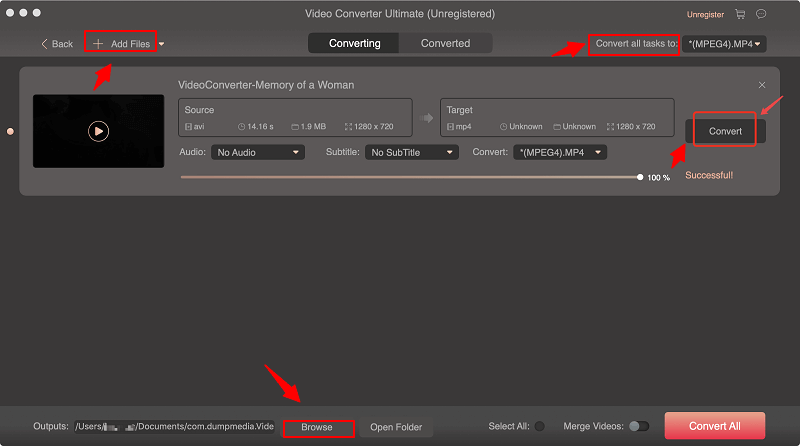
The DumpMedia Video Converter can convert your MP4 into an AAC or MP3 file. It depends on which format you want. Here the steps that can help you convert your MP4 video using the DumpMedia Video Converter.
The good thing about the DumpMedia video converter is that it gives you an option to try it out for free. So, if you want to try it out, click on the Free Download.
4. Open the DumpMedia Video Converter.

That’s how easy it is to convert an MP4 video with the DumpMedia Video Converter.
The DumpMedia Video Converter supports a long list of input formats. So, it doesn’t matter what your video format is because the DumpMedia Video Converter can easily convert it to your preferred format.
Another good thing about the DumpMedia Video Converter is that it comes with an online Video Downloader. Video Downloader can easily download your favorite YouTube.
You may know how to record Netflix movies now. You can now easily record Netflix movies on your computer screen with the use of CamStudio. With the use of the DumpMedia Video Converter, you can easily convert a video so that it wouldn’t take up so much space on your computer.
Go right ahead and try out the DumpMedia Video Converter. Feel free to share your thoughts by leaving a comment below.
