“I have some videos on my PC and I wanted them to be imported to my iTunes library. However, I am not sure if I can do this as I am afraid that the format of the videos I have might not be supported by the app. How do I know more information about the video formats for iTunes? ”
iTunes app has a lot to offer, of course, people tend to find ways on how this app can be utilized further. And so, this could be one reason why some are looking for methods to import and play their media files on the app. In this post, the main point of the discussion will actually be about video files, specifically, video formats for iTunes. If you are also wondering which video you can add to your iTunes library and stream anytime, you must know first if iTunes can support opening the file.
Contents Guide Part 1. What Format Does iTunes Use For Videos?Part 2. How To Play Videos in iTunesPart 3. Bonus: How to Convert M4V to MP4Part 4. Conclusion
Once you search and visit the Apple support-related articles, you’ll know immediately that both the H.264 and MPEG-4 are video formats that are playable on iTunes. And, technically speaking, we have three file formats that are best supported by the app – MP4, M4V, and MOV.
Apart from being supported by iTunes, you can also have these files opened in QuickTime media player. With that being said, the videos that are in these formats can easily be added to your iTunes library as you wish. To learn further details about these video formats for iTunes, we have the succeeding texts for you.

If you aren’t aware, MP4 is actually an abbreviation for MPEG-4. Usually, once you try downloading video content from several sites, those are in MP4 format. This is because the MP4 format has the ability to store subtitles, images, and both video and audio streams.
If we are to compare the MP4 format with the other file formats, it is notable when it comes to compatibility. In fact, almost all media players and several platforms can support handling files in this format. Additionally, apart from being able to be played on iOS devices, MP4 files can also be streamed on Android gadgets and even on Windows PC and TVs.
M4V is usually known as the iTunes movie format and is so regarded as one of the video formats for iTunes. This is the format that is utilized for those content that can be purchased and even rented from the iTunes store.
If you do not know, those iTunes movies, shows, and music video files are in M4V format. Also, those files in this format are protected by Apple’s FairPlay protection. This means that the files cannot be distributed illegally. With this protection, the M4V files can only be accessed on authorized media players and gadgets such as Apple devices – iPhones, iPads, etc.

MOV, on the other hand, is QuickTime’s file format. It is one of the video formats for iTunes that subscribers can make use of. This was also developed by Apple Inc. and is also a MPEG-4 video container format. As this file format can handle video effects, texts, subtitles, and more, it is known as a very famous format in video editing software apps.
Now that you know more details about the usual video formats for iTunes, we will now be dealing with the procedures of how you can have them played on your iTunes app.
In this section of the article, we’ll explain both procedures if you wish your purchased or rented iTunes movies or your own videos played in the iTunes app.

If you have been an iTunes app enthusiast and you love getting and renting iTunes movies, you can follow this procedure in order to have them played via the iTunes app with ease.
Step #1. On your personal computer, have the iTunes application launch. Afterward, you have to select either “Movies” or “TV shows” via the menu that you shall see at the top left area of the screen. Now, tick the section for Library. If you wish to stream music videos instead, just click “Music” then “Library” and then you have to select the button for “Music videos” in the side portion of the page.
Step #2. You can either double-click the video you wish to watch to play it or just have it selected and then tick the “play” icon. A new window shall open and then the video will play in seconds. You have the ability to resize the window or have it moved.
Step #3. If you wish to have the video playback controlled, just move your mouse pointer on the window for playback until the control buttons or panel appear. You can now play or pause the video or adjust the volume if you prefer to.
Here’s the procedure you can follow if you want your own videos to be played via the iTunes app.
Step #1. The first thing that must be checked is the current format of the video you want to play in the iTunes app. You have to make sure that it is in the format supported by iTunes (video formats for iTunes) making it playable in QuickTime. You just have to take note that if you have an MP4 file, not all of them would be compatible with QuickTime. Also, those that are in other formats such as WMV, AVI, or MKV, won’t be playable. And so, you have to convert them first into an iTunes-supported format.
Step #2. After checking if your video file has a compatible video format, you can now launch your iTunes app. If the videos are in video formats for iTunes, you should be able to import them easily or add them to your iTunes library. In the top-left area of the screen, choose “Movies”. Three sections will be displayed.
Step #3. Now, select the “File” button and then the “Add File to Library” menu or the “Add Folder to Library” option. You now have to locate or choose a certain file or folder. If a folder is selected, all those files in it will be added to your iTunes library. You shall be able to see an added section under the “Library sidebar, the “Home Videos” menu. Alternatively, you can just drag and drop a folder or a file from one of your PC’s folders (or desktop) going to the iTunes window to have it imported right away.
Step #4. Once imported, you can now double-click the file to have it opened and played. If you also want to manage your collection of movies, you can right-click on the video imported and then choose the “Video Info” menu. Switch to the “Options” tab and then utilize the menu for “Media Kind” to sort those videos you imported based on their categories.
We do hope that after reading the content of the first and the second parts of this post, you are now more well-versed about the video formats for iTunes as well as the procedure of how you can have the videos (purchased/rented or your own videos) played on your iTunes app.
As you go and read the third part, you’ll get a bonus idea about how you can convert the M4V video files into a more flexible format such as MP4. As we mentioned in the first part of this post, the M4V format is encrypted with DRM protection. So, conversion might be confusing and difficult at first. To transform them, a need for professional application is a must. To give you an idea of what app to use, make sure you read what we have in the third part of this post.
The M4V format is absolutely a great format that has the ability to handle video files. This is why a lot of people still love utilizing this format. However, one drawback this format has is that it’s encrypted by Apple’s FairPlay protection making it a challenge for most users to open the files on any device or player that they have. This is one reason why they still keep on looking for methods to convert the video files (in M4V format) they have into a more flexible format such as MP4.
Conversion might be hard at first for some users who aren’t aware of the best tools and methods to use but we are here to help. To easily convert the M4V video files that you have to MP4, you can use apps like this DumpMedia Video Converter.
With the DumpMedia Video Converter, you can have the M4V to MP4 conversion done in a snap. Apart from its ability to transform video files, it can also support audio file conversion. You can also have the files edited and enhanced. There are a lot of output formats supported by this app. For instance, you can also convert your M4V files to GIF.
This is also flexible in supporting file editing as you can do rotating, clipping, cropping, and even adding watermark. While using this app, you can be so assured that the quality of the output files. It can do the conversion at 6x speed – faster than most converters ever introduced to the public.
This is so easy to use as this is too user-friendly. Here’s a detailed procedure to help you convert your M4V files to MP4 using this DumpMedia Video Converter.
Step #1. Have the installation done. Have those completed and launch the app after having the app installed on your PC. Once opened, you can now start adding the M4V files either by using the “Add Multiple Videos or Audios” button or just by dragging the M4V files and dropping them onto the DumpMedia Video Converter’s window.

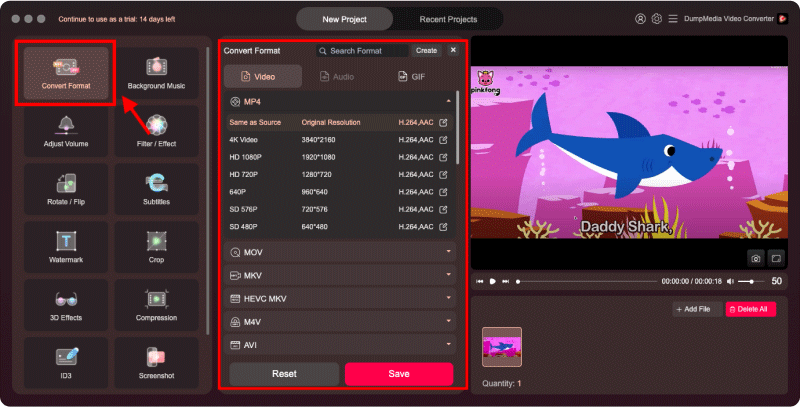
Step #2. Set MP4 as the output format. Also, specifying the output path is required and suggested for you to easily access the transformed files once the conversion is over.

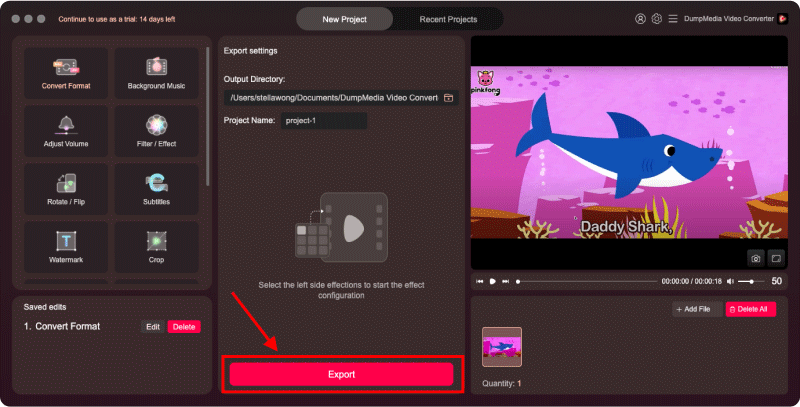
Step #3. Tick the “Convert” button and the app will transform the M4V files to MP4. This will take only a few minutes.

Once done, you shall see the MP4 files on the folder specified in the second step. By just following these three steps, you can have the M4V files changed to MP4 format! Now, you can have the files streamed on any device as you wish!
Apart from learning more about the video formats for iTunes in this post, we hope you also learned about how playing videos on iTunes can be possible as well as having your M4V files transformed into formats like MP4. If you have further information related to the topic, you can have it shared in the section below.
