“I am so into listening to my current Apple Music favorites recently that I wish to have them played every time somebody calls me. Can you use Apple Music as ringtones? ”
When it comes to music streaming, there will be no doubt why lots of people are so into using Apple Music. With lots of perks and sometimes, exclusive songs, music listeners would really love subscribing to one of its plans!
Fortunately, if you are one of those who are asking about the procedure of setting up Apple Music as ringtones, you arrived at the right page. Here, the focus of the discussion would be about how you can actually convert Apple Music songs and make them accessible on any device and then have them set up as your mobile device’ ringtones!
Actually, the whole process of making Apple Music as ringtones is totally is. Surely, even if this is your first time doing so, you will be able to do it well. Without that much ado, let’s start!
Contents Guide Part 1. Convert Apple Music with Apple Music ConverterPart 2. How to Set the Converted Apple Music songs as iPhone Ringtone without iTunesPart 3. How to Set the Converted Apple Music songs as iPhone Ringtone with iTunes?Part 4. Summary
Making Apple Music ringtones on your mobile devices would be so much more appealing especially if you have custom-made ones. But how would you do this?
You need to know that Apple Music songs are under Apple’s FairPlay Protection Policy. This means that using them out of the app won’t work as you can’t actually download Apple Music songs directly from the app. Well, you can do it with your Apple Music subscription however, playing them outside the app won’t be possible.
To finally make Apple Music as ringtones, there is a need for you to remove the DRM protection of the songs first, and then convert them to file formats that are compatible with the mobile devices that you are to use.
Finding an app that can help you set up Apple Music as ringtones could be a difficult task for you if you haven’t tried doing the same activity before. We can’t blame you. Actually, when you browse through the web, you will be offered numerous recommendations. You should always be keen before choosing an app that you will install on your computer. Of course, it is always suggested that you rely on professional conversion software. Apart from being trusted, they are already proven to be effective and won’t surely harm your PC or any of your files. The best app that we truly recommend is this DumpMedia Apple Music Converter.

What makes this DumpMedia Apple Music Converter the best?
Well, here are the app’s start features.
To convert your Apple Music favorites to a format that can be played by any device, and finally have Apple Music as ringtones on your mobile devices, the below procedure must be followed.
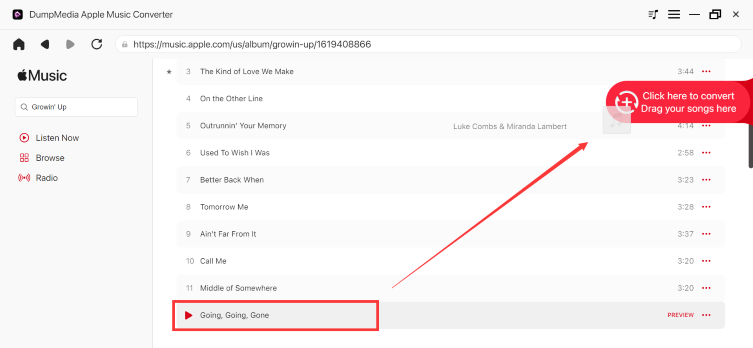
Step #1. Complete the installation needs of the app. Afterward, just install and then launch. On the main interface, you can start choosing or previewing the Apple Music songs that you like to convert. The app is also capable of converting a bunch of Apple Music songs in one go. So, if you have lots of songs to transform, that is possible through this app.

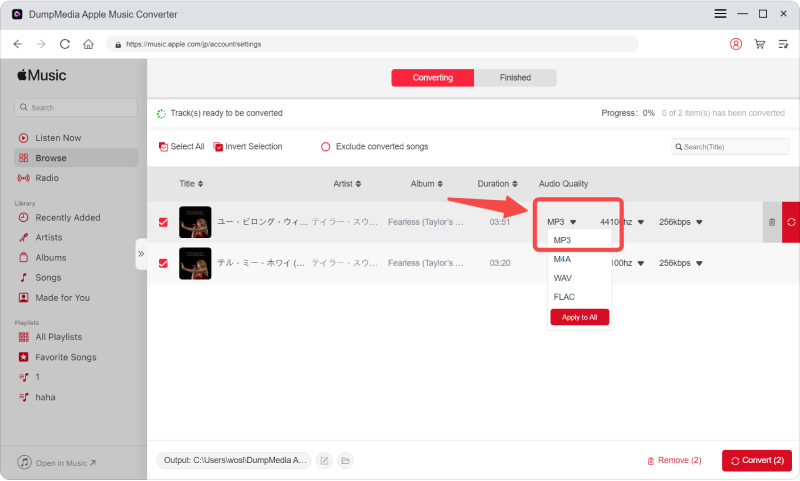
Step #2. Once you have selected all the Apple Music songs that you like to convert, you can now set up the output parameters as you like. Just don’t forget to set up two important things – the output format and the output path. All the remaining options can be changed as you wish.

Step #3. Tapping the “Convert” button at the bottom of the page will trigger the app to do the conversion process. While conversion is being done, the DRM removal procedure will be done by the app as well.

In just a few minutes, the Apple Music songs processed will be converted and will be DRM-free! It is now the time that you learn how you can set up Apple Music as ringtones!
After having your favorite Apple Music songs converted to a format that you like, you can now set up the converted songs as your device’s ringtone! You can do it even without the iTunes app.
It should be noted that if your aim is to use Apple Music as ringtones for iPhone, the output format that you should set is M4R. Once you have the files, you can actually directly import those into your iPhone and set them up as ringtones. Since we are trying to show how the setup can be done without the help of the iTunes app, a different tool will be needed to continue, an iPhone transfer tool.
Actually, you can use this useful tool, iPhone/iPad/iPod Manager, alongside iPhone Ringtone Maker to finally move those Apple Music ringtones and other files like photos, videos, and music from your computer to your iOS devices or vice versa. Apart from this, you can also create backup files with just a few clicks.
Once you have converted the Apple Music songs to MP3 or M4A format, you can just turn them to M4R Apple Music ringtones through the iPhone/iPad/iPod Manager tool’s iPhone Ringtone Maker feature.
Here is a reference for you.
Step #1. Open this iPhone/iPad/iPod Manager tool. On the main interface, click the “Music” button, then choose “Add”. This will allow adding of MP3 or M4A files.
Step #2. You shall see the “Ringtone Maker” option located at the top area of the screen as well. Tap on it to see the view wherein you will be able to create ringtones.
Step #3. Now, you can trim the Apple Music songs and save them in the length you wish by hitting the “Save to Device” option to have the Apple Music ringtones saved to your iPhone.
Step #4. You can now set up your chosen Apple Music song as your iPhone ringtone by heading to “Settings”, then “Sounds”, and finally, “Ringtone”.
Here is the procedure that you must follow to set up the Apple Music ringtone in case you already have the M4R files with you.
Step #1. Your iPhone must be connected to your computer first. After ensuring that, launch the iOS Manager tool next.
Step #2. There are options at the top of the screen. Choose the “Music” button. You can just select the ringtones you want from the left side and then just drag and drop them to your iPhone.
Step #3. You can now do the ringtones creation here. You can set up the start and end times as you like and cut the song. After doing the trimming process, hit the “Save to Device” button. This will then save the created ringtones to your iPhone.
Step #4. Afterward, you can just set up any Apple Music song that you like as your Apple Music ringtone. After syncing, head to the “Settings” of your iPhone, then click “Sounds”, and look for the “Ringtone” option. Just select the ringtone you just processed.
Of course, as usual, the iTunes app is always helpful. You can also set the converter Apple Music songs as your iPhone ringtones with the iTunes app’s aid. You can just sync them to your iPhone and finally set them up as Apple Music ringtones! You just have to make sure that you have the DRM-free songs saved on your iTunes library and then follow the below procedure to proceed.
Step #1. Launch the iTunes app on your computer (either Windows or Mac) and then hit the “File” button next. Afterward, select the “Add File to Library” option. You can now start importing the converted Apple Music files (M4A, MP3, or M4R) to your iTunes library.

Step #2. Choose a song and then right-click on it. From the options displayed, select the “Get Info” button to continue.
Step #3. A pop-up window will be shown on the screen. Just choose “Options”. Set up the start and end times of a certain clip and then tap the “OK” button next. You just have to take note that the Apple Music ringtones should only be 40 seconds in length as this is set as Apple’s limit.
Step #4. Tap the “File” button next and then select “Convert” then “Create AAC Version”. A copy will then be saved in your iTunes library. You can also listen to the AAC file to check it has been set up in the length you want.
Step #5. After creating a copy, just right-click on it, and then from the options, choose the “Show in Windows Explorer” menu. A new popup window will appear on your screen. You will be asked to rename it. Just click “Yes” to proceed and then make sure that the file extension will be changed from the current to .m4r. Move back to your iTunes library and just delete the shortened version of the Apple Music song you chose.
Step #6. Now, head back to the “File” button and then add the M4R file to your library. Find those created files and add them to the iTunes’ “Tones Library”.
Step #7. It is now the time that you connect your mobile device to your computer. Just choose the “Sync Tones” to sync the sounds with iTunes.
Step #8. Now, on your iPhone, head to the “Settings” section, then choose the “Sounds” button, then finally, the “Ringtone” option. You will then see the Apple Music songs on your device’s ringtones list. You can now just select any of those Apple Music ringtones that you like to use and that is basically it!
Indeed, the iTunes app is very useful. Apart from being a file manager, it is also a media player and, at the same time, a converter as well.
Now, you just found out that you can use any of your favorite Apple Music songs as Apple Music ringtones! Surely, at first, you are wondering how it could be possible given that Apple Music songs are protected files. Luckily, through apps like the DumpMedia Apple Music Converter, you can just have the protection removed and convert the files as you want!
More so, the process of setting them up as your iPhone’s ringtone is so easy as well, and you won't have to worry about Apple Music occasionally not functioning. We do hope this article helped you out! If you have further queries about the topic, feel free to leave them in the below section!
