


How To Get A Refund On iTunes Music [BEST GUIDE]
Have you ever purchased music from iTunes that turned out to be not what you expected, or simply changed your mind about a purchase? It can be frustrating to feel stuck with a purchase that you don't want or can't use. Fortunately, iTunes offers a refund process for eligible purchases.
In this guide, we'll explain the steps you can take on how to get a refund on iTunes music, including the types of purchases that are eligible for refunds, the timeframe for refunds, and how to request a refund through iTunes. We'll also discuss common refund issues and provide tips for resolving them. Whether you're a seasoned iTunes user or a newcomer to the platform, this guide will help you navigate the refund process and ensure that you get the best possible outcome. So let's dive in!
Contents Guide Part 1. Eligibility For RefundsPart 2. How To Get A Refund On iTunes MusicPart 3. How To Check Refund StatusPart 4. Common Refund Issues And How To Resolve ThemPart 5. Bonus Tip: Grabbing Tracks From Apple Music And iTunesPart 6. Conclusion
Part 1. Eligibility For Refunds
Timeframe For Refunds
Before we get into the types of purchases that are eligible for refunds, it's important to understand the timeframe for refunds. According to Apple's refund policy, you can request a refund for a purchase within 90 days of the purchase date. However, there are a few important caveats to keep in mind:
- Refunds for in-app purchases and subscriptions are subject to different rules and may have shorter refund windows.
- If you've pre-ordered an item, your refund window may begin on the date that the item is made available to you, rather than the date that you placed the pre-order.
- If you've received a gift from iTunes, the person who gave you the gift may request a refund on your behalf.
Types Of Purchases Eligible For Refunds
Not all iTunes purchases are eligible for refunds, but many are. Here are some of the types of purchases that may be eligible for a refund:
- Music
- Movies and TV shows
- Books
- Apps
- In-app purchases
- Subscriptions
To be eligible for a refund, your purchase must meet the following criteria:
- It must have been made within the last 90 days (or within the refund window for in-app purchases and subscriptions).
- You must have a valid reason for requesting a refund (e.g., the item doesn't work as advertised, you accidentally purchased the wrong item, etc.).
- The item must not have been downloaded or played yet.
Exceptions To Refunds
There are a few types of purchases that are not eligible for refunds, including:
- Apple Music subscriptions (although you can cancel your subscription at any time).
- Gift cards and store credit.
- Items that have been downloaded or played.
- Items that have been refunded previously.
- Items that were part of a bundle or promotion (unless all of the items in the bundle are being returned).
Keep these exceptions in mind when requesting a refund, as they may affect your eligibility. In the next section, we'll explain how to request a refund on iTunes Music.
Part 2. How To Get A Refund On iTunes Music
Now that you know what types of purchases are eligible for refunds and the timeframe for refunds, let's go over the steps to request a refund through iTunes. There are a few different ways to do this, depending on the device you're using. Here are the steps for each method:
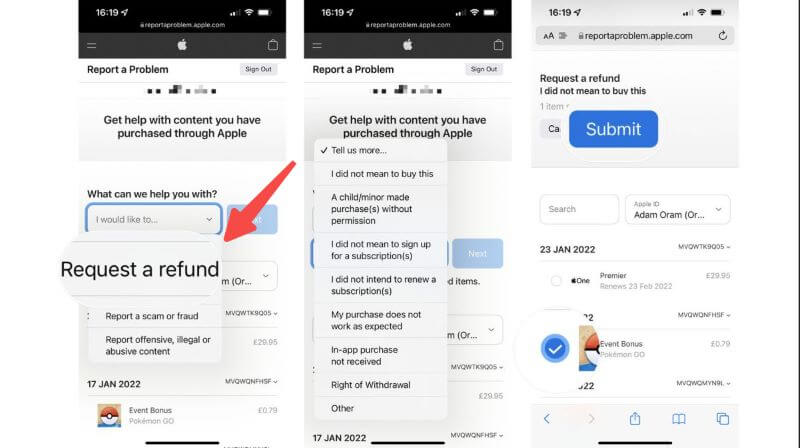
Using a web browser:
- Go to reportaproblem.apple.com and sign in with your Apple ID and password.
- Find the purchase that you want to request a refund for and click on "Report a Problem".
- Choose the reason for your refund request from the drop-down menu.
- Follow the prompts to complete your refund request.
Using an iPhone, iPad, or iPod Touch:
- Open the App Store app on your device.
- Tap on your profile icon in the upper-right corner of the screen.
- Scroll down to your Purchase History and tap on it.
- Find the purchase that you want to request a refund for and tap on it.
- Tap on "Report a Problem" and follow the prompts to complete your refund request.
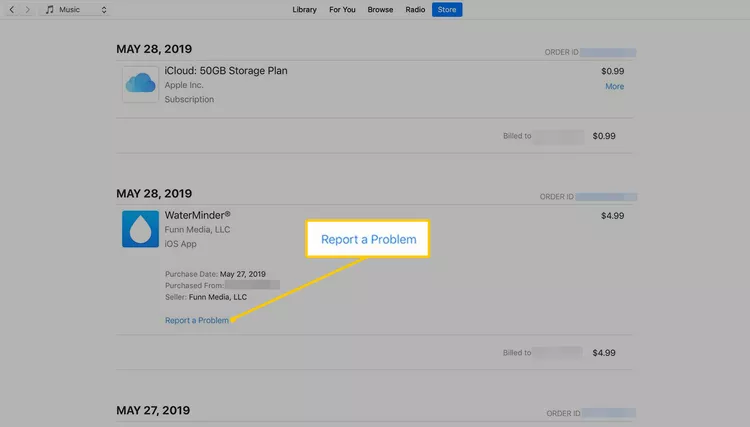
Using a Mac or Windows PC:
- Open iTunes on your computer.
- Click on your account name in the upper-right corner of the window and choose "Account Info".
- Enter your password and click "View Account".
- Find the purchase that you want to request a refund for and click on "See All" to the right of it.
- Click on "Report a Problem" and follow the prompts to complete your refund request.
Information To Include In Refund Request
When you're requesting a refund through iTunes, it's important to provide as much information as possible to support your request. Here are some tips for the information to include in your refund request:
- The reason for your refund request (e.g. the item doesn't work as advertised, you accidentally purchased the wrong item, etc.).
- The date of purchase and the purchase amount.
- Any error messages or other issues that you encountered.
- Screenshots or other documentation to support your request (if applicable).
Tips For Improving The Chances Of A Successful Refund
To improve the chances of a successful refund, keep these tips in mind:
- Be polite and courteous in your refund request.
- Provide as much information as possible to support your request.
- Be honest about the reason for your refund request.
- Request your refund as soon as possible after the purchase date.
- Follow up with iTunes customer support if you don't receive a response within a reasonable timeframe.
- In the next section, we'll explain how to check the status of your refund request.
Part 3. How To Check Refund Status
After you've requested a refund through iTunes, you may be wondering how to check the status of your request. Here are the two methods for checking refund status:
Checking Refund Status Through iTunes
To check the status of your refund request through iTunes, follow these steps:
- Go to reportaproblem.apple.com and sign in with your Apple ID and password.
- Find the purchase that you requested a refund for and look for the status of your refund next to the item.
- The possible statuses include "Pending", "Refunded", "Problem Solved", and "Declined".
If the status of your refund is "Pending", it means that your request is being reviewed by iTunes. If the status is "Refunded", it means that your refund has been processed and you should see the refund amount in your account within a few days. If the status is "Problem Solved", it means that iTunes has addressed the issue in another way (e.g. by providing a credit to your account). If the status is "Declined", it means that your refund request has been denied.
Contacting iTunes Customer Support For Updates
If you're not able to find the status of your refund through iTunes, or if you have questions about your refund, you can contact iTunes customer support for updates. Here's how to do it:
- Go to getsupport.apple.com.
- Choose "iTunes" as the product that you need help with.
- Choose "Purchases, Billing & Redemption" as the topic.
- Select the option to "Contact Apple Support".
- Follow the prompts to describe your issue and request a refund update.
When you contact iTunes customer support, be sure to provide your purchase information and any other relevant details about your refund request. This will help them to provide you with the most accurate and helpful information about the status of your refund.
Part 4. Common Refund Issues And How To Resolve Them
While the process of requesting a refund on iTunes Music is usually straightforward, there are a few common issues that users may encounter. Here are some tips for resolving these issues:
Issue 01. Refund Not Received
If you requested a refund but have not received the refund amount within the expected timeframe, there are a few things you can do:
- Check the status of your refund through iTunes (as outlined in Section IV) to make sure that the refund has been processed.
- Check the payment method that you used for the purchase to make sure that the refund has not been credited to a different account or card.
- Contact iTunes customer support (as outlined in Section IV) to inquire about the status of your refund and any potential delays.
Issue 02. Refund Rejected
If your refund request has been rejected, there are a few possible reasons for this:
- The purchase may not be eligible for a refund based on Apple's refund policy (as outlined in Section II).
- The refund request may have been submitted after the deadline for refunds (also outlined in Section II).
- There may be issues with the payment method or account used for the purchase.
If your refund request has been rejected, you may want to review the eligibility requirements and reasons for refunds (as outlined in Section II) and consider submitting a new request with additional information or a different approach.
Issue 03. Unauthorized Purchase
If you notice an unauthorized purchase on your iTunes account, you should take immediate action to secure your account and request a refund. Here's what to do:
- Change your Apple ID password and security questions to prevent further unauthorized purchases.
- Contact iTunes customer support (as outlined in Section IV) to report the unauthorized purchase and request a refund.
- Review your purchase history and account settings to make sure that no other unauthorized activity has occurred.
Part 5. Bonus Tip: Grabbing Tracks From Apple Music And iTunes
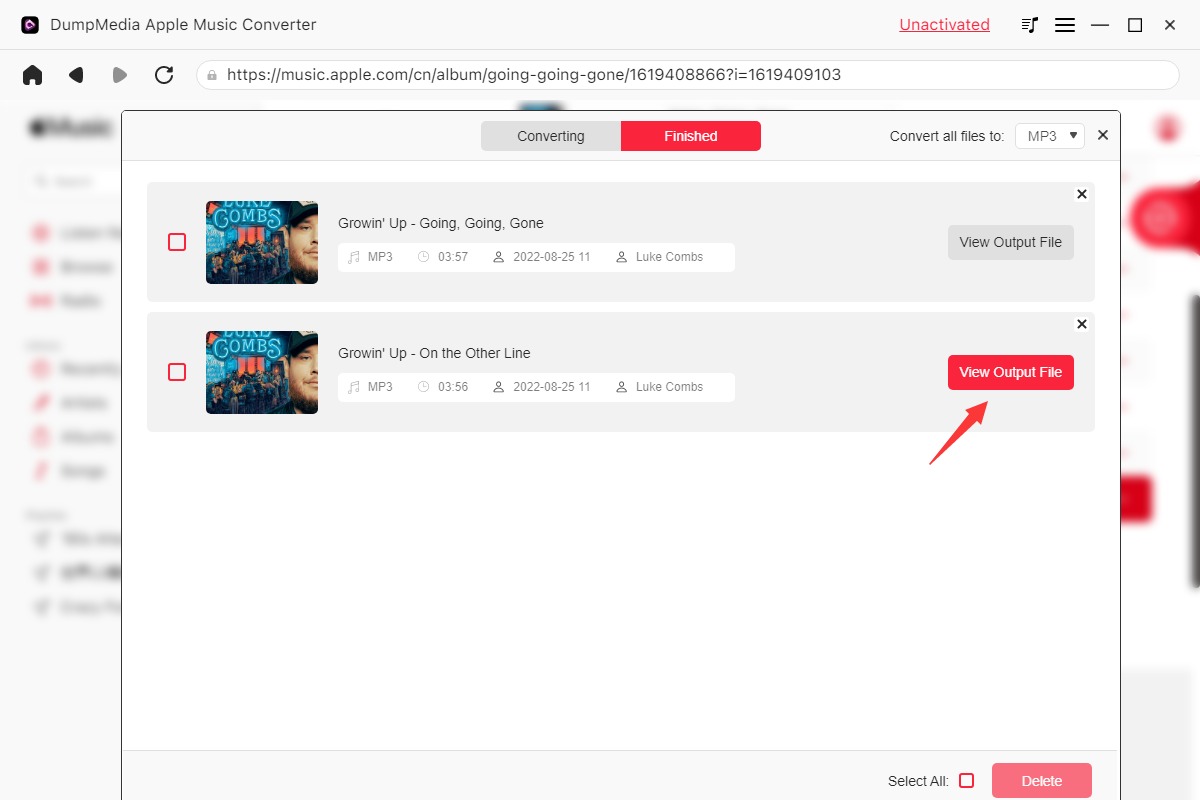
You may download songs from Apple Music and use them as ringtones or even offline listening options. Use DumpMedia Apple Music Converter to accomplish that. This program enables music lovers to download all the playlists, albums, podcasts, and tracks they desire from Apple Music for offline consumption. With the help of this fantastic tool, you may download your favorite songs from Apple Music. It could help you receive the music in high-quality output files without losing the data and ID3 tags.
The procedures to utilize the tool are as follows:
- Download the application, then install it on your Mac or PC. After installation, open it.
- Following that, add the music files you want to delete from Apple Music to the software.

3. Choose the export format that you want. A variety of options are available, including MP3, M4A, WAV, FLAC, and others.
4. In the destination, select the location where you want to save the converted files.
5. Click the "CONVERT" button to separate the songs and convert them to the desired format, such as MP3.
6. When the conversion is complete, the converted music will be accessible in the folder you specify as the destination. You may now transfer them to various devices as needed.
Part 6. Conclusion
In conclusion, getting a refund on iTunes Music is a straightforward process that can be done in just a few steps. By following the eligibility requirements for refunds, submitting a refund request through the appropriate channels, and checking the status of your refund, you can increase your chances of success and get your money back for any purchases that don't meet your expectations.
As a bonus tip, we talked about DumpMedia Apple Music Converter. You can also use this tool to grab all the tracks you love from iTunes and Apple Music so that you don’t have to worry about purchasing the wrong music and getting a refund. You can opt for the free trial of DumpMedia Apple Music Converter today!

30% Off >>>