Have you been a long-time user of the Apple Music and iTunes app? Both are actually good music streaming platforms. However, there could be some of you who are planning to switch to other apps like Spotify. Have you ever wondered what you should do in case some of your favorite Apple Music songs aren't on Spotify?
This could happen, yes! There are some songs that are only exclusive to Apple Music users. With this being said, we are sure you are interested in iTunes to Spotify playlist transfer.
We will be tackling three methods to help you import iTunes to Spotify playlists. Let’s start discussing how iTunes to Spotify playlist transfer will be possible using a manual method in the first part. If you wish to immediately find out about the best way, you can also jump to part 3 if you want to.
Contents Guide Part 1. How to Import iTunes Playlist to Spotify Manually?Part 2. Import iTunes Playlist to Spotify OnlinePart 3. The Best Way to Transfer iTunes Playlist to SpotifyPart 4. Summary
Actually, before, there is an option on Spotify that will let you easily import iTunes songs. Unfortunately, this has been removed already. The good thing is that there is still a way to upload local files (from your computer) to the Spotify app. That is, via the “Add A Source” option. We will be sharing how you can use this feature to import iTunes to Spotify playlists with ease.
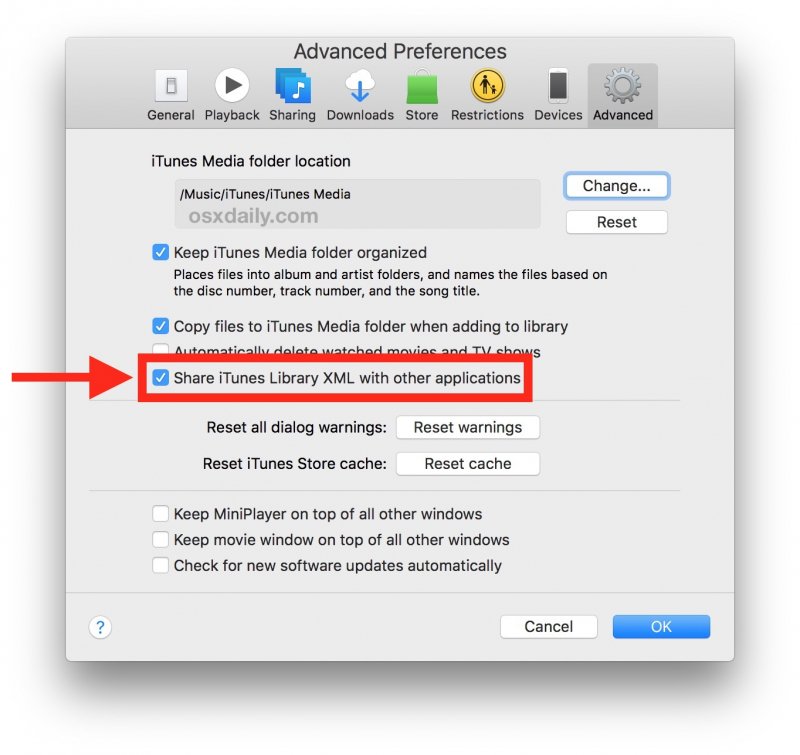
Step #1. On your computer, launch the iTunes app and then tick the “File” button followed by tapping the “Edit” button, and then “Preferences”.
Step #2. There will be a pop-up window on your screen. There are options in the upper area. Make sure to click the “Advanced” button.
Step #3. You have to put a checkmark on the checkbox next to the “Share iTunes Library XML with other applications” option.
Step #4. Afterward, tap the “OK” button to confirm and close the window.

You have to take note that iTunes songs are in M4A and M4P format. These aren’t supported by Spotify. And so, you have to convert the iTunes songs to a common format like MP3 to proceed with the importing process. Also, you have to keep in mind that this process will only work if you got unprotected iTunes files. Otherwise, you have to remove the DRM encryption of the songs first.
Here is what you need to follow to do the conversion process and finally transfer iTunes to Spotify playlist.
Step #1. On the iTunes app, head to the “Preferences” menu to see the window for settings. Tap “General”, then “Import Settings”, and finally “MP3 Encoder”.
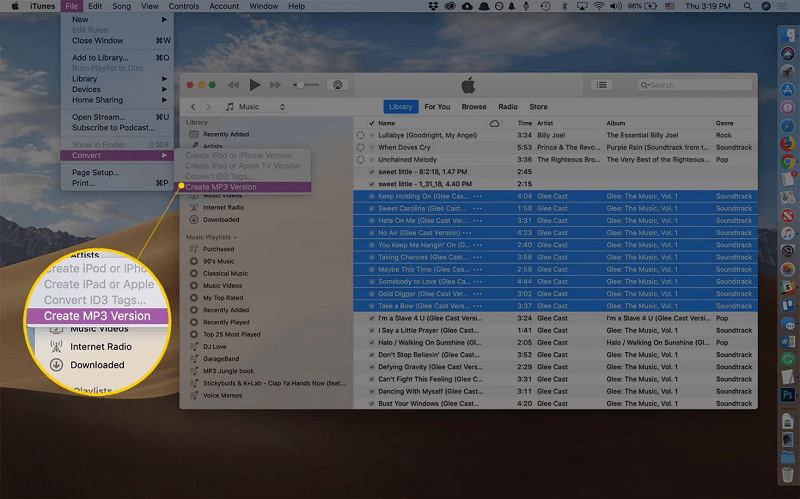
Step#2. Make sure to select the iTunes songs that you wish to import to Spotify. Then, tap the “File” button”, “Create New Version”, and then “Create MP3 Version”. After doing so, the iTunes app will then export the songs selected to MP3 format.

Step #1. On your Spotify desktop app, next to your name, there is a downward arrow icon. Tap on it and then choose “Settings”. Scroll down until you see the “Local Files” tab.
Step #2. Right after arriving at the page, you will see both “iTunes” and “Music Library” already. You would need to toggle the slider to enable both. By doing so, those unprotected iTunes songs that you have will be imported to Spotify automatically.
Step #3. Head back to Spotify’s main screen. Click the “Local Files” button, and you shall see the songs from your iTunes library are all there.
Step #4. Now, you can open your Spotify app on your mobile devices and just head to the local files section to see those iTunes songs that you imported.
Some users had reported that the “iTunes” button can’t be seen. To still do the transfer of iTunes to Spotify playlist, you can tap the “Add A Source” button and then just find those iTunes songs in your computer’s folders.
Apart from resorting to the first option that was discussed in the previous part, you can also check out how you can transfer iTunes to Spotify playlist via an online method.
You can use Soundiiz. Soundiiz is a converter and playlist manager for the most popular music streaming platforms. This is capable of syncing the playlist titles between two given music streaming apps. Unlike the first method, Soundiiz does not all local songs from iTunes to Spotify playlists but the titles.
The advantage of using Soundiiz is that there is no need for you to re-create your favorite iTunes songs on Spotify. Now, here is the procedure that you can follow.
Step #1. On your personal computer, open the iTunes app and then look for those iTunes playlists that you wish to be imported to Spotify.
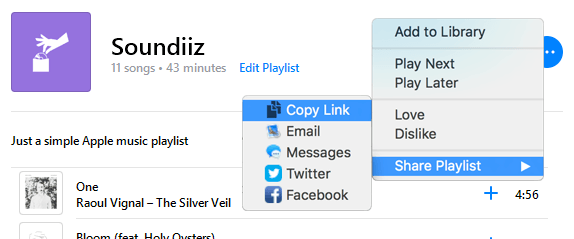
Step #2. Click the “three-dot” icon and then select “Share Playlist” then “Copy Link” to have the link of the iTunes playlists selected copied.

Step #3. Now head back to the Soundiiz website and in the list of platforms, make sure that you choose “iTunes”.
Step #4. You have to paste the iTunes playlist link that you copied before then just confirm it. You can now start following the procedures to add iTunes to your Spotify playlist.
There is also another option that you can do to import iTunes to Spotify playlist via Soundiiz. Since Soundiiz can support the uploading of “.txt” files, you can first have your iTunes playlists exported to this format. After that, tick “iTunes” then select the “upload the file” button on Soundiiz to load the files, and finally sync iTunes to the Spotify playlist.
You might find both methods presented in the first and second parts a bit complicated in some ways especially if you are to deal with protected iTunes songs. Don’t worry. You can still sync iTunes to Spotify playlists even if they are under DRM’s protection policy through an app named DumpMedia Apple Music Converter.
The DumpMedia Apple Music Converter can easily get rid of the iTunes songs’ DRM protection and even aids in the conversion to common formats like MP3, FLAC, and more. It works at a pretty decent speed and even lets you do batch conversion. You can also ensure that 100% original quality of the iTunes and Apple Music songs will be maintained as well as their ID tags and metadata information. It can also do audiobook conversion.
So, in case you have some AA/AAX audiobooks that you like to be converted as well, you can also use this converter. Of course, it has a very simple UI letting you do the conversion fast to immediately proceed with iTunes to Spotify playlist syncing. Here’s the process.
Step #1. Install the DumpMedia Apple Music Converter on your PC. It’s supported by both Windows and Mac so issues in compatibility won’t be present. Once launched, start selecting the iTunes songs to be converted to formats like MP3.
Step #2. Set up the output profile settings. Make sure that you had defined the correct output format and output folder to use.

Step #3. By tapping the “Convert” button, you can have the selected iTunes songs converted to MP3 (or to any other format selected). The DRM removal procedure will also be done by the app simultaneously. Within just minutes, you can now see the DRM-free and converted iTunes songs in the output folder you defined in step 2.

After converting the iTunes songs, you can now transfer iTunes to the Spotify playlist. Head back to your Spotify app and under the “Settings” window, tick “Local Files”, then the “Add A Source” button.
There are plenty of ways to import iTunes to Spotify playlists. We have presented here three methods that you can try and check out. Of course, what we always recommend is to utilize the functions of professional converters like the DumpMedia Apple Music Converter as this will always be the most convenient and safest method.
Click here to have a free try! It's 100% secure!
