“How do I turn off iCloud Music Library?”
Well, if you have a huge or more complex music library, you are likely to face more dilemmas. Therefore, some are resorting to just turning off the iCloud Music Library on their devices.
But what would be the process of how to turn it off? Of course, we have here a complete guide of how you can disable the iCloud Music Library feature on your iOS devices like iPhones, iPads, or iPods as well as on your Mac computer or Windows PC.
Contents Guide Part 1. What is the iCloud Music Library?Part 2. How to turn off the iCloud Music Library?Part 3. How To Use Apple Music Without iCloud Music Library?Part 4. Summary
Knowing what the iCloud Music Library is would be vital before deciding if you’ll proceed to turn off the iCloud Music Library. That’s what we’ll share here.
iCloud Music Library was launched in the year 2015 by Apple Inc as a cloud-based service platform for those tracks downloaded via the Apple Music app and iTunes. Using your iCloud account, this iCloud Music Library allows the synchronization of songs, albums, and playlists to your iOS device automatically.
You can further use this if you are paying the 9.99 USD plan under Apple Music or 24.99 USD for annual use of iTunes Match. One good thing about this iCloud Music Library is that you can store up to 100,000 songs on up to 10 devices. It is notable as well that you can’t have a song that is larger than 200 MB in size.
Before you decide if you’ll turn off the iCloud Music Library as it’s a real solution to syncing errors, you must know the drawback of doing so as well. If you continue, you will be losing your access to those music files you saved from iTunes or Apple Music as well as to those tracks you uploaded to the cloud for streaming or listening on other devices. Additionally, you can’t listen to Apple Music tracks offline. If you wish to continue, there is a need for you then to back up the songs.
Now if you decide to just proceed and turn off the iCloud Music Library on your devices, then you may refer to the below procedures of how you can do it on your iPad, iPhone, or iPod or on your personal computer.
Follow this procedure.

Step #1. Using your iPhone, iPod, or iPad, just head to the “Settings” button. Afterward, choose “Music”.
Step #2. Scroll down until you see the setting for “iCloud Music Library”.
Step #3. You shall see a slider. Just toggle that to turn off the iCloud Music Library.
As simple as that, you just disabled the iCloud Music Library on your portable iOS devices.
If you are thinking about how to do it on your Mac or Windows PC, we have here a procedure as well that you can follow.
Upon learning how to turn off the iCloud Music Library on iPhones, iPods, or iPads, you can also try doing it on your Mac computer or Windows computer. Here’s an easy procedure for your reference.
Step #1. On your personal computer, open the iTunes app.
Step #2. Tap the “iTunes” button and then choose “Preferences” from the new options displayed.
Step #3. You will be able to see more options. From those, under the “General” option, you have to uncheck the “iCloud Music Library” menu.
In this part, you were able to learn how easy it is to turn off the iCloud Music Library on both handy devices and computers. As you head to the next part, you will be exposed to the idea of how to use Apple Music without the iCloud Music Library. This seemed to be difficult if you’ll think at first but there is no problem with this at all! This can be done easily through amazing applications like this DumpMedia Apple Music Converter.
If you still wish to listen to some Apple Music songs in offline mode, you then have to download and keep them on your devices for streaming. Direct downloading isn’t possible since Apple Music tracks are encrypted under Apple’s FairPlay Protection Policy.
But as mentioned, you should not be thinking a lot about this as a dilemma because this is actually not a problem at all! With great professional software applications like the DumpMedia Apple Music Converter, you can do the downloading fast!
Of course, we created this section to teach you how to use Apple Music without iCloud Music Library through the help of the DumpMedia Apple Music Converter and so, we have the steps highlighted in the next paragraphs for your reference.
You actually need to follow only three steps to download and finally convert those Apple Music songs that you wish to stream in offline mode.
Step #1. Start with making sure you have completed all the installation needs. Afterward, proceed with the installation proper and begin by launching the DumpMedia Apple Music Converter. The first step is to preview or select any Apple Music song you want to convert, download, and save.
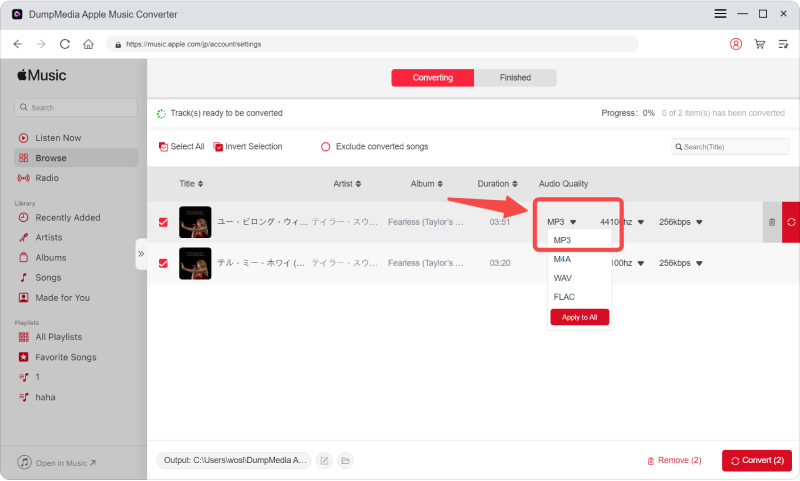
Step #2. At the bottom area, you’ll see the option to modify the output settings. In the “Output Format” section, select a format you desire (from the supported). Customize the output settings as well. You can change the bitrate, codec, and sample rate as you wish. Also, an output path must be defined.
Step #3. Tap on the “Convert” button to allow the app to start processing the conversion of the files as well as the DRM removal procedure. In just a few minutes, you shall see the converted files ready for streaming under the output folder you defined in step 2.

Once you have the converted tracks, you can just move the songs to any device and just stream in offline mode without having to worry if your iCloud Music Library has been turned off.
It’s just simple to turn off the iCloud Music Library, right? Finally, you already know how it can be done on any device that you have – on your handy gadgets like iPhone or iPad and even on your personal computer.
We also shared a great way to download Apple Music songs for offline listening (through DumpMedia Apple Music Converter’s help). If you have further questions about the topic of this post, you can just leave them in the section below and we’ll get back to you right away.