“How can I do the iTunes to MP3 format conversion?”
Are you also fond of using the iTunes application? We can’t argue how great the iTunes app is. From being a media player to media manager and organizer, nobody will doubt how capable the iTunes app is.
If you got some tracks in your iTunes library, it would be so tiresome and tedious to have them moved to the other devices that you have perhaps, for streaming or keeping purposes. Additionally, those devices should have the iTunes app installed on them.
To get rid of the hassle and make it very easy to stream and access those iTunes files that you have, you can then perform the iTunes to MP3 format conversion.
You must also know that those iTunes files that you purchased from the iTunes Store are in AAC file format. This isn’t actually compatible with a majority of media players and devices. But if you can have them transformed to more flexible formats, accessing them on any gadget won’t be an issue anymore. You can easily get rid of your compatibility problem!
So, we will now be heading to the detailed discussion of iTunes to MP3 format conversion. We will start by giving you’re the conversion procedure with the help of the Apple Music application or iTunes itself. Let’s start!
Contents Guide Part 1. How to Convert Song to MP3 with the Apple Music App or iTunesPart 2. How to Convert iTunes Songs to MP3 within iTunesPart 3. Summary
Before we finally head to the discussion of the process of iTunes to MP3 format conversion, you might be wondering why lots of people are into using the MP3 format.
In fact, the MP3 format is the most popular audio file format as this was introduced to the public during the emergence of digital music. There have been lots of MP3 players sold and used by people during that time (well, until up to now) making the MP3 format the easiest format to access. It’s also free of use!
It might be true that the AAC format was created as a replacement for MP3 but still, a lot of people are not willing to change their devices or media players just to access these AAC content or files. Though AAC files have better audio quality compared to MP3 ones, people still prefer utilizing the MP3 format more. And so, finding a method of iTunes to MP3 format conversion would be very helpful.
In this part of the article, we’ll help you do the iTunes to MP3 format conversion using the iTunes app itself, or the Apple Music app. However, take note that you can have these apps used if you are to process the unprotected iTunes files.
We will be sharing first how you can do the iTunes to MP3 format conversion on your Windows computer.
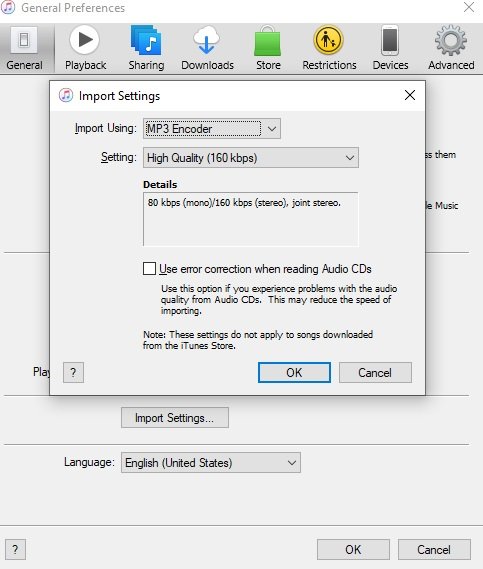
Step #1. Open your iTunes app and then tick the “Edit” button followed by tapping the “Preferences” button. You have to click “Genera” next and then choose “Import Settings”. Under the “Import Using” option, you have to select “MP3 Encoder”. You also have the option to choose the conversion quality you prefer.
Step #2. Once you are done with step #1, just tap the “OK” button and then head back to your iTunes library. Click the track you wish to undergo iTunes to MP3 format conversion. Tap the “File” button afterward and then choose “Convert”, then tap the “Create MP3 Version” button. The iTunes to MP3 format conversion will also work if you are to select multiple files.

If you have a Mac computer, you can follow the below iTunes to MP3 format conversion procedure.
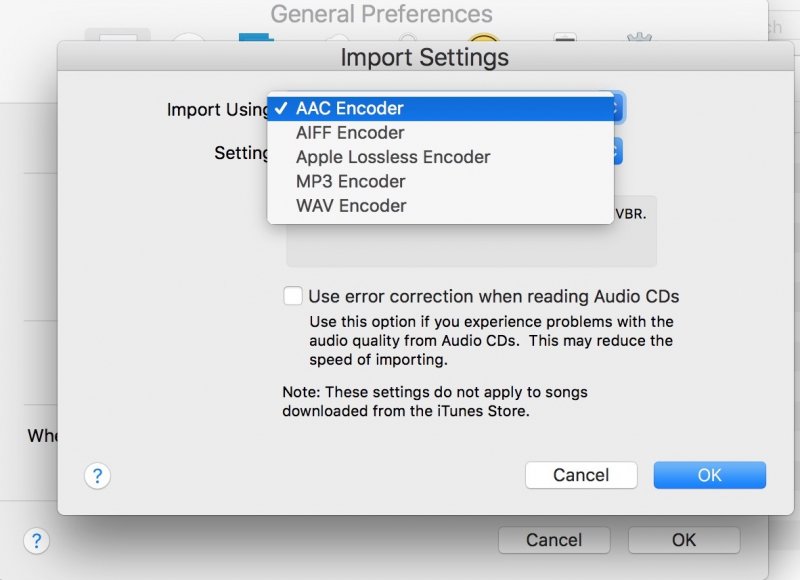
Step #1. Open your Apple Music application and from the options at the upper area, select “Music” then choose “Preferences”.
Step #2. Tap the “Files” button then the “Import Settings” button and finally, choose the button for “MP3 Encoder”.

Step #3. Select the iTunes songs you wish to transform to MP3 and then tap the “File” button, the “Convert” button afterward, and then tap “Create MP3 Version”.
That’s how you can do iTunes to MP3 format conversion on your Windows and Mac computer. Remember that the procedures presented will only work if you are to process unprotected iTunes files. There are iTunes files that are under Apple’s FairPlay protection policy. Thus, having them converted or transformed to another format would be a challenge.
The iTunes app or the Apple Music application won’t be of any help. In this case, what you need is a reliable tool that can do the removal of that protection and, at the same time, help with the iTunes to MP3 format conversion. We’ll discuss more a professional application that has these abilities as you jump to the second part of this article.
Check out and try using this DumpMedia Apple Music Converter. The DumpMedia Apple Music Converter is a trusted app that lets the user successfully perform not only iTunes to MP3 format conversion but as well as the transformation of the audio files to the other output formats it supports.
It is also the answer to the removal of the DRM protection of the songs. Additionally, it can process audiobook conversion. So, if you are into audiobook streaming and you need to do the conversion of those files that you have, you can also use the DumpMedia Apple Music Converter.
This app works fast at a speed of 10x faster compared to other converters. Even if the processing is too fast, you can still expect that the output files will be of great quality and with maintained ID tags and metadata information.
It has an interface that is simple enough to be understood even by beginners. It will only require you to complete a few installation needs before you finally have the app installed on your computer. For the complete list, we suggest you visit the main and official websites.
So, with this DumpMedia Apple Music Converter, how can the iTunes to MP3 format conversion (for both the protected and unprotected files) be done?
We have here the detailed procedure for your reference.
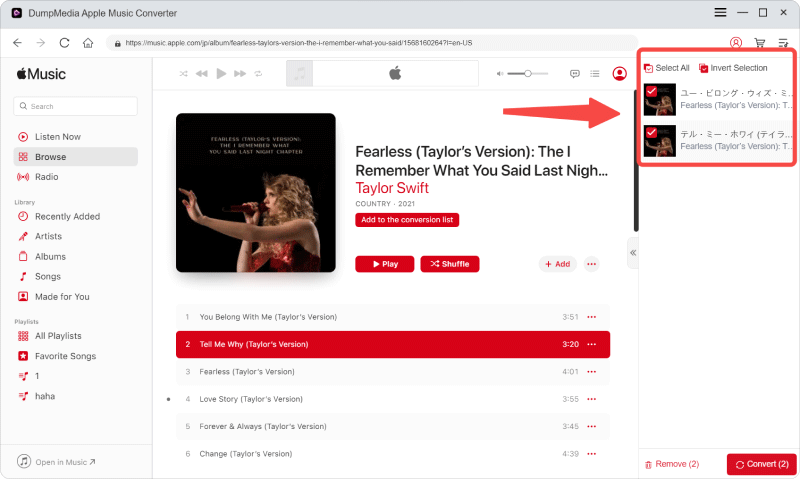
Step #1. Once you have completed the installation requirements, have the DumpMedia Apple Music Converter’s installer downloaded and then start the installation process right away. Once done, just launch the app to start previewing and selecting the Apple Music songs to convert. The app can do the batch conversion so if you like to select a lot, that will do as well.

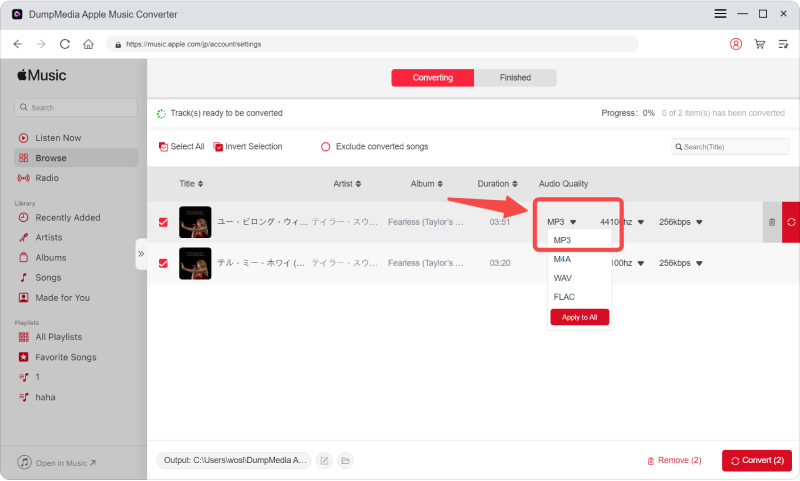
Step #2. Since we are focusing on iTunes to MP3 format conversion, make sure that you choose MP3 as the output format to use. Also, specifying an output folder will give you easy access to the converted files after the process. You can also modify some output settings if you wish to. There are options at the bottom area of the screen that you can modify as you wish.

Step #3. You can allow the DumpMedia Apple Music Converter to start the iTunes to MP3 format conversion by tapping the “Convert” button that is in the bottom area of your screen. Simultaneously, the app will also do the DRM removal procedure.

Expect the converted files to be ready within just a few minutes. You can now access them in the output folder you just defined in step #2. Move or transfer and access them on any device or media player that you like! These are already DRM-free files so there shouldn’t be any issues.
Performing iTunes to MP3 format conversion is just easy. In fact, with your iTunes app and Apple Music application, you can do the processing already. However, for the protected ones, you still need a professional converter. There are lots of options available on the web but we genuinely recommend using the DumpMedia Apple Music Converter.
