"I want to transfer YouTube songs to USB, and I have YouTube Music Premium and have downloaded YouTube Music songs offline. Is it possible to do it?"
YouTube Music, Google's music and entertainment branch, stands out for its extensive collection of song releases, music videos, and interviews. It immediately gained traction, and many people wanted to know how to download music from YouTube to USB. However, if you search for songs on YouTube Music, there is no option to immediately download the music and save it to a personal drive for offline use. Don’t worry, we will share the method with you in this article.
Contents Guide Part 1. Is It Possible to Download music from YouTube to USB?Part 2. How to Convert Songs from YouTube to Common Formats?Part 3. How to Download Music from YouTube to USB?Part 4. Summary
A USB drive is a portable flash memory stick that is frequently used to store, backup, and transfer files. Using a flash drive eliminates the possibility of losing files. If you download songs from YouTube Music to a USB flash drive, you may listen to them on any computer or portable device with a USB port.
However, attempting to transfer YouTube Music to USB will fail. This is because YouTube Music is a music streaming service that enables Premium subscribers to play songs offline. Streaming YouTube Music files can only be played within the YouTube Music app and cannot be transferred to other devices via USB.
You need to save songs from YouTube Music on a USB drive, you can convert YouTube Music songs to common audio formats, such as MP3, WAV, FLAC, M4A and other formats.
After knowing the method of downloading music from YouTube to a USB, you might be interested in converting songs from YouTube Music to common formats. In this section, we will introduce you to the most efficient way to achieve this conversion.
The simplest method to convert songs from YouTube to common formats is by using third-party music converters. These tools help you bypass DRM restrictions and convert audio into formats compatible with any device. Among the available options, we highly recommend the DumpMedia YouTube Music Converter.
DumpMedia YouTube Music Converter is an exceptionally powerful tool designed to provide lightning-fast download speeds—up to 10 times faster than usual. This feature is especially beneficial if you need to convert entire albums or playlists, saving you a significant amount of time.
Moreover, DumpMedia supports a wide range of audio formats, including MP3, WAV, FLAC, M4A, and more. Its user-friendly interface ensures that even those with minimal technical knowledge can quickly learn to use it. Importantly, should you encounter any difficulties, the DumpMedia team offers fast and professional technical support to assist you.
By using DumpMedia YouTube Music Converter, you can effortlessly convert and enjoy your favorite music on any device, in the format of your choice.
Here are the detail steps:
Step 1. Install DumpMedia YouTube Music Converter
First, download and install DumpMedia YouTube Music Converter on your computer. Once the installation is complete, launch the software and log in to your YouTube Music account. This will allow the converter to access your music library.
Step 2. Select Your Songs and Desired Output Format
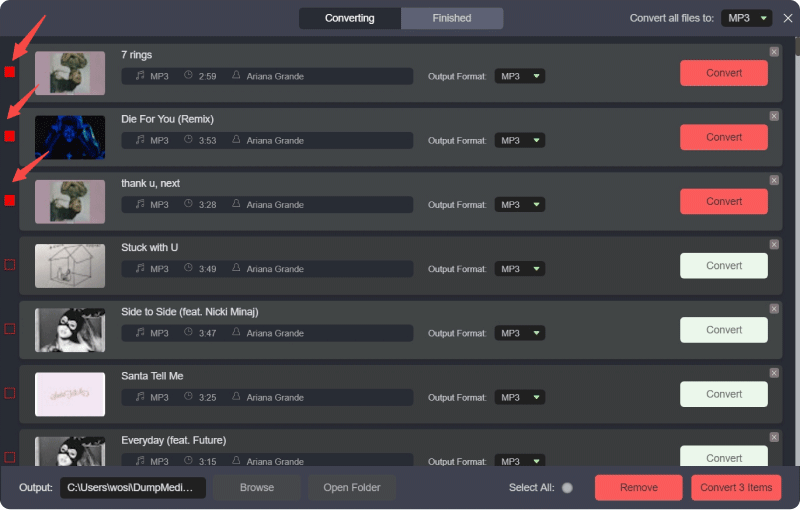
Browse through your YouTube Music library within the DumpMedia interface to select the songs or playlists you wish to convert. After selecting your desired files, choose your preferred output format from the available options, such as MP3, WAV, FLAC, M4A, etc.

Step 3. Start the Conversion Process
Once you've selected your files and output format, click the "Convert" button. DumpMedia YouTube Music Converter will quickly convert your chosen music to high-quality MP3 files (or your selected format) at lightning speed. The converted files will be saved on your computer, ready for you to enjoy on any device.

Now that you have converted songs from YouTube Music, you can now transfer them to your USB. Here is how to do:
Step 1: Connect Your USB Drive
Begin by plugging your USB drive into an available USB port on your computer. Once connected, open a File Explorer window and locate your USB drive under "This PC" or "My Computer." Double-click on the USB drive icon to open it, revealing its contents.
Step 2: Locate and Copy Your YouTube Music Files
Next, navigate to the folder on your computer where your downloaded YouTube Music files are stored. Open this folder and press "Ctrl + A" on your keyboard to select all the files within. Once all files are highlighted, right-click on any of the selected files and choose "Copy" from the context menu. This action will copy all the selected music files to your clipboard.
Step 3: Paste the Files to Your USB Drive
Return to the File Explorer window displaying your USB drive. Right-click within the window and select "Paste" from the context menu. This will transfer all the copied YouTube Music files from your clipboard to the USB drive. Wait for the transfer process to complete, ensuring that all files are successfully copied.
By following these steps, you can easily transfer your favorite YouTube Music files to a USB drive, allowing you to enjoy your music on various devices.
Transferring YouTube Music to a USB drive involves a few steps. First, use a third-party converter like DumpMedia YouTube Music Converter to convert the music files to common audio formats such as MP3, WAV, FLAC, or M4A. This software bypasses DRM restrictions, allowing you to download and save music from YouTube Music.
After conversion, connect your USB drive to your computer. Open a File Explorer, copy the converted music files, and paste them onto the USB drive. This process ensures your music is easily accessible and playable on any device that supports USB playback, such as car audio systems, portable speakers, or other media players. This method lets you enjoy your music offline and, on the go, overcoming the limitations of YouTube Music’s DRM protection.
